Wednesday, March 28, 2012

Eine kleine österreichische Zinn-Soldaten

OK, so the title is a bit pidgin German, trying to make a weak play on Mozart's "Eine kleine Nachtmusik". It doesn't concern Zinnfiguren of Austrian Manufacture, but rather some miniature figures of Austrian Napoleonic soldiers that are newly arrived here on the banks of the blogisitical Danube. My birthday falls this month, and this and other celebratory occasions are opportunities for the receipt of gifts with a hobby connection. That's one of the great things about our hobby - we can be (supposedly) grown up men, and still get toys as gifts, and not just those boring clothes you hated getting as a kid, LOL!

Anyway, of course your family/whomever knows exactly the manufacturer, scale, nationality, and catalogue numbers you want, down to the fine details of your unit organizations. No? Seriously?!  Uh, thought not. So in our household, the majority of my wargaming purchases (aside from those emergency ones - you know the ones you just have to have now, of course) go into the queue for future gifting opportunities, and are doled out as the occasions arise. What's that you say?  A trifle, uh, mercenary? Well, perhaps, but I'm happy because I get *exactly* what I want, they're happy because they don't have to try and guess what I'm into now or where to get it from, and it also acts as a modest modulator on my hobby purchases. Now face it, guys, wouldn't it make it much easier if you had a similar system for you wives/girlfriends/whatever? Of course, they'd probably see that as being un-romantic, not spontaneous, and way too practical. Sigh! 

Anyway, now that I'm done blabbering and getting myself in very hot water with the one female reader of this blog out of thousands, LOL, let's talk some Austrian Lead, courtesy of my extremely tolerant wife, even if she doesn't really "get" my hobby much!

The first group is the "Tyrolean Rebels Deal"  from Eureka - 28mm, of course! These are simply wonderful figures, very nicely sculpted and full of character. The plan behind these is to see all the figures in the range, and use the figures in the deal plus whatever additional ones I need to make up a small force of these "backward" Mountaineers that gave their erstwhile Bavarian rules and their French, etc, allies so much trouble during the 1809 campaign.

First are these six different musket armed figures wearing plumed round hats. Very nice castings in a nice variety of poses - two different standing firing, one each kneeling firing, loading, priming, and biting open a cartridge.


Next are these four figures in taller hats with various farm implement derived weapons; again very nicely executed. they look like the wouldn't be too out of place even a century or two (or three!) earlier.


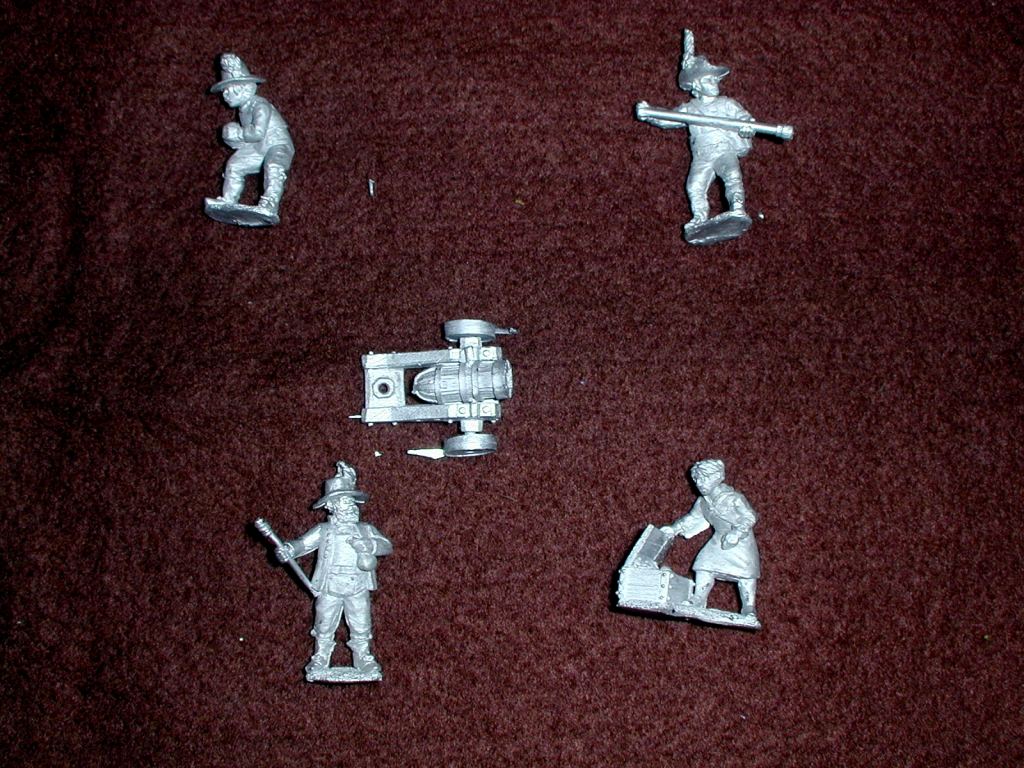
Next is a small, rather antique looking lightweight "mountain" Howitzer, along with three crewmen and one crew-woman.  Very nicely done once again. 


Here's another group of 4 Tyrolean Rebels with "polearms", this time with turned up round hats. "Yes, my dear, the peasants are revolting, aren't they?"


Six more musket armed Tyroleans, same poses as the other group, but with the "top hat" type headgear.


And yet another group of six with muskets and hats turned up, corsehut style. 


A final group of 4 more rebels with farm implements and round hats not turned up.


These are the "command" type figures for the Tyrolean Revolt - drummer, officer with halberd (perhaps Josef Speckbacher?), standard bearer, another officer, Andreas Hofer with his full black beard, and a priest (the red-bearded Joachim Haspinger, perhaps?). 


Posthumous portrait of Andreas Hofer (from Wikipedia).  By trade an innkeeper, he became a martyr after he was executed by the Italians under orders from Napoleon. He was later made a Catholic saint! 


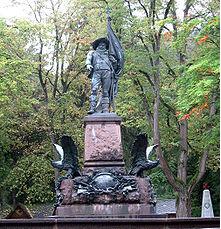
Hofer and his Tyrolean rebels defeated the Bavarians and their allies at no less than three battles of Bergisel in 1809, just outside of Innsbruck; this bronze statue was erected at the site in 1893 to commemorate his role. A ski jump is located in the area of the battle, along with a museum related to the Tyrolean mountain troops in Austrian service (the Kaiserjager museum), as well as the history and culture of Tyrol, and a cyclorama of the 2nd Battle of Bergisel.

My 1809: Blunders on the Danube scenario book includes a scenario for that battle; to do it with actual Tyrolean figures will require nine units of Musket armed troops and six with polearms. My usual units are six stands of three each for Infantry, but really only 4 stands are needed. For Militia troops like this, I could certainly use 2 figures per stand, so only eight per unit; still, that will come 15 units or 120 figures, which is a lot for a force of only limited use, although I suppose they could double as more Landwehr. Still, if I cut the Musket armed troops, who will fight as skirmishers anyway, down to a single figure per stand and kept 2 figures per stand for the polearm guys, that would require 36 Muskeers and 48 polearm guys, plus an artillery section (seen above), plus three leaders (ditto). From the Deal I have 18 different Musketeers in six pose variants... hmm, if I went with six figures per Musket unit with two bases of 2 figures and two bases on 1 figure per unit, that would require 54 figures (36 more needed), which would work out well. For thePolearm guys I have 12, plus three spare command figures making 15; thus I'd need another 33 polearm/command figures, totaling 69 new figures, and about 100 for the entire "Revolt". That seems feasible, I think

**********************************************************************************

The second half of this post concerns some 28mm Old Glory Grenz, skirmishing with command; AXI-20 form their catalogue. An overview of the contents is seen below:

So, that's nine figures standing firing, plus five each kneeling firing, marching while reaching for a cartridge, and   standing while biting open a cartridge, plus six command figures, 2 each officer, drummer, and standard bearer. 


Here's a bit closer picture of the various poses, which doesn't really do them justice. 


Her's a picture of the same figures from the other side. The really cool thing about this set is that, aside from the officer, they are all *wearing* the famous bright red cloaks of the Grenz; I don't think I've ever seen any other figures like them! The cloaks are sculpted with exaggerated folds, so they should paint up very easily.


OK, so now I have to plan out how I'll organize them into units. SAs I mentioned, my standard Napoleonic infantry have six stands of three figures each; so I'll take the nine firing guys for three stands, a set of command figures for the fourth, and the five reaching and one cartridge biter for the last two stands.


The remaining 12 figures will be the second unit; again, I really only need 12 figures per units for the standard Field of Battle units, so this will work out fine. 

    This unit I plan to make into a Siebenburger (Transylvanian) unit. Hollins (in his Osprey) mentions in passing that these units may have had *black* cloaks issued instead of red; he later indicated that this information may have been in error or at least that the black was not worn except on home defense/frontier service. However, the idea of  a Transylvanian unit with black, almost bat-like cloaks worn is just *way* too over the top to pass up, so black cloaks it will be!  As I'm thinking about his, I'm starting to wonder if maybe I shouldn't do the six stand unit with one stand.company each in the reaching and cartridge biting poses, and then do the Siebenburgers in a more irregular skirmish look, with every other figure on the non command stands kneeling firing, and the in between figures loading or biting ("I vant to bite your... cartridge. Bleah!"). Yep, I think that's what I'll do after all! Planning out these things is part of the fun of new units as well. I won't be able to do anything about painting them until after the Borodino project and Historicon this July, but I'll look forward to doing them soon thereafter!

Say, as it turns out, although the castings covered here fought for the Austrian Empire, neither are actually Austrian at all, but rather Tyrolian, Croats, and Transylvanians. No wonder the Kaiser was cautious about encouraging *too* much nationalism among his subjects, even in 1809!

Auf wiedersehen...

Peter

Sunday, March 25, 2012

Starfleet Wars: Carnivoran Ships, Part 3

This is the final installment covering the Starfleet of the Carnivoran Republic, as set forth in the original "Starfleet Wars rules". As noted previously, this line of ships is in production once again as the Galactic Knights range, with its own new rules set to go with the new name. More about Galactic Knights another time!


Here is a squadron of Carnivoran "Snarl" class Starbombers; for a fleet that specializes in the close up, punch through attack of Particle weapons, having Starbombers might almost seem a bit redundant!


This squadron certainly looks like it means business. Unfortunately, the Starbombers are as vulnerable as they are dangerous; this makes them high priority targets.


Here are the stats for the Carnivoran Snarl class SB:
Power         Light Laser Factors         Particle Weapon  Factor      PW reloads
N/A                       6                                        6                                   12


A Starbomber is destroyed by a single hit by an offensive beam, factor or particcle weapon, or 4 hits by light lasers and/or CIDS factors. 

The underside of a Snarl class Starbomber.


Next up is a squadrom of six "Kitten" class Star Armored Pursuit Ships (SAPS). 


The SAPS are similar to the Starbombers in terms of the number of his it takes to destroy one, but SAPS generally mount a large number of Light :Laser factors, and little else. 


Here are the stats for the Carnivoran Kitten class SAPS:
Power           Light Laser Factors                    Particle Weapon  Factor           PW reloads
N/A                       8                                                       0                                   0                   


This squadron of SAPS is in pursuit of its habitual prey; enemy Attack Craft (aka fighters)!


Underside detail of a Carnivoran Kitten SAPS.


Two groups of Carnivoran Bobcat light attack craft (fighters).


These light fighters are armed primarily with light lasers for anti-fighter (and Starbomber/SAPS) combat.


These are five groups Carnivoran of Leopard  class heavy fighters.


Each heavy fighter is armed with a single particle weapon, making them dangerous to Capital ships, especially in large numbers.


"By Your Command?!"


This spread of missiles are Carnivoran Fang CAPTACS.


CAPTACS are "Captive Towed Tactical Missiles".  They are towed by ships using their tractor beams, two missiles by one ship with one tractor beam max, and then released and fired.


CAPTACS are vulnerable to CIDS as well as fire by fighters and other light lasers, but if hey strike their target they do an immense 40 points of damage, and an automatic roll on the Special Damage table must also be made. Obviously, timing is everything when using these engines of destruction!


This concludes the posts on the Star Navy of the Carnivoran Republic. There will be follow up posts on my Entomalian Fleet, but those will probably be just a single class at a time, as I still have much painting to do on them. Finally, my good friend Joe has just begun the process of collecting his Aquarian Starfleet, with the first posts already added to his blog. We can also expect some rules posts and battle reports in the not too distant future. 

"Sir!  Sensors show multiple blips headed straight for us. Engine signatures indicate a large task force of those damned Kitties... we can let them get too close to us too quickly..."

Peter

Wednesday, March 21, 2012

Russian Napoleonic Grenadier Regiments

Unlike any of the other major combatants in the Napoleonic Wars, the Russian army had permanent Grenadier regiments. Exactly how it was decided which new soldiers would enter a Grenadier regiment (as opposed to the Musketeers or Jagers) is unclear to me, nor is it clear whether men were transferred into a Grenadier regiment in recognition for bravery etc. (in the fashion of the French Imperial Guard), but I have never read anything to indicate that this was a common Russian practice. Never the less, the Rusian Greandier regiments generally seem to have turned in very solid battlefield performances. These standing Grenadier regiments certainly must be distinguished from the Converged Grenadier battalions of 1812, which were formed from the Grenadier companies of the Depot battalions of each Infantry Division, and thus were probably little better than ordinary line units.

From 1801, the Grenadier Regiments wore the mitre cap (the tall version was for the Grenadier company of each battalion, with a shorter version for the three Fusiler companies of the battalion). These had a brass front, while the rear of the cap was in the Inspection color, with the headband in the shoulder strap color. The Grenadiers officially changed to the shako in February 1805, but obviously this order did not take effect instantaneously, the Pavlov regiment (at the very least) of course  still wearing the Miter at Austerlitz (December 1805) and again at Friedland (June 1807), after which they were officially granted the right to retain it, which they did even after entering the Imperial Guard, wearing them all the way down to 1914!

There is a simply great listing of the Inspection/facing/flag/mitre colors for the Russian Napoleonic infantry, along with the later shoulder strap colors and so forth on here on The Napoleon Series. In addition, the colors of the drumsticks, halberd shafts (for NCOs), and flagpoles varied by regiment within each Inspection, and could be straw yellow, white, black, or coffee brown. In 1808, with the adoption of the Divisional system, this became more systematic, the 1st and 4th regiments of the Division having these items in yellow, the 2nd, and 5th regiments black, and the 3rd regiment of each Division white! The Halberds were withdrawn from the Musketeer regiments in 1809, although Viskovatov records that the order to withdraw them form the Grenadier regiments didn't come until October 1811! A best as I can tell, these drumstuck/flagstaff colors remained the same thereafter until well after the end of the Napoleonic Wars.

In 1805, there were 13 regiments of Grenadiers: the Life Grenadiers, Pavlov, St. Petersburg, Tauride, Ekaterinoslav, Little Russia, Kiev, Kherson, Siberia, Caucasus, Moscow, Fangoria,  and Astrakhan regiments. In January 1811, the Rostov or Count Arakchyev Musketeer regiment was converted to Grenadiers, while the Kexholm and Pernau Infantry regiments were converted to Grenadiers in 1813. Meanwhile, in April 1813, the Life and Pavolov Grenadier regiments were transferred into the Imnperial Guard as Guard Greandier regiments.


These 28mm Sash and Saber figures represent the St. Petersburg Grenadier regiment. Both of the two regiments shown in this post were part of my recent "Magic Wash" experiment, so you may notice some difference in the shading from stand to stand.


Note the black drumsticks, flagstaff, and fifes for this regiment. As the regiment was originally part of the Livonia Inspection, its colored flag has the Turquoise color of that (earlier) Inspection. 


I have given my Grenadier regiments the yellow shoulder straps that became universal for them only in1814; a matter  of personal preference!


This fine looking regiment is the Life Grenadiers, which was eventually added to the Guard along with the Pavlov regiment; note the straw yellow flagstaff, drumsticks, etc. The black and red flag is that of a regiment from the St. Petersburg Inspection to which it belonged earlier. Why wasn't the St. Petersburg Grenadier regiment part of the St. Petersburg Inspection? Beats me, you'll have to ask Czar Alexander that one!


If you look closely, you can see the gold "galon" lace ornamentation on the collar and cuffs of the NCO  in the foreground, front rank. This was typical for NCOs in all regiments of the Russian army. 


Rear view of the Life Grenadiers; the excellent flags are by GMB Designs; highly recommended! Note the red plumes of the drummers and the fifers also; I like to include fifers in my Guard and Grenadier regiments so I can have more of those tall red plumes on the table!   :-)

Until next time...   Good Gaming!

Peter

Tuesday, March 20, 2012

Painting, and Doing "The Dip"

More properly, this post involves more the "Magic Wash" than the dip, the Magic Wash basically being clear Future acrylic Floor polish (see the last post, "Prime Time", as well), diluted or not with anywhere from a little to a lot of water, tinted with ink and or acrylic paint, and possibly including a surfactant of one kind or another. There seem to be at least as many recipes for "The Dip" as there are painters, although the original dip was Minwax Tudor Polyurethane wood stain, a ? more sophisticated version of which is marketed as the Army painter line. I really didn't want to get into using any product involving volatile, flammable, malodorous and toxic solvents, so the Acrylic version is what I have decided to experiment with.

The Volunteers for this experiment are two regiments of 28mm Sash and Saber Russian Grenadiers... weren't you warned never to volunteer in the army, son? Anyway, I'm going to really belabor this thing by taking them through the process from start to finish, so bear with me. I have no delusions about being more than a fairly good hobby painter as best - I'd never even dream of  entering a painting competition, but I like my figures to look good, and to put lots of them on the table, so they can't take forever to finish! 

After being trimmed of flash etc, the figures were glued (using plain white "Elmer's" PVA glue)  in groups of three to tongue blades (aka tongue depressors - new ones, I'm a physician in private practice so I have plenty of these around - very cheap, and I have yet to finish the box of hundreds I ordered just for hobby use 10+ years ago). They are the spray primed white with Krylon spray primer (flammable noxious fumes warning!). Once that has dried thoroughly (in the garage!), I applied the first, very sloppy coat of dark green (I use mostly Delta Ceramcoat craft paints, this was a mixture of semi-opaque Pine green and opaque Christmas Green with a drop or two of Color Float (water with surfactant to slow drying and encourage settling of pigment into the lower spots of the castings) added.


Next, the pants are painted white, taking care at the join with the green coats but otherwise sloping it on with a big brush. 


Next the shakos and pack were painted Delta Charcoal, a very dark grey. I don't usually use that for these items, but rather pure black instead , but I figured it might give some play for the Magic Wash to bring out the details in these items later.


Next the overcoats, which the Russian Infantry characteristically wore slung across their chests when not otherwise needed, thus acting as some protection form sword cuts, etc, were painted a greyish brown color, Delta Toffee Brown, IIRC.


Then I used Delta Terra Cotta with a bit of Color float added to paint the hands and faces and orange-bron color, with some shading effects happening from the surfactant/drying delay action. I've seen many expert painters recommend painting the faces *first*; this doesn't work for me as they get too much paint slopped on them from the other items if I do it that way. Don't worry, I won't leave them with this unnatural color!


Next I have painted the black items - the tall Grenadier plumes (except the musician), shoes, sword scabbards, etc - with pure black this time. 


Yep, the cartridge boxes were painted black too; and here I've painted the metal canteens that were standard Russian issue with Valejo "Oily Steel"; I do love the Vallejo acrylic metallics, and especially this color, which is great for medieval armor, among other things. 


Bright red, Delta "Fire Red", I believe, for the collars, cuffs, turnbacks... and the tall plume of the Fifer!


Rear view of the officer, Standard Bearer, and drummer at this stage. Still look pretty crude, eh?


Now I've added the finer details in white - the cords on the shakos, straps on the coat, and the lace on the fifer's uniform... starting to look like they  just might come out OK after all!


Rear view after the white details are added... oops, missed the cords on the NCO on the left - we'll have to fix that later!


Muskets painted Burnt Umber with a bit of Color Float added - this paint is semi opaque, and with the thinner added it gives a bit of a wood grain look to the guns. I admit that I hate spending time painting muskets, so I don't paint the metal bands, etc on them - do the minimum I can there!


Rear view after painting the muskets brown... and now adding the brass metal elements to the cartridge boxes.


and (Vallejo acrylic) Brass to the shako ornaments, sword hilts, and buttons... I have also gone back and painted a dark green stripe over the cuff flaps just before painting the buttons there as well. 


Next the tall plumes were dry brushed with Delta Hippo grey, a medium grey shade.  This regiment has "straw colored flagpoles, drumsticks, NCO crops, etc, painted with Delta... "Straw", a somewhat muddied yellow. Noted also the (Vallego acrylic) gold trim to the collar and cuffs of the NCO on the left. The hands and faces were dry brushed with Delta Medium Flesh, and mustaches and hair painted with Delta Brown Iron Oxide.


Silver (again Vallejo acrylic) is painted onto the bayonets, as well as the officer's sashes, swords, etc. 


The musicians tall red plumes were dry brushed with some Delta "Pumpkin" a bright "Halloween" orange; this works well for highlighting bright red.  The same color is also used to paint the fine orange stripes of the Russian Officer's sash. This is the other regiment, which had black flagpoles, drumsticks, etc.


Delta Opaque Yellow for the shoulderstraps; although yellow didn't become universal for the Grenadier regiments until very late in then Napoleonic, I like restricting it to the Grenadier regts; they also had the initials of the regiment's title (in Cyrillic) embroidered on them in red - no way I'm attempting that in 28mm, LOL!


OK, the figures are done, so now it's time to mix up some Dip (or, once again, more properly, Magic Wash). Some recipes recommend the use of Jet Dry as a surfactant or "wetting agent", so I got some. Also India ink is recommended by many, so here's a bottle of black ink as well. The beaker above (as will become evident shortly, my undergrad major was in chemistry, so I have a graduated beaker lying around the house, LOL) is actually the final, most dilute version I made. It looks very dark in the beaker, but it appears almost colorless as a drop on the brush! 

Some painters write that spraying the figures with gloss varnish (or applying a coat of straight acrylic future) to the figures before using the Magic Wash is an essential step, others ignore it. It seemed suspect to me, but I decided to spray one regiment with the varnish and not the other one to see if I could detect any effect from that upon the eventual magic Wash. Thus, I had two regiments of 18 figures each, which in turn had six stands/tongue depressors of three figures each. My plan was to use a succession of different recipes to see which effects I liked best. I start with Mixture "A", based upon a recent post on TMP, although that dealt with  6-15mm figures; still, it seemed like a good starting point, although I suspected the amount of ink was on the high side for my tastes:

I just wanted to share the perfect recipe-after much trial and error- to make an easy to use, mistake free black wash to bring out detail superbly on 6-15mm figures (only tested on these)
No colour dulling,easy to use + a time saver was the sought formulae.
To make 8 oz wash:
scant 4oz Future acrylic finish
scant 4oz distilled or boiled water
1 teaspoon "jet dry" (or other liquid diswasher spot remover)
50 drops opaque black acrylic ink
shake!
pigment stays suspended really well and requires the mildest of agitation to be ready to use.
Prime and paint figures any method, oil or acrylics.
spray with Krylon acrylic coating #1305 (a gloss finish)and let dry to touch (in low humidity, only about 10 min. max!)
brush on miracle wash and let dry to touch (as above 20-30 min max)
Spray with Krylon matte acrylic finish #1311 if you want a matte finish, otherwise spray again with the 1305 and you are done.
Comes out excellent every time!
Indestructable to general handling!
Wont "grey out" white uniforms!


So, I approximated this with 20ml tap water (the heck with distilling it or boiling it!), 20ml of Future, 2 drops of Jet Dry, and six drops of black india ink (not acrylic, which certainly might make a difference). Wow, that was really, really, black!

So, I brushed it liberally onto a bridge that I had semi-finished; looked OK there., not as dark as I feared.


Then I tried it on two figures of Opolchenie I had left over, being reserved for a future Militia Command stand; actually looked pretty good on their drab uniforms, settling nicely into the folds and seams. 


So, I took a deep breath and applied mixture A to my first pair of Volunteers; regiment "1", which will be the Life Grenadier Regiment is in the front,. and was not pre-varnished, Regiment "2", which will be the Petersburg Grenadiers, and was pre-varnished, is in the rear. At least the Russian uniforms are pretty dark to begin with! Looked darker than I wanted on the pants, but I wanted to let it dry to be sure I gave this mix a fair shake, and here's the result - definitely brings out the details in the cords well, and the settling in around the collar and low parts of the chistraps, hands etc works well... but the pants - really a dirtier, darker look that I really like. How about you?


So, I created mixture "B" by adding 10ml each of water and Future to the prior batch, thus effectively reducing the concentration of ink by about 1/3, and applied it liberally to my next set of "volunteers". After drying, the result is above. I like this better, but still a bit dark on the white pants for my taste, and I really don't want to fuss with going back and dry brushing them after the Wash!


So, I created mixture "C" by adding another 10ml each of water and Future to "B", thus decreasing the pigment by roughly half from the original starting  mixture "A". There is still detail being brought out in the cords and flounders, and elsewhere, and he pants look much more acceptable. By the way, I can't detect any difference at all between 1C and 2C, or any of the other pairs, so the pre-varnish seems a waste of time and fumes to me so far! Also, the finish is only very slightly glossy; I like a semi gloss finish on my figures, and this is actually less than there generally is after varnishing them. 


My next trials switched to using undiluted future... Mixture "D" consisted of 40ml of Future and 3 drips of ink, so effectively the same concentration of ink as "C", but no water (or jet dry). Not surprisingly, the results are similar to that seem with C, except the finish is notably glossier than that seen with the first three trials. I think this still may be a bit heavy on the ink, having seen John Leahey, who paints for $ and has posted a number of times to TMP on the subject, recommend very small amounts of ink in pure Future.


This lead to mixture "E", diluting "D" 50% by adding another 40ml of Future. This gave the more subtle results above, which I was fairly happy with. Still no difference I can discern between 1E and 2E, (no varnish vs. pre-varnished). 


Finally, I was curious to see if there would be any effect on the coloration or gloss by adding Jet Dry to the pure future and ink mixture of "E", thus creating mixture "F", which was applied liberally (removing obvious, unwanted pooling, as in prior all cases) to the final volunteers, the command stand figures. Looks pretty good, although I'm not sure the Jet Dry changed anything. That's not too surprising as the water content of pure Future is supposedly fairly low. The gloss of the finish also seems about the same, although not displeasing to me. I like the fact that no final spray varnish is required; trying to find a day warm enough to do that in the garage in Winter in New England is a hit or miss proposition! Similarly, it seems that pre-varnishing is pointless, at least with the mixtures tried to date, again a plus in my book. Future also has a rather mild, fairly pleasant scent, especially compared with solvents, and requires no ventilation!

Here's a table with the compositions of the various washes standardized to a 4 ounce (120 ml) volume:

Mixture
Future
Water
India Ink
Jet Dry
A
60ml
60ml
18 drops
6 drops
B
60ml
60ml
12 drops
4 drops
C
60ml
60ml
9 drops
3 drops
D
120ml
none
9 drops
none
E
120ml
none
4.5 drops
none
F
120ml
none
4.5 drops
3 drops


Based upon the above, I'm inclined to try "G" next time - 60ml Future, 60ml water, 4 or 5 drops ink and 3-6 drops Jet Dry; that will give a satin type finish with similar results to "E" and "F" otherwise... or so it would seem!  Maybe compare without the Jet Dry as well. We'll see. The darker version may still be good for horses and drab uniforms/ancient/medieval types.

I'll present the finished units  (I didn't touch them up at all after the Magic Washes above) in the next post!

Thanks for bearing with my pseudo-scientific methods!

Peter