We pick up the action at the start of Turn 3. The Royalists opt to begin with their large right flank Cavalry command. Their objective is to crush the sole remaining unit of Parliamentary Horse on that flank before any returning Foragers can intervene. How hard can it be to destroy one unit that is already Disordered, with a unit to its front and flank, and yet another situated well behind it, albeit needing to maneuver?


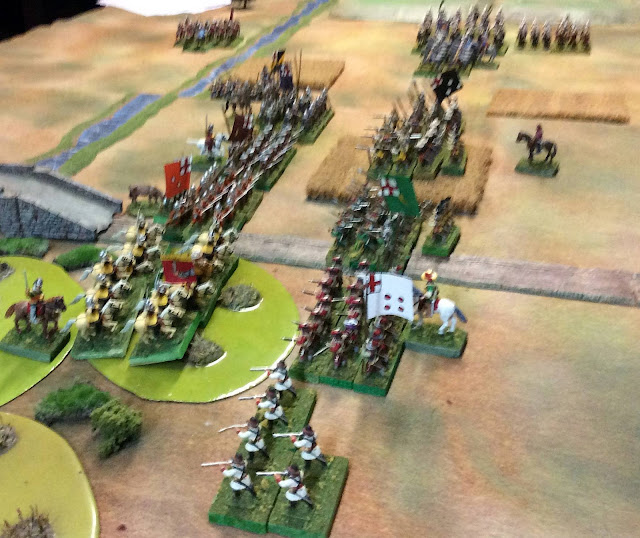 Situation at the midpoint of Turn 4 from the Royalist Left, which is looking good,


The Buffs charge the flank of the Greys, succeeding with a 9, and scoring 2 hits with an 8 and a 10. Game over, right? "Not so fast, Snuff breath!"reply the Roundheads, as they save BOTH hits, and thus survive, although their strike back fails with a 3. The Cavaliers attempt to Rally the Blues, but fail to activate when they turn a big fat Ace. Arrgh! Turn Over for the Cavalry!

Yellow Regiment (w/ General) activates to move forward one box diagonal to the right, and succeeds with a 4".

The White Foote Regiment then activates to shoot at the enemy Cavalry to their front, succeeding with a "7", they choose to expend 1 ammo to shoot twice (at present in this variant, only allowed if shooting into the box directly to their front). They turn a 9 and a 10, needing 8+ to hit (not shown), so 2 hits!. The Colonel saves twice, but the cavalry pass one save but fail the other, and thus are Disordered - one more hit and they are "over the hills and far away".
The Blue Regiment of Foote successfully moves forward 1 with a "7". The Black regiment of Foote attempts to move forward one box as well, and also succeeds with a "6". The Yellow Regiment of Foote successfully moves forward a second box, turning a "6".
The Green Regiment of Foote activates to shoot at the enemy Horse with a "9"; as their target is one box diagonally to their front, this costs an ammo, and they can only shoot once. They miss with a "3". The Parliamentary cavalry is battered but not dispersed!
The Blue Foote Regiment attempts to move forward a second box, which will place them on the flank of the Parliamentary infantry. They fail with a 4, but the General replays the card and they succeed with a "9" on their second attempt. The Black Regiment of Foote fails its attempt to move forward a second box, ending the turn for the Infantry command, but the battle looks to be soon joined in the center.

With just the Dragoons left, and the Parliamentary Horse more or less pinned by being in the ZoC of the White Foote, the Dragoons move forward 2 boxes on an "8".

The Dragoons Dismount with a "10", but unsurprisingly cannot turn another 10 when they attempt to shoot.

Situation at the end of the royalist half of Turn 3. Cromwell's boys are looking pretty up against the ropes, eh Guv?

View from the opposite end of the battlefield.

View Halloo! Needing a 2 or more to enter, the foragers roll a "1". A second die roll determines that the 2 units will appear box that is the closest of the three to the Royalist side. Talk about unwelcome guests crashing the Cavalier's party... who's on who's flanks, now?!

The Mixed Troop of Horse (top of picture) move forward 2 boxes with a "9", but are too far to charge the flank of the Cavalier Blues... yet. Hasselrig's Lobsters (not counting as such for game purposes, though) are ordered to charge the rear of the buffs. They turn an 8. "We'll enjoy this!" The lobsters fire their pistols into the Buffs on their way in. Being Rear fire, they get a bonus card. With an 8 and a 2, they score 1 hit, which the Buffs and their general both save with a 10 and a 2 respectively. In the actual melee, the 6 and 8 are both hits, with the Buffs saving once and failing once, whilst the General saves each time. The Buffs are now disordered. Their attempt to strike back fails, now needing an 8+ instead of a 6+ to hit.

The Greys activate to Rally with a "5" (with 2 units that could charge them, and no GG, they needed a 4+), and their attempt succeeds with a "9". Their Disorder/Hit marker (rock) is removed.

With enemy still to their flank, the Greys figure their best bet is still to overwhelm the Disordered Blues to their Front. Their first activation to charge fails (3), but Sir Thomas inspirational replay of the card succeeds with a 9. However, they miss with a 3. The Blues strike back with a 10, hitting the Greys whose 4 fails to save. Back to Disorder for them! Sir Thomas saves.

With 8's and 9's on the three Parliamentary Cavalry units, and the General's replay already use, the Roundheads take their best chance at an activation, with the Lobsters attempting to charge the rear of the Buffs again. Unsurprisingly, they fail with a 2. The Royalist cavalry have managed to survive... for this turn.

The Right flank Yellow Horse's attempt to pull back one succeeds, barely with a 4 (they needed a 4 + because they were attempting a difficult maneuver, and into difficult terrain as well). I see now that I made a mistake here - when cavalry pull back they must face in the opposite direction. They then attempt to rally from Disorder, activating with a 7 and Rallying with a "9". Their attempt to move forward 1 diagonally and then charge the Dragoons fails with a "3" (they needed a 9+). We'll just say that their attempt to turn around succeeded...

The Parliamentary Infantry in the Centre now acts. They have all moved forward 1 Box on a successful Group Move (9), but The Purple Regiments attempt to activate to shoot at the opposing Blue Regiment , needing a 10, fails with an Ace, and the General's replay also fails with a second Ace. Probably a good way to burn those bad cards with the least pain!

End of Turn 3 overview from the Parliamentary Right flank...

and their Left.

Predictably, the Royalists choose to start with their beleaguered cavalry wing. Unfortunately, the Pursuit activation of the Red cavalry unit MUST be done first. This will carry them across the River, which requires a 3+, the 2 Fails, threatening to end the Command's turn then and there, but the General's replay with a 3 succeeds. Actually, I now see this was a mistake as well, as Pursuit activation actually get a bonus, so here a 2+ would have succeeded despite the difficult terrain. "Pardon me, milord, but did you actually read these riles?" Ahem.
The Disordered Buffs figure they have a decent chance of riding down the flank of the Disordered Greys. which would give them some breathing room from the repeated prodding of their arses by the enemy Lobsters. Their charge activation succeeds with an 8, but both of their attempts to Hit fail with two 4's (they would need 6+ ordinarily, but being Disordered they needed 8+, although they did get to play a Bonus Hit card for attacking a Rear). They Greys attempt to strike back also fails (3).

The action now shifts to the Blues. They activate to Rally with a 4 - with two units that can charge them, that is exactly what they needed, except that their accompanying Gallant Gentleman they could have allowed them to ignore those penalties,. so here a 2+ would have sufficed. Regardless, their rally attempt succeeds with a 9. Huzzah! Thus reorganized, the Blues charge the Greys, successfully with a 9, and Hit with an 8. "Take THAT, you rebellious swine!" And indeed they do, failing their Save with a 4, whilst Sir Thomas's attempts to evade his historical fate (Fairfax was killed at this battle) meets with success once again with a 5.

The victorious Blues have moved forward to occupy the box the Greys were in; as they were already disordered, another hit destroyed them; 2 more Parliamentary Victory medals are lost. Sir Thomas slips away to join the Lobsters. The Red horse then successfully activate and turn 90 degrees to their right. This also removes the Pursuit marker (as does any successful non pursuit activation). An attempt to turn 90 degrees again failed with a 6 (not shown).

With the end of the turn for the Cavalier cavalry, the action shifts once more to the infantry scrum in the Centre. The Black Regiment activates to shoot at the Purple regiment to their front with a 4; at one box range they can either shoot once at no ammo cost, or twice for the cost of 1 Ammo. They choose the later, and hit twice with a 9 and a 10 (an 8+ is needed, 9+ if Disordered). A cheer goes up from the ranks... but it doesn't last long as the Roundheads save both with an 8 and a 6. The General also saves twice, playing a pair of 2's. "Close call, that!"
The General then makes a Command Move to join the Blue Regiment, poised on the flank of the Parliamentary center, but feeling rather insecure about its own rear, should the expected collapse of the Royalist cavalry take place soon. Their attempt to turn 90 degrees left needs a 4+, and they succeed with a 7.
The Yellow regiment next activates to shoot with a 7, but both of its shots at the enemy Brown regiment miss with a 7 and a 3; one ammo is expended. The Colonel then uses a Group Move (4) to advance the White and Green Regiments one box.

Continuing the action in the Centre, the Black regiment activates to shoot again (10), and once again hits twice (9,10)! Another ammo is expended. This time, Purple fails both saves (Ace, 5 - being a Veteran outfit, they save on 6+). It is now double disorganized (2 hits); another hit will remove the unit, and the cause of Parliament will be in grave peril! The General in the box, however, calmly saves twice (6, 8). 'Heads up, chaps!"

The Blue Regiment attempts to finish off the Purples They activate (8) to shoot one box diagonally into the flank of the Purple regiment. Ordinarily, this costs 1 Ammo for 1 shot into anything but the one box directly to their front, , but as they are firing into a flank or rear, they get to play a bonus Hit card. Unfortunately, both shots miss (6 and 6, not shown). "Bloody Hell! You Purples are lucky bastards!"

The White company's attempt to shoot the cavalry to their front fails with a 2, ending the Centre command's turn. No ammo is expended for the failed attempt.

The Dragoons, who have heretofore had little to do in the battle, activate (4) to move forward 1 box, and then shoot (9) at the Yellow cavalry diagonally to their front. They hit with a 10, but the cavalry save with a 9; one ammo expended (most infantry have 3 to 4 ammo). A vain attempt to shoot again fails with a 6, ending the cavalier portion of Turn 4.


and from its right... which does not!

Parliament starts with its endangered Centre. The Purple Regiment (Lord Brooke's), which has a GG with it (the Halberdier stand denotes this in their case), activates to Rally (6). It rallies one hit off with a 7. It makes a second attempt to Rally ("8" - here the GG makes a difference, as with 3 units in charge range, it would otherwise have needed a 10!), but fails in the attempt (3). The Browne Regiment activates to shoot (9) at the Yellow Regiment, but misses twice (7, 5), expending 1 Ammo. The General then makes a command move to join the Orange Regiment.

The Orangers Shoot (4) at the Green Regiment to their front - one shot hits (10) and the other misses. The Greens fail to Save (3), and thus become Disordered (1 hit(). The Tangerines shoot again (5) and score two more hits (9, 10), but the Greenies Save both (9, 10). Some what predating the Gatling Gun, the Oranges none the less shoot a third time (7), but this time both shots miss (2, 7); They have just expended 3 of their 4 Ammo.

Frustrated (and with the General in their box for potential replays), the Tawney Regiment charges the fragile Frogmen (9). The Greens fire as they charge comes home but miss twice (3, 6 - they need 9+ being Disordered), expending an Ammo. Their blood up, the Oranges hit in melee with an 8, which the Greens fail to Save (5), taking a second Hit. They strike back and hit (9 - being disordered they needed an 8+ instead of a 6+). The Tawneys save with a 9. Phew!

Their bolt pretty well shot (although being armed with matchlock muskets, they don't really have a bolt to shoot, but whatever!), the Parliamentary action shifts back to the endangered Purples. First the Infantry General moves to join them on a (free) command move, and then the Purples try to Rally again, but fail to activate (6, General replay 8). That ends the Turn for the Centre.

The Yellow regiment of Horse pulls back another box through the swamp (10, but same error again, they should face to the rear after this). Needing another 10 to do anything, the 4 doesn't make it,

The action now moves to the Parliamentary left flank. The Lobsters get thing rolling like an anachronistic steamroller charging (5) the rear of the Buff, and scoring 2 Hits (6, 6). The Buffs fail to save (3), and having 1 hit already are now eliminated. The "buffing" of their armor leaves the Lobsters glinting in the sunlight.

The Lobsters have (obligatorily) moved forward into the box formerly known as the Buff's, and are marked for pursuit. The Mixed Horse attempt to charge 1 diagonal into the Blues, needing a 3+ to do so, but fail with an Ace! The figure with them is a Colonel, and not a General, and thus no replay is possible. Perhaps Sir Thomas should have made a Command move to join them prior to their charge attempt? He was doubtless still rattled from his difficult stay with the now departed "Dolly" Greys! Be that as it may, turn is 4 over, with the outcome still very much in the balance! To be continued...
Impressive play-by-play, Peter. How does TsS compare against your favored Piquet gaming engine? While you have the troops out, why not give Impetvs Baroque a spin?
ReplyDeleteThere are considerable similarities between the two. While TtS and related systems do have a fixed turn sequence, the activation system means that a given command could do a lot or nothing at all. The small number of hits that each unit can take (generally 1-3) means that combat can be decisive if multiple hits are scored and not saved, or can have little discernible effect (misses or lots of saves). No polyhedral dice in these games, though.
DeleteThe ECW variant of Piquet (Anchor of Faith) is one of the few that I wasn't crazy about. The authors chose to make shooting much too ineffective for my tastes, and did so by introducing new rules rather than adjusting the firing factors and/or modifiers almost guaranteeing that shooting would usually be indecisive and attritional.
I don't have a copy of Impetus Baroque (et al), but trying some form of Impetus is on the list to do eventually!
Looks like poker with miniatures :-) Very nice AAR and the troops look excellent.
ReplyDeleteThanks, Garry. I'd say it looks a bit more like solitaire! :-)
DeleteIn actual play, the cards aren't on the table for that long.
Good looking game, got to love blocks of pike!
ReplyDeleteBest Iain
I do love pike blocks as well. These are pretty small - just 8 pikes per unit. These are actually HALF units - each of my full foot regiments has 16 pike and 24 shot.
DeleteI like how the generals add a reroll function for a unit in their box. Gives the miniature generals something to do other than collar skulkers and rally retreating units. Also makes their placement a little more strategic, I would imagine, other than the usual "anywhere in that area for his in-command distance should be fine."
ReplyDeleteYes, thoughtful positioning and moving your Generals can be key to the success of your army!
DeleteThis comment has been removed by a blog administrator.
ReplyDelete