Here is the scenario for Ligny as we used it; it was shamelessly stolen adapted from that by my e-freind, Michael (aka Wargamer Rabbit). The main changes were to simplify the map, eliminate all but Jeanin's Division of Lobau's Corps (as it doesn't appear to me that the rest of the 6th Corps fought at Ligny), and to move most of the Prussian troops onto he actual table at the start of the game... and of course adapt it to the Field of Battle rules.
Having played it twice now, I'd suggest the following changes:
1) Change The Ligny to a Class III stream, with normal FoB rules. This is quite bad enough!
2) Downgrade the Prussian Infantry to be DD 6, CD 10 for all "Line"/"Reserve" regiments", and DD4 CD8 for all Landwehr regiments.
3) "His presence on the battlefield is worth 40,00 Men!" Add an extra 12 Morale points to the French total as otherwise determined by the normal Field of Battle rules. They are going to need them! Should Napoleon be lost, well the game is effectively lost anyway, but so are the bonus Morale Points.
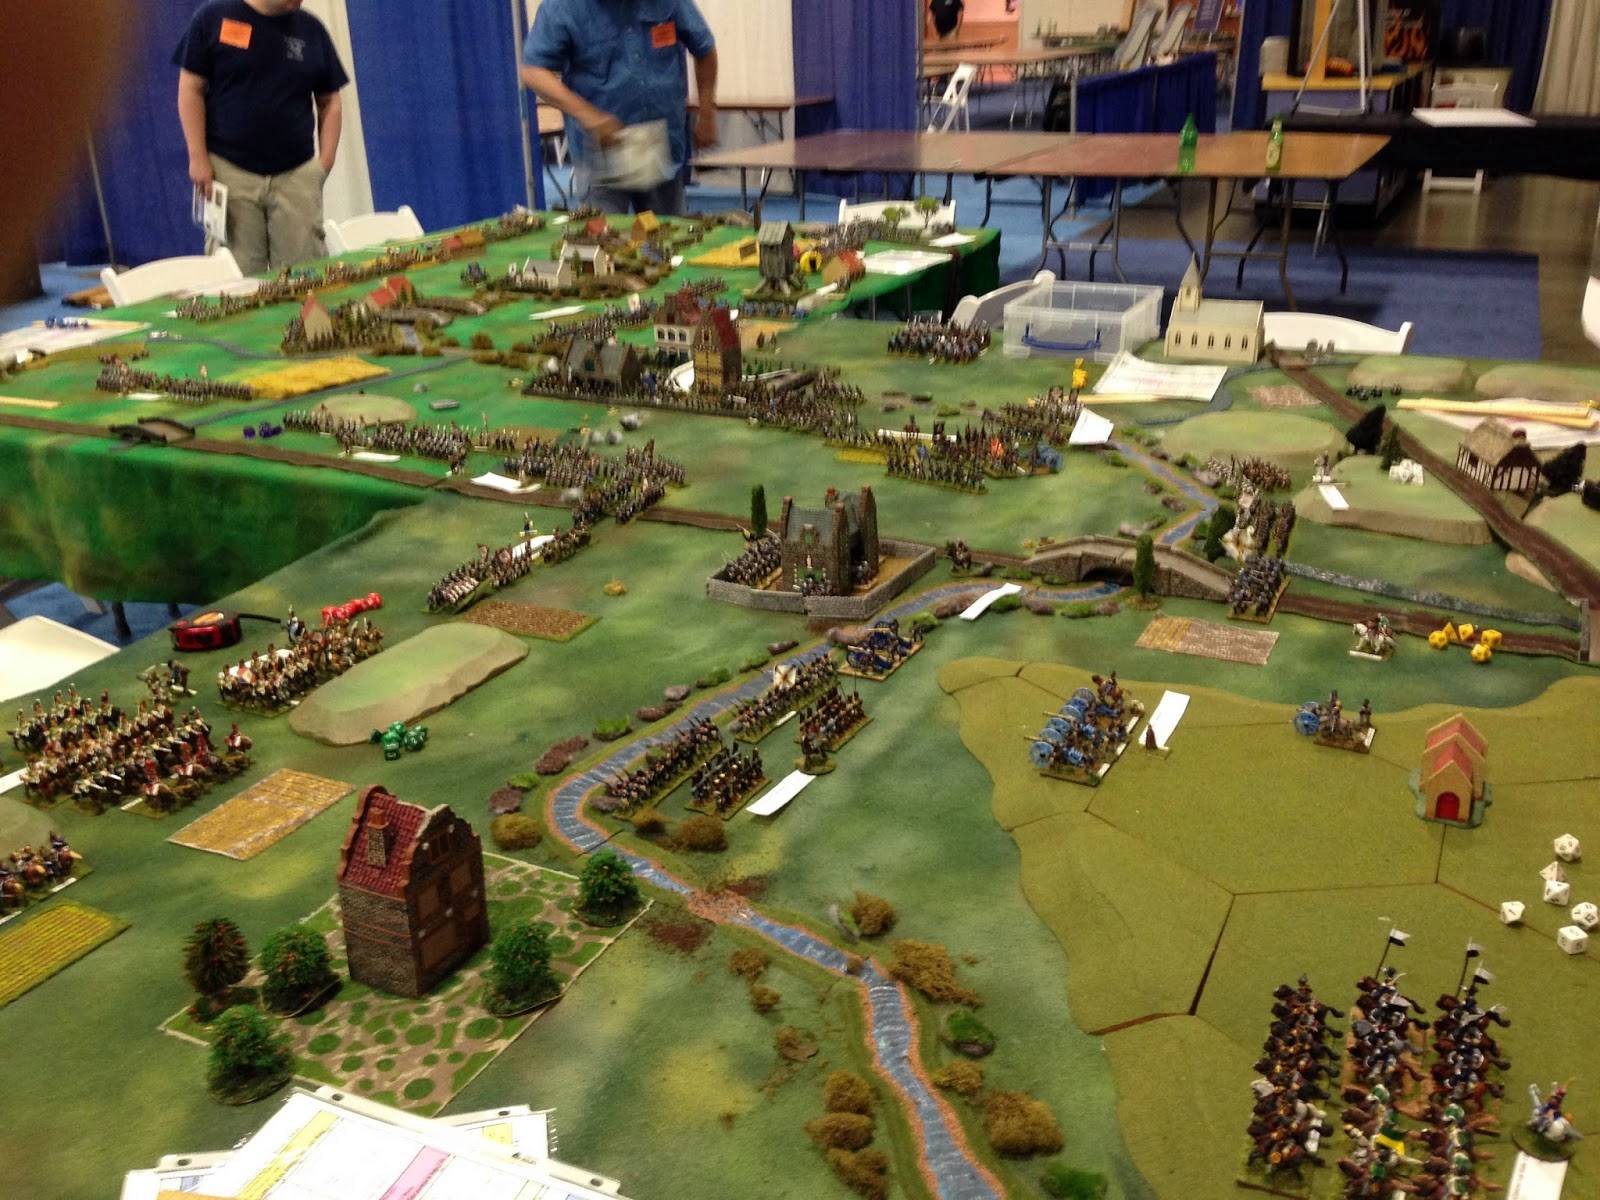
The Battle of Ligny is much less well known (to English speakers, at least) than Waterloo or Quatre Bras. Playing the games gave me a greatly improved understanding of the battle, as well as an appreciation for how well the French fought this day in order to inflict a significant (but not decisive) defeat upon the Prussians. One can only imagine what might have happened had all of D'Erlon's Corps arrived as expected, and had he notified Napoleon properly of his approach to the area!
The Battle of Ligny: June 16, 1815


1st
Brigade, Major-General von Steinmetz
LD
Having played it twice now, I'd suggest the following changes:
1) Change The Ligny to a Class III stream, with normal FoB rules. This is quite bad enough!
2) Downgrade the Prussian Infantry to be DD 6, CD 10 for all "Line"/"Reserve" regiments", and DD4 CD8 for all Landwehr regiments.
3) "His presence on the battlefield is worth 40,00 Men!" Add an extra 12 Morale points to the French total as otherwise determined by the normal Field of Battle rules. They are going to need them! Should Napoleon be lost, well the game is effectively lost anyway, but so are the bonus Morale Points.
The Battle of Ligny is much less well known (to English speakers, at least) than Waterloo or Quatre Bras. Playing the games gave me a greatly improved understanding of the battle, as well as an appreciation for how well the French fought this day in order to inflict a significant (but not decisive) defeat upon the Prussians. One can only imagine what might have happened had all of D'Erlon's Corps arrived as expected, and had he notified Napoleon properly of his approach to the area!
The Battle of Ligny: June 16, 1815
Scales:
1200 men/Infantry Unit, 800 men per cavalry Unit, 12 - 16 guns
per Artillery Unit
1" = 50 yards. Rules: Field of Battle, 2nd Edition, by Brent Oman (Piquet, Inc).
1" = 50 yards. Rules: Field of Battle, 2nd Edition, by Brent Oman (Piquet, Inc).

Terrain
notes:
.
Built
Up Areas (BUA’s)
represent the gardens, low walls, outhouses, narrow lanes etc. of
these villages. Infantry positioned in the green zone BUA’s are
treated as though in light woods (Class II) for visibility, movement
and combat modifiers. The actual building placed within the BUA are
still class II or III positions.
Buildings
are class II except for one. En-Haut
farm located in Ligny, shown on map with a Cross, is class III.
En-Haut
is representative of several buildings in Ligny, which were solid
strong points.
Ligny
stream has special
crossing rules. It counts as Class II Terrian, with an additional
movement cost of 2” for infantry (4” for cavalry), and causes any
unit crossing the stream to become Out of Command until rallied, and
prevents charge movement (engaging in Melee on a won Even roll, or a
melee card, unless already in contact). Bridges nullify the above
special movement rules. Artillery must remain limbered on MOVE they
cross the stream, is out of Command and costs 2” of movement.
Fords
and other streams
count as class II streams without the additional special rules
Weather:
Possible
rainfall from the turning of the 5th
French MOVE card onwards. Roll a D6; on a score of "6", a rainstorm (with
lighting) occurs. Add one to the D6 roll for each MOVE card turned by
either side thereafter until the rain event occurs. The Rain lasts
for that MOVE card and the following MOVE card (of either side) ,
and ends when the 2nd
MOVE card (of either side) is turned following the one that triggered
the downpour. During the Rainfall artillery is DOWN 1 additional for
fire, and Infantry is DOWN 2 for fire combat.
Deployment
Map

Special
scenario rules:
Prussians
must hold the villages:
The Prussian army must attempt to contest three (3) of the five (5)
following villages. Contesting means occupying one or more buildings
in each village. The five (5) villages are; Ligny,
St. Amand, St. Armand la Haye, Wagnelee,
and the group of
Tongrinelle, Baignee and Balatre together.
Failure to contest at least three (above list) causes Prussians to
lose D8 Morale Points when each Prussian MOVE card is turned until
the requirement is fulfilled again.
French
Village Tactics:
While positioned in
the outlined BUA’s (green zones), a French infantry unit is UP 1
for both morale and melee combat while in the BUA zone itself. This
French bonus is not applied to units in buildings (normal rules
apply).
Franco-Prussian
hatred:
Any melee combat in the BUA zone, or buildings in the BUA,
automatically gives the losing (retiring) side additional UI loss.
This additional UI loss does not cost a Morale Point, nor count
towards causing a Routed/Destroyed result.
Reinforcements:
French
have reinforcements marching to the battle.
Jeanin's Division of Lobau’s 6th
Corps will arrive
starting with the First French MOVE Card. 6:00
pm hour turn. They
march onto the table in March columns along and within 12” of the
Fleurus road at the Southern table edge.
D’Erlon’s
1st
Corps will be “seen”
starting with the Third French MOVE card. Once seen, the Prussian
commander may invoke a special “dark masses” condition at the
start of the 3rd,
4th
OR 5th
French MOVE Card. From them until the next French MOVE card, the
Imperial Guard and Milhaud's Cavalry Division may not cross the far
side of the Ligny stream, or if they have crossed, may not advance
further until the next French MOVE card is turned.
D’Erlon’s
detached 4th
Infantry Division and 1st Cavalry Division will actually enter
the table at the start
of the 5th
French MOVE card. They enter Deployed along the Northern 3 feet of
the far Western table edge opposite Wagnelee, etc.
The
Prussian
Cavalry of the 2nd
corps starts just off the table as shown, and may enter the playing area
adjacent on any Prussian MOVE card.
The
game ends
after the 7th
French MOVE card is played and acted upon (Move One Command Cards are
ignored when counting MOVE cards for any reason). Darkness has
fallen, ending the fighting.
Victory
conditions:
French
Crushing victory: The
Prussian army is driven from all
the named villages and has failed Army Morale by nightfall.
French
Minor victory: French
have control of four named villages and/or the Prussian Army has
Failed Army Morale. (Historical result)
Hung
Battle (draw for today):
Prussian Army is still contesting two or more named villages. Neither
side has failed Army Morale. Battle will either continue next day or
Blucher and Wellington make other plans.
Prussian
Minor victory: Be
contesting all the named villages at nightfall, and/or French fail
Army Morale.
Prussian
Major victory: Cause
the French to Fail Army Morale and have Prussian infantry units
within 12” of the exit road to Fleurus. Napoleon soon signs his
second abdication. The Hundred Days is over.
L'Armée
du Nord (66,000 men, 232 guns + late arrivals from D'Erlon)
Emperor
Napoleon I LD
Sequence
Deck: Morale Points:
Imperial
Guard, Marshal Mortier (GD Drout acting cmd) LD:
Old
Guard Grenadier Division GD Friant LD
2
Old Guard Grenadiers a Pied DD10, CD 12+1
1
Middle Guard Grenadiers DD10, CD 12
Old
Guard Chasseur Division GD Morand
LD
2
Old Guard Chasseurs a Pied DD10 CD12+1
1
Middle Guard Chasseurs DD10, CD 12
1
Marines/Genie of the Guard (2 stands, 2 UI) DD10, CD 12
Young
Guard Division GD Duhesme
LD
2
Voltigeurs DD 8, CD12
2
Tirailleurs DD8, CD12
1
6# Marine Foot Artillery DD6, CD 12
Cavalry
Division, GD Guyot
LD
1
Grenadiers a Cheval DD 10, CD 12+1
1
Empress Dragoons DD 10, CD 12+1
1
Gendarmes d' Elite (2 stands, 2 UI) DD 10, CD 12+1
Guard
Artillery, GD St. Maurice LD
2
Old Guard 12# Foot Batteries DD10, CD 12+2
1
Old Guard 6# Battery DD10, CD 12+2
1
Old Guard 6# Horse Battery DD10, CD 12+2
1st
Corps, D'Erlon (Corps HQ absent)
4th
Division, GD Drutte
LD
3
French Line DD 6, CD 10
1
6# Foot Battery DD 6, CD 12
2nd
Brigade, 1st Light Cavalry Division GD Jacquinot
LD
1
French Chevau-Leger Lanciers
DD
6, CD 10
II
Corps Commander: GD Reille (at Quatre Bras, except:)
7th
Infantry Division, GD Girard
LD
2
French Legere DD 6, CD 12
2
French Line DD 6, CD10
1
6# Foot Artillery
DD
6, CD 12
3rd
Corps, GD Vandamme
LD
8th
Division GD Lefol
LD
1
French Legere DD 6, CD 12
3
French Line DD 6, CD 10
1
6# Foot Artillery DD 6, CD 12
10th
Division Habert
LD
3
French Line DD 6, CD 10
1
Foreign Regt (Swiss) DD 8, CD 12
1
6# Foot Artillery DD 6, CD 12
11th
Division Bertheneze
LD
4
French Line DD6, CD10
1
6# Foot Artillery DD 6, CD 12
3rd
Cavalry Division GD Domon
LD
1
French Chasseur a Cheval DD 6, CD 10
IV
Corps, GD Gerard
LD
12th
Infantry Division, GD Pecheux
LD
1
French Legere DD 6, CD12
3
French Line DD 6, CD 10
1
6# Foot Artillery DD 6, CD 12
13th
Infantry Division, GD Vichery
LD
4
French Line DD 6, CD 10
1
6# Foot Artillery DD 6, CD 12
14th
Infantry Division, GD Hulot
LD
2
French Legere DD 6, CD 12
2
French Line DD 6, CD 10
1
6# Foot Artillery DD 6, CD 12
6th
Cavalry Division, GD Maurin
LD LD
1
French Dragoon DD 6, CD 12
1
French Chasseur a Cheval DD 6, CD 10
VI Corps, GD Compte Lobau absent except:
20th Infantry Division, GD Jeanin LD
1 French Legere DD 6, CD12
2 French Line DD 6, CD 10
1 6# Foot Artillery DD 6, CD 12
Cavalry
Reserve, Marshal Grouchy
LD
1st
Reserve Cavalry Corp, GD Pajol
LD
(4th
and 5th Cavalry Divisions)
1
French Hussar DD 8, CD 10
1
Chevau-Leger Lancier DD 6, CD 10
1
Chasseur a Cheval DD 6, CD 10
1
6# Horse Artillery Battery DD 8, CD 12+1
2nd
Reserve Cavalry Corps, GD Exelmans
LD
(9th
and 10th cavalry Divisions)
3
French Dragoons DD6, CD 12
1
6# Horse Battery DD 8, CD 12+1
4th
Cavalry Reserve Corps, GD Milhaud
LD
(13th
and 14th Cavalry Divisions)
4
French Cuirassier DD 8, CD 12+1
1
6# Horse Battery DD 8, CD 12+1
French
Totals:
26 French Line Infantry
7 French Legere Infantry
1
Foreign (Swiss) Infantry
4
Old Guard Infantry
2
Middle Guard Infantry
4
Young Guard Infantry
1/2
Marines/Genie of the Guard
3
Chasseurs a Cheval
1
Hussar
2
Chevau-Leger Lanciers
4
Dragoons
4
Cuirassiers
1
Grenadiers a Cheval
1
Empress Dragoons
1/2
Gendarmes d" Elite
9 Line 6# Foot Artillery
1
Marine 6# Foot Artillery
3
Line 6# Horse Artillery
2
Guard 12# Foot Artillery
1
Guard 6# Foot Artillery
1
Guard 6# Horse Artillery
TOTAL:
44.5 Infantry, 16.5 Cavalry, 17 Artillery = 78 Units
Prussian
Army (84,000 men, 216 Guns),
Field
Marshal Gebhard Leberecht von Blücher LD
Sequence
Deck: Army Morale:
I Korps, Lieutenant-General von Ziethen
LD
1st
Brigade, Major-General von Steinmetz
LD
4 Prussian Line
(12 ex Reserve,24 ex Reserve) DD6, CD 10
2 Prussian (Westphalian)
Landwehr DD4, CD 8
1 Silesian Shutzen DD 8, CD 12
1 6# Foot
battery DD 6, CD 12
2nd
Brigade, Major-General Pirch II[a]
LD
2
Prussian Line (6th)
DD6, CD 12
2
Prussian Line (28, ex ) DD 6, CD
2
Prussian Landwehr (Westphalian) DD 4, CD 8
1
Prussian Grenadier
DD8,
CD 12
3rd
Brigade, Major-General Jagow
LD
2
Prussian Line (7th
) DD 6, CD 12
2
Prussian Line (29th,
ex ) DD6, CD 10
2
Prussian Landwehr (Westphalian) DD4, CD 8
1
6# Foot battery DD 6, CD 12
4th
Brigade Major-General Henckel von Donnersmarck
LD
4
Prussian Line (13,19 both ex-Reserve) DD 6, CD 10
2
Prussian Landwehr (Westphalian) DD4, CD 8
Reserve
Cavalry, Lieutenant-General von Röder
LD
2
Prussian Dragoon DD6, CD 12
1
Prussian Hussar DD8, CD 10
1
Kurmark Landwehr cavalry DD 4, CD 10
Reserve
artillery, von Lehmann
LD
12#
Foot Battery DD 6, CD 12+1
1
6# Foot battery DD6, CD 12
1
6# Horse Artillery Battery
DD 6, CD 12
II Korps, commander: Lieutenant-General von Pirch II LD
5th
Brigade, Major-General von Tippelskirch
LD
2
Prussian Line (2nd
) DD6, CD 12
2
Prussian Line (25th
ex ) DD 6, CD 12
2
Prussian Landwehr (Westphalian) DD 4, CD 8
1
Prussian Jager DD 8, CD 12
1
6# Foot battery DD 6, CD 12
6th
Brigade, Major-General von Krafft
LD
2
Prussian Line (9th)
DD 6, CD 12
2
Prussian Line (26th
ex ) DD 6, CD 10
2
Prussian Landwehr (Elbe) DD 4, CD 8
1
Prussian Jager
DD
8, CD 12
7th
Brigade, Major-General von Brause
LD
4
Prussian Line (14th,
22nd
both ex Reserve) DD 6, CD 10
2
Prussian Landwehr (Elbe) DD 4, CD 8
1
6# Foot battery DD 6, CD 12
8th
Brigade, Major-General Bose
LD
4
Prussian Line (21, 23 both ex-Reserve) DD 6, CD 10
2
Prussian Landwehr (Elbe)
DD
4, CD 8
Reserve
Cavalry Major-General of Cavalry, von Wahlen-Jürgass
LD
1
Dragoon DD 6, CD 12
1
Hussar DD 8, CD 10
2
Landwehr Cavalry DD 4, CD 10
Reserve
artillery, von Röhl
LD
1
12# Foot Battery DD 6, CD 12+1
1
6# Foot battery DD 6, CD 12
1
6# Horse Battery DD 6, CD 12
III Korps, Lieutenant-General von Thielmann LD
9th Brigade, von Borcke
LD
2
Prussian Line (8th)
DD 6, CD 12
2
Prussian Line (30th
ex- ) DD 6, CD 10
2
Prussian Landwehr (Kurmark) DD 4, CD 10
1
6# Foot battery DD 6, CD 12
10th
Brigade, von Kämpffen
LD
2
Prussian Line (27th
ex ) DD 6, CD 10
2
Prussian Landwehr (Westphalian) DD 4, CD 8
11th
Brigade, von Luck
LD
4
Prussian Landwehr (Kurmark) DD 4, CD 10
1
6# Foot battery
12th
Brigade, von Stülpnagel
LD
2
Prussian Line (31st
ex ) DD 6, CD 10
3
Prussian Landwehr (Kurmark) DD 4, CD 10
Reserve
Cavalry Major-General von Hobe
LD
1
Prussian Dragoon DD 6, CD12
2
Prussian Hussar DD 8, CD 10
1
Prussian Uhlan DD 6, CD 10
2
Landwehr cavalry DD 4, CD 10
Korps
Artillery Reserve, Mohnhaupt
LD
1
12# Battery DD 6, Cd 12+1
1
Prussian Horse Artillery battery DD 6, CD 12
Prussian
Totals:
36
Line
24
Landwehr
1
Schutzen
1
Jager
1
Grenadier
4
Dragoon
4
Hussar
1
Uhlan
4
Landwehr Cavalry
8
6# Foot Artillery
3
12# Foot Artillery
3
6# Horse Artillery
TOTALS:
63 Infantry, 13 Cavalry, 14 Artillery = 90 units
Some sources:
Waterloo 1815 (2): Ligny (Osprey Campaign), John Franklin. London, February 17, 2015
Waterloo 1815 (2): Ligny (Osprey Campaign), John Franklin. London, February 17, 2015