Friday, November 27, 2015

"Semi-witz"; Pre Game Show

    As mentioned in the scenario post, in Field of Battle 2nd edition, Brent included a simple system for adding some variance to pick up type scenarios. I've never tried it, so I decided to apply it to this game to get a feel for how it works. First a set of roll is made for "Fate" - three D4 rolls for each side. The score determines which of 4 areas is effected, and then a D12 is rolled for each of those, producing an Up or Down 1 modifier and a short descriptive phrase.

"French"  1, 2, 2

Tactical Adjustment: 3 - "Spread out to locate enemy" - Down 1
Strength: 11 = "Main Body" - Up 1
Strength:  4 = "Poor Roads" - Down 1

Allies  4, 2, 4

Deployment: 8 = "Parallel Routes" - Up 1
Strength: 11 = "Main Body" - Up 1
Deployment: 6 = "Inactive" - Down 1

Neither side rolled any 3's, which relates to Reconnaissance. The descriptions of the modifiers can be used to construct a basic pre-battle narrative


Command Decisions:

Each Army C-in-C gets 4 die types (the mix is dependent upon his Leadership Die - better LD gives a better mix of die types to choose from. In this case, both von Bulow and Ney have an LD of 10, so they get a D6, D8, D10, D10, and must allocate one die to each of the four categories - Tactical Adjustment, Strength, Reconnaissance, and Deployment. From the Fate process above, the French Tactical Adjustment die type will be modified by Down 1 die type, and the Allied Strength Die Type will be adjusted by Up 1.

The French choose to allocate their dice as below:
Tactical Adjustment D8 {(Down 1 as above = D6)
Strength  D10
Reconnaissance  D10
Deployment D6


The Allies choose to allocate their dice as below:
Tactical Adjustment  D6
Strength  D10 (Up 1 as above = D12)
Reconnaissance  D10
Deployment D8

The rolls and the outcomes thereof were:
Tactical Adjustment:  French 3 vs Allied 5
Strength: French 6 vs Allied 5
Reconnaissance:  French 8 vs Allied 8
Deployment:  French 6 vs Allied 4

As it turns out, tied rolls or a difference of 1 or 2 has no effect, so there is  no change to the scenario from this process. Had there been more significant differences in the die rolls, then some interesting effects were possible, depending upon how great the difference was. As it was, both sides commanders  had the same LD rating and allocated their dice similarly, Here's a taste of some of the things that could have happened:

Deployment: This envisages the players setting out their command groups one at a time, alternating from one side to the other. Difference of 3 or 4 = 1 enemy Command group must be placed on the table (additional) at any time that the winning side chooses; 5-6 same but 2 Command Groups, 7+ same but three command groups. In addition, if the Winning die roll was even, the command group(s) to be placed may also be specified by the winning player.

Tactical adjustment: Difference of 3 or 4 = all the units in one Command Group may be repositioned within their deployment zone, including changes of facing or formation; 5-6 same but 2 Command Groups, 7+ same but three command groups. In addition, if the Winning die roll was even, the command group(s) may also be re deployed into a different (baseline) deployment are.

Reconnaissance:  Difference of 3 or 4 = 1 add one zone for deployment; 5-6 same but add 2 zones, 7+ same but add three zones. In addition, if the Winning die roll was even, the winning player may instead deploy with a 1 zone gap between zones; only one gap in total is allowed. If the deployment zone(s) added extend to the enemy baseline zones, this will prevent the enemy from deploying said zone(s). The additional zine(s) to be used must be announced prior to commencing deployments.

Strength:  Difference of 3 to 6 = 1/8 of the enemy's command groups will be delayed in arriving at the battlefield. Round all fractions up;  7+ = 1/4 of the enemy command groups will be late arriving. Round all fractions up.  In either case, the Command Groups that are delayed is determined randomly. If the LOSER rolled even, then dice for each command group, rolling a D4. The score is the number of MOVE/MOVE 1 COMMAND cards that must be played in order for the late units to arrive (MOVE ONE COMMAND cards used in this fashion cannot also be used for tabletop movement). If the LOSER rolled odd, then each delayed Command Group must roll a D4 plus a D6, with effects as above.

Earthworks: Either or both armies may elect to build earthworks. Each earthwork built will result in one unit (of the C-in-C's choice) being removed from the forces available. No more than 1/4 of the army's strength may be employed in this fashion. The Army Morale point total is not reduced for units removed for Earthwork construction.


The empty tabletop, looking from the French left; the Church represents the village of Dennewitz itself. 


Looking over the "mountains" (used to hide all the junk on the other 8 feet of the table from view) from the French right.


Looking from the French left, with troops added.


Another view from the Allied right; the gold coins are used to indicate the deployment areas as set out in the scenario. 


Reynier's Corps of Italians and Saxons. The Austrians won't be the white coats in today's battle!


Another view of Reynier';s boys. 


Bertrand's Corps of Poles and Wurttemburgers; I have used my colorful 4 unit Vistula Legion infantry for the Polish infantry. 


The Wurzburg Regiment of the Rhine Confederation has been brigade with the Wurttemburgers. 


Oudinot's Corps of Bavarians, Badeners, and Hessians. Oudinot had been replaced in command of the Army of Berlin after his defeat at Gross Beeren; thus he was not on very cordial terms with his replacement, Marshal Ney!


Roger will be providing the Hessian Chevau-lagers, one of the (seemingly few) Napoleonic units not in my collection. 

Bernadotte's (Crown Prince Carl-Johann) Swedish Corps. It has been at least 12 years since these guys last made it onto the table!


Another view of the very colorful Swedes!


Tauentzien's large Corps of Prussians.


The Prussians are a very mixed bag of Line, Reserve, and Landwehr units!


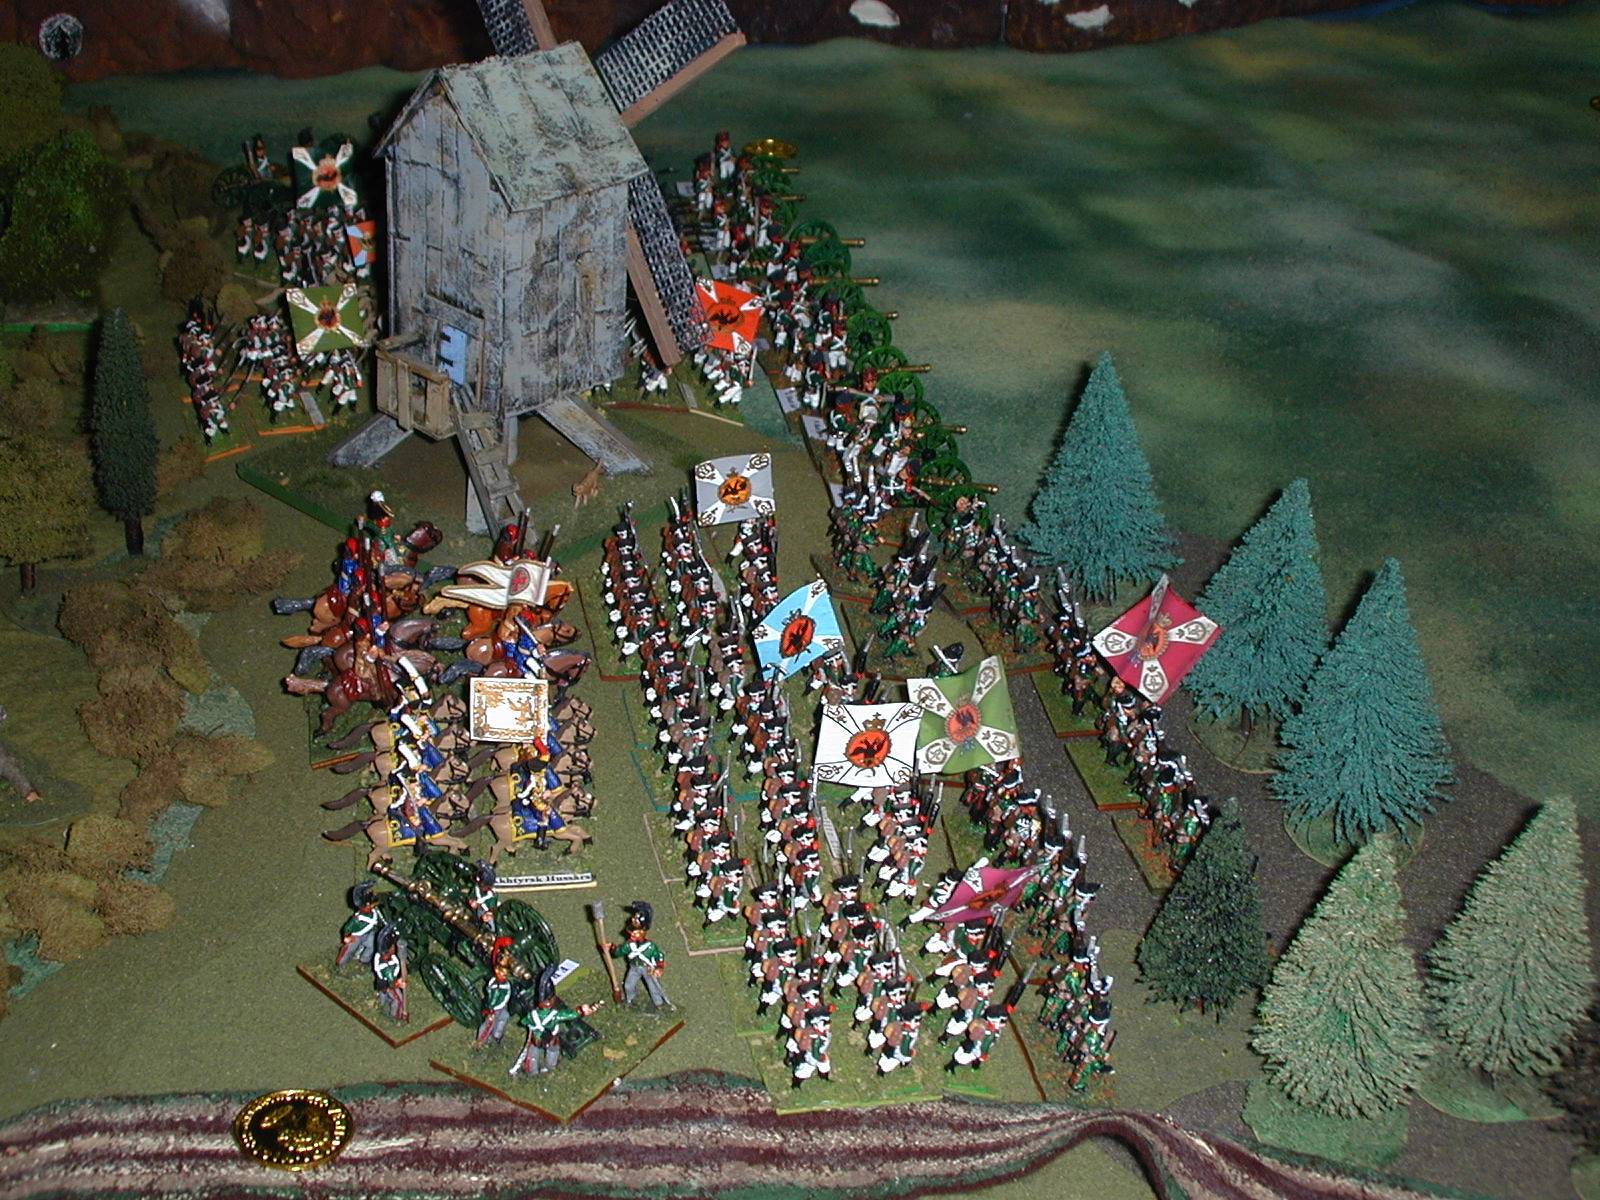
Winzingerode's Russian Corps. 


In typical Russian fashion, they have so much artillery that they can't deploy it all at the start of the game; the Horse Batteries will have to move out when they get the chance; fortunately, they are highly mobile. 


General Arrighi de Casanova's small cavalry Corps, awaiting its chance to enter the game. 


Cassanova was a cousin of Napoleon's, and distinguished himself at the actual Battle of Dennewitz. 


Morand's French Division, also reinforcements waiting to enter the tabletop. 


Best known for serving under Marshal Davout, Morand had a falling out with him in 1810, believing that he had blocked his advancement. He requested a transfer to another command, which was refused, and he continued to serve under Davout during the Russian campaign. In 1813, his request was granted and he served in Bertrand's Corps, later assuming command of it himself in 1814. 


The Von Bulow monument at Dennewitz.

Wednesday, November 25, 2015

The Civil War, then and now in photos (The Guardian)


    One of my patients shared this site with me, which some of you may find of interest. It consists of pairings of iconic pictures from the American Civil War with modern pictures of the same site, and as much as possible, taken from the same perspective, etc.


The Dunker Church at Antietam after the battle (the bloodiest day in US military history)
- Library of Congress


The Dunker Church in 2015; interestingly, the church was destroyed in a storm, and wasn't rebuilt until the 100th anniversary of the battle in 1962, as part of the Antietam National Battlefield Park. I have visited Antietam twice, and both times had the eeriest feeling there. Not at all like Gettysburg, Harper's Ferry, The Wilderness, Fredericksburg, or any other civil war battlefields that I have visited. 


Anyway, consider paying The Guardian website a visit for a number of additional intriguing "then and now"pictures.

Another interesting factoid (in the section about how the modern photos were taken): Allegedly, famed Civil War photographer Matthew Brady took over 10,000 photos during the Civil War, and spent $100,000 of his own money in so doing (one shudders to think what that would be in today's terms - an online estimate came up with 1.8 million dollars!). He only recouped a fraction of that, and died alone, blind and penniless. I hope that it might be some consolation to his spirit that he has hardly been forgotten more than 150 years after the end of the Civil War. It is amazing to think that I was 10 years old at the time of the Centennial of the end of the Civil War in 1965, and that the last veteran of the Civil War died a year after I was born (at age 109). This was also the time of the Civil Rights movement, and while much progress has been made since then, as a nation it seems that we have yet to put the Civil War and its origins fully behind us. 

Sunday, November 22, 2015

Semi-witz 1813 scenario

    Napoleon's defeat of the Allies at the Battle of Dresden (August 26-27, 1813) brought the French very little fruits from their victory, followed as it was by defeats of Vandamme at Kulm, Mac Donald at The Katzbach, and Oudinot at Gross Beeren. Napoleon appointed Matrshal Ney to replace Marshal Oudinot in command of yet another drive towards Berlin. This lead to an engagement with elements of the Allied Army of the North, under the command of Crown Prince Carl-Johan of Sweden (the general formerly known as Marshal Bernadotte of France), on September 6, 1813. The battle began with an engagement between the troops of  Bertrand and Tauentzien outside the village of Dennewitz. I will be hosting a six player Napoleonic game the Sunday after Thanksgiving, using Field of Battle, 2nd edition by Brent Oman/Piquet. It is going to be  (very) loosely based upon the terrain and forces involved at in this battle, hence the title of Semi-witz!


"French"Army of Berlin  - Marechal Ney  LD 10

IV Corps, GD Bertrand   LD 10

Infantry Division (Wurttemburg) - GD Franquemont  LD 8
3 Wurttemburg Line  DD6 CD10
1 Wurttemburg Light  DD6 CD12
1 Wurzburg (3rd CoR regt) Line  DD4  CD10
1 Wurttemburg 6# Foot Battery  DD6 CD10

Infantry Division (Polish) - Dombrowski  LD 10
1 Provisional Croatian Regt  DD6 CD10 
4 Polish Line/Vistula Legion  DD8 CD12
1 Polish 6# Foot Artillery  DD6 CD12

Cavalry Division,  von Jett  LD 8
1 Wurttemburg Chevau-Leger  DD6 CD10
1 Polish Uhlan  DD8 CD12
1 Polish Hussar  DD8 CD10

IV Corps Artillery
1 French 12# Foot Battery  DD6 CD12+1


VII Corps, Reynier  LD 10

Infantry Division (Saxon) - Lecoq  LD 8
4 Saxon Line  DD4  CD10
1 Saxon Light  DD6 CD12
1 Saxon Guard  DD8 CD12
1 Saxon 6# Foot Battery  DD6 CD10

Infantry Division (Italian) - GD Fontanelli  LD 10
4 Italian Line  DD6 CD10
1 Italian Light Infantry  DD6 CD12
1 Italian Guard Infantry  DD8 CD12
1 Italian 6# Foot Battery  DD6 CD12

Cavalry Division - Von Lindenman  LD 8
1 Saxon Hussar  DD8 CD12
1 Saxon Cheavu-Lager Lancer  DD6 CD12
1 Italian Guardia di Onore  DD8 CD12

VII Corps Artillery
1 French 12 # Foot Battery  DD6 CD12+1


XII Corps - Marechal Oudinot  LD 10

29th (Bavarian) Division - Raglovich  LD 8
1 Bavarian Jager  DD6 CD12
4 Bavarian Line  DD6 CD10
1 Bavarian 6# Foot Battery

13th Infantry Division (Baden/Hesse) - Pacthod  LD 10
2 Baden Line  DD6 CD10 
1 Baden Jager  DD6 CD12
2 Hessian Line  DD6 CD10
1 French 6# Foot Artillery  DD6 CD12

Cavalry Division  Beaumont  LD 10
1 Bavarian Chevau- Leger  DD6 CD10
1 Hessian Chevau-Leger  DD6 CD10

XII Corps Artillery
1 French 12 # Foot Battery  DD6 CD12+1


Reinforcements:

Infantry Division, GD Morand  LD 12
1 French Legere  DD8 CD12
4 French Ligne  DD6 CD10
1 French 6# Foot Battery  DD6 CD12


III Cavalry Corps - Arrighi  LD 10
1 French Chasseur a Cheval  DD6 CD10
1 French Hussar  DD8 CD10
2 French Dragoons  DD6 CD12
1 French 6# Horse Battery  DD8 CD12+1


Allies: Army of the North - GL von Bulow  LD 10
Von Bulow was functionally in charge of the battle for almost the entire day, thus he will serve as C-in-C


4th Prussian Corps - Tauentzien  LD 10

1st Brigade - Dobshutz  LD 8
1 Prussian Grenadier  DD8 CD12
2 Prussian Line  DD6 CD10
2 Prussian Reserve  DD4  CD10
2 Prussian Landwehr  DD4 CD8
1 Leib Hussars  DD8 CD10
1 Uhlan  DD6 CD10
1 Landwehr cavalry  DD4 CD10
1 Prussian 6# Foot Battery  DD6 CD12

4th Prussian Brigade - Von Thumen  LD 12 +1
2 Prussian Line  DD6 CD10
2 Prussian Reserve  DD4  CD10
2 Prussian Landwehr  DD4 CD8
2 Prussian Dragoon  DD6 CD12
1 Prussian Landwehr cavalry  DD4 CD10
1 Prussian 6# Foot Battery

Corps Artillery
1 Prussian 12# Foot Battery  DD6 CD12


Russian Corps - Winzingerode  LD 8

21st Division - Laptiev  LD 8
2 Russian Jagers  DD8 CD10
4 Russian Line  DD8 CD 8
1 Russian Hussar  DD8 CD10
1 Russian Cossack  DD4 CD8
1 Russian 6# Foot Battery  DD6 CD12
1 Russian 6# Horse Battery  DD6 CD12

14th Division - Voronsov  LD 8
2 Russian Jagers  DD8 CD10
4 Russian Line  DD8 CD 8
1 Russian Dragoon  DD6 CD12
1 Russian Uhlan  DD6 CD10
1 Russian 6# Foot Battery  DD6 CD12
1 Russian 6# Horse Battery  DD6 CD12

Corps Artillery
1 Russian 12# Foot Battery  DD6 CD12+1


Swedish Corps - Carl Johann, Crown Prince of Sweden  LD 8

1st Division Posse  LD 12
1 Swedish Jager  DD6 CD12
4 Swedish Line  DD6 CD10
1 Swedish Guard  DD8 CD12
1 Swedish 6# Foot Battery  DD6 CD10

2nd Division  Sandels LD 8
1 Swedish Jager  DD6 CD12
4 Swedish Line  DD6 CD10
1 Swedish Grenadier  DD8 CD12
1 Swedish 6# Foot Battery  DD6 CD10

Cavalry Division  Lagerbring  LD 8
Swedish Light Dragoons  DD6 CD10
Swedish Dragoons  DD6 CD12
Swedish Life Cuirassiers  DD8 CD12


Terrain:

The Agger River is a Class 2 stream. All the hills are class 2, as are the woods. The towns are all class 3 terrain. 

Deployment:

The basic deployment will be pretty straight forward as seen above. Field of Battle Has an interesting system for pick up/fictional battles to add a little variety to the setup, which I have never used. I am going to use a modified version of this to make teaks to the basic scenario and deployment. It involves a series of  rolls for Fate and Command Decisions. I will resolve these prior to the game ()and probably detail the process in a separate blog post. This may change the deployments to some degree, and could cause some troops to arrive on the table late.

Reinforcements:

The French have some additional troops arriving - Morand's French Infantry Division and Arrighi's Cavalry Corps. After any adjustments to the scenario are made, the French players must decide which of the three roads each of these will enter on (they can use different roads or the same road for both); the road to Gohlsdorf, the road to Dennewitz, or the road Rohlbeck. When each French MOVE Card is turned, roll a D3 for BOTH formations (D6: 1,2 = 1, 3,4 = 2, 5,6 = 3). If the roll for that command is less than or equal to the current Move card, the command may enter at the designated road, in Column of March. In the (unlikely) event that the road entry point should be occupied by enemy troops, the reinforcements may not enter until the road entry point is recaptured. Both will remain independent commands - only their command group officer and Ney may rally them, make LD rolls for Movement, etc.

Special Rules:

1) Huge Russian Batteries
 All Russian Artillery units have 3 UI instead of the usual 2 UI

2)  Bernadotte's "Precious Swedes"
Swedish Infantry units have only 3 UI each, Swedish Cavalry 2 UI each. Swedish Artillery has the usual 2 UI each

3) "The Bravest of the Brave"
After at least one "French" unit has been routed or destroyed, on subsequent Leadership Cards, Ney must roll his LD vs a D*. If the D8 is higher, Ney MUST attach himself to any infantry Division of his choice within his Command Radius.  All infantry in that Division get an UP! to both their Combat and Defense Die types while Ney is attached, and will use his LD for Movement and Rallying. Ney uses a D12 for Survival tests while attached, and The French use a D6 for Army Leadership while Ney is attached to a Division. If Ney passes the roll, he may  CHOOSE to attach himself as above, or if already attached, may CHOOSE to detach himself and regain overall control of "French" forces, in which case Ney's LD will once again be used for Army initiative (and Army Morale) rolls.

4) Brent's "No Maneuver Card" rule.
No Maneuver cards are placed in the deck. Units can maneuver or change formation on Move cards for the price of 1 move segment. On Move cards with won even rolls, the maneuver/formation change is free. Finally, and most significantly, ordered cavalry can melee on Move cards. Disordered/out of command cavalry still requires either a Melee or won even roll on a Move card.

5) Move 1 Command Card
This card will allow one command of each *player* on that side to move. 

Friday, November 20, 2015

Hussite Wars Part 2: Crossbowmen and Handgunners

    The execution of Jan Hus, followed by that of his freind and supporter, another priest named Jerome, who was burned at the stake in May 1516 without even the appearance of a fair trial, along with the apparent treachery of Holy Roman Emperor Sigismund spurred the Bohemian radicals to action, and  infuriated even the most conservative members of the Bohemian nobility. "The outraged sense of betrayal, usurpation of local judicial prerogatives, and besmirching of national honor was shared by Czechs of all social classes, temporarily overshadowing political and religious differences that later re-emerged." (Warrior of God, Victor Verney, pg 44). In the, in my opinion, unlikely event that Sigismund was not complicit in Hus' arrest and execution, subsequent events gave little evidence of it. He continued to pressure Wenceslaus to act against the Hussites. In 1419, Queen Sofia of Bohemia, although a staunch Hussite supporter herself, became fearful of an invasion of the country and convinced her indecisive husband to restrict Hussite services to just three Prague churches.

    This failed to have the desired effect (at least from Sigismund's viewpoint). Large numbers of clergy left Prague, and held open air, hilltop services unrestricted by capacity or outside authorities. It did convince the Archbishop of Prague to lift the interdict. As so many Bohemian clergy had left, Wenceslaus encouraged the return of anti-Hussite priests, many of them German, who had fled the previously city out of fear. In June 1419, a church rededication in Prague was interrupted by a Hussite crowd, lead by Jan Zevlisky, a former monk and firebrand preacher at on of the three remaining Hussite churches, St Mary's ijn the Snows. This prompted Wenceslaus to purge the city government of Hussite supporters in July 1419. The new, anti-Hussite city council instituted a series of police actions against Hussite supporters, and banned teaching of anything except strict Catholic Orthodoxy. This caused growing resentment throughout the country, and by the later part of July, Nicholas, a former courtier who had been exile from Prague earlier that year, organized a mass gathering outside of Bechyne, attended by over 40,000 people from all over the country, This gathering also was notable for the first use of the Biblical term "Tabor", which gave it's name to the radical Hussite movement. Back in Prague, Zevlisky continued to fan the fires of insurrection. At last as important, he had previously enlisted the assistance of a petty nobleman with military experience who was devoted to the Hussite cause - Jan Ziska.

    On July 30th, 1419, Zevlisky preached a fiery sermon to a packed church, condemning the actions of the City Council. Afterwards, he took the Sacred Host from the church and lead a protest march, supported my many armed men. The march proceeded to another Church that supported Rome, and was due for re-consecration. The mob stormed the barred doors of the church, and hanged a resisting priest. From there, they proceeded back to St Mary's, in the process, probably quite deliberately on Zevilsky's part, passing by the Prague City Hall. The frightened councilors had barred the doors here as well. The crowd demanded admission to present their grievances to the Council, The officials attempted to parley from the assumed safety of the upper story windows of the building. It was claimed that someone threw a stone at the Sacred Host, striking the priest leading the procession. The angry mob stormed City Hall and threw the councilors from the windows; those who survived the fall were dispatched by the crowd below. This event became known as the "First Defenestration of Prague (from the Latin phrase, de fenestra, "from a window"). Amazingly, there was to be a Second Defenestration of Prague at the start of the Thirty Year's War, 200 years later.

    A new City Council of Hussite supporters was declared, and a civic militia was decried, with several; captains, chief among them Jan Ziska. Learning of the rebellion, King Wenceslaus flew into a rage. In the midst of an angry tirade, he suffered a massive stroke, leaving him paralyzed on one side. At the same time as he reached compromise by which he would recognize the new City Council in exchange for their contrition, pledge of allegiance and agreement to follow the rule of law, he wrote to Siguismund (who was also his brother) requesting his swift and armed intervention. The King suffered a second stroke soon thereafter, and died on August 16, 1419. Queen Sofia spirited his body away to the Vysehrad castle, accompanied by loyal troops, but still was unable to bury the late King for another three weeks.

    Sigismund assumed the crown of Bohemia himself, and, afraid to come to Prague himself, appointed one Cenek of Wartenburg as regent in an attempt to curry favor with the Bohemians, Cenek being a Hussite himself. Further mass meetings and incendiary sermons ensued, and it became clear that the differences of the two sides, both political and religious, were irreconcilable. The Hussite Wars were about to commence in earnest with the first Catholic "Crusade" against the Hussite heretics.


Infantry armed with missile weapons, such as these crossbowmen, were vital to the defense of the Hussite "Wagon Fort" employed in battle against their invariably better armored and equipped enemies.


One Hussite regulation called for each Wagon to have a complement of 10 - 20 men, stated to include 2 Wagon drivers, 2 Hand gunners, 6 Crossbowmen, 14 Flailmen, 4 Halberdiers, and 2 Pavisers.


While it is alleged that a Hussite War Wagon could hold 15 to 20 men, clearly many of them would have to be fighting from between (or even under) the wagons


The Hussites were early adapters of gunpowder weapons, such as these early handguns. 


These relatively primitive firearms must have been hugely inaccurate, but at the close ranges involved in defending the wagons, their penetrating power against the masses of their foes in plate mail would have more than made up for this.


Being relatively novel weapons, the psychological effect of the noise and smoke they produced upon men and horses both must have been considerable as well. 


Although I have painted these crossbows with steel staves, the majority of the weapons used by the Hussites would have had the staves made from a composite of wood, sinew, and horn. These had the advantage of becoming stronger in cold weather (as opposed to more brittle for steel staves).


The crossbow was an excellent weapon for use against heavily armored foes, especially when the shooter could shelter behind cover during the lengthy reloading process, during which he was very vulnerable. 

These figures are once again Old Glory 25/28mm, with the "command" figures form the Mad Monks and Agitators" set. 


The smallest of the  Hussite guns would have been similar to those seen above. An example found at an archaeological dig at Tabor has a barrel 16.5" long with a caliber of 0.7 inches. There is a socket at the base for a wooden pole or stock to be inserted.


In contemporary illustrations, the guns are usually shown with the stock held under the left arm and fired with a lighted match applied to the touch hole with the right hands. Field trials of a replica of a similar hand gun showed that holding in under the right arm improved the accuracy of the weapon, but made it more difficult to fire.


These early hand guns could also be rested on a pavise or the sides of a wagon or mantlet when shooting, in an attempt to improve accuracy as well. 


Regardless, Crossbows heavily outnumbered hand guns within the Hussite armies.


The use of crossbows in conflicts between Christian states had been famously outlawed by the Second Latetran Council in 1139, the weapons being regarded as "hateful to God", and perhaps more importantly, the aristocracy!


An exception was made for use against non Christians and heretics; neither side showed any qualms at using them against their enemies!


The Battle of Sudomer, the first use of Hussite War Wagon tactics. 

This is great cinema from a Wargamer's standpoint, and considerable effort was made to be as historically accurate as reasonably possible. Note the scenes depicting the deployment of the Wagons, including setting up the mantlets between them, the realistic gunfire, etc. Well worth viewing!

The scenes are from the 1957 film "Jan Ziska", part of the Hussite trilogy of Czech director Otakar Vávra. Unfortunately, a version with English subtitles has never been made available. It (apparently)contains some Marxist propaganda, but  it is said to be limited, especially given the time of its production. Religious elements aside, perhaps the story of a largely underclass revolt, although more nationalist and theological than economic in origin, is not so dissonant with such ideology?!

The music heard is the Hussite hymn "Ktož jsú boží bojovníci", "Ye who are Warriors of God", parts of which are used in Smetana's patriotic tone poem, "Ma Vlast" (My Homeland). especially the last two movements, Tabor and Blanik.

Saturday, November 14, 2015

Hussite Wars Part 1: Melee Infantry

  Jan Hus was born into a relatively well to do family in small farming community of Husinec, in Southern  Bohemia circa 1370, He showed early intellectual promise, and was accepted into Charles University ion Prague in 190. He would go on to earn a Bachelor of  Arts degree in 1393, Bachelor of Theology in 1394, and Master of Arts in 1396. In 1398, he was chosen for University post and began lecturing in Prague. Among the texts he used were the writings of the English religious reformer, John Wyclif. Hus was ordained a Catholic priest in 1400., and in 1401 he became dean of the philosophical faculty of the University, and Rector in 1402. 

    In 1402 he became curate of Bethlehem Chapel, a financed and built by zealous Prague residents in 1391, with the goal of fostering preaching in the Bohemian language.  This seems to have deeply affected Hus, who had a spiritual awakening. Like Wyclif, he supported translation of the Bible into the vernacular, its place as final authority, the fallibility of the Pope, limiting the temporal power of the Pontiff, and the wealth of the clergy.

    Hus also took issue with Catholic doctrine regarding the Transubstantiation of the consecrated bread and wine of the Eucharist, supporting instead an alternate concept called consubstantiation or "remanence", holding that substance of Christ's Body and Blood exists concurrently with that of the bread and of the wine. The argument in Bohemia, which Hus him,self tried to sidestep until shortly before his death, was that the benefits of he Eucharist were not conveyed by receiving solely the bread; "Communion ion Both Kinds", i.e., both the bread and the wine, was deemed necessary.

    Political unrest between King Wenceslaus IV of Bohemia (who had been elected Holy Roman Emperor 1376, but deposed in 1400) and the church lead the King to appoint Hus Rector of the University in Prague a second time.The Archbishop of Prague,. Zbynek, summoned Hus before the Czech Inquisition and denounced him. The Great Schism of the Papacy was further confounded in 1409, with the establishment of the short lived Pope Alexander V in Pisa (with Pope Benedict XIII still in Avignon and Pope Gregory XII still in Rome!). Alexander supported Zbynek, , who ordered Wyclif's teachings suppressed and forbade Hus from preaching in Bethlehem Chapel, both of which edicts Hus ignored. Both men appealed to rival Popes, with Zybnek winding up ordering that Wyclif's books be burned in the courtyard of the Episcopal palace, and excommunicating Hus and his followers. Hus had become very popular, with many Bohemians viewing him as a divinely sent leader. Thus, these actions provoked widespread rioting in Prague.

    Over time, however, Hus' political naivete cost him the support of King Wenceslaus (who was definitely not the one of the Christmas Carol, that being his namesake from the 9th century). In 1411, all of Prague was placed under a Papal interdict, closing churches, ending baptisms, marriages, and burials, and proclaiming a general excommunication. Hus refused several summons to appear in Rome and his own excommunication was reaffirmed. Excommunication was extended to any who gave Hus support of any kind. Wenceslaus insisted Hus and his more strident supporters leave Prague, and he entered voluntary exile about 40 miles away for the next 2 years.

    In 1414, Sigismund, King of Hungary and now Holy Roman Emperor himself, endorsed convening the Council of Constance, to put an end to the Papal schism once and for all. King Wenceslaus had grown increasingly exasperated with Hus' intransigence, as he engaged in open air preaching and theological writing. In the interest of helping dissipate dissension, Hus accepted a summons and safe conduct to the Council given by Sigismund, probably encouraged by Wenceslaus.

   Upon his arrival in Constance in October 2014,. Hus saw the announcement of his trial as a heretic. The curia held that the safe conduct promised to him by Sigismund, a temporal ruler, had no force i n a Papal court, and that promises or pledges of honor given top heretics were null and void. Hus was imprisoned for seven months, during which witnesses were heard, and he was accused of many heresies that he had not endorsed, including Communion Both Kinds. He was not allowed an advocate for his defense, and was found guilty of 39 counts of heresy. Hus continued to protest his innocence to the last, and was burned at the stake in 1415, a fate which he suffered with great dignity. Thus, the stage was set for the outbreak of the Hussite Wars.*

* this background material was condensed and modified from Warrior of God: Jan Ziszka and the Hussite Revolution, Victor Verney. Frontline Books, London, 2009. I will have occasion to refer to this excellent book again as this series continues. 


The Hussite Rebellion encompassed all facets of Bohemian society,. but its greatest support always came from the peasantry. 


The military Flail was an adaptation of the threshing tool that peasants were well accustomed to using. 


These are 28mm figures by Old Glory from their Hussite Wars ("Vlad the Impaler" heading) range, I have used figures from their Medieval "Revolting Peasants" range, specifically the "Leaders, Agitators, and Mad Monks" set for Command figures for these units. 


"Bohemian Militia" armed with Polearms. 


Note the use of the "Mad Monk" with Quarterstaff. Clergy were integral to the Hussite cause and army. 


The "can opener" resemblance of their weapons is fitting considered the well armored "Crusader" forces they fought against. 


Another unit of Hussite Flailmen. The Flail took considerable strength to wiled effectively, but these men had spent a lifetime at hard work. Note the monk in the front rank once again. 


The big guy with the club in the back rank reminds me of the epitome of a High School bully!


Striking from a height (we will come to the famous Hussite War Wagons later) gave these guys an added advantage in combat. 


I love the guy with the flaming torch and the hatchet in the front rank of this unit!


More "Bohemian Civic Militia" with polearms. 


They are better equipped than their rural brethren!


The hornist is also from the "Revolting Peasants" set.


Many of these Flail men have more Easter European looking fur caps. 


And another monk/priest in the second rank.