Game
Master’s Thoughts and Perspective, by James
Overall,
I was quite pleased (if I do say so myself) with the way the game and
the day turned out. It would appear to me that the GM only really
(unintentionally) screwed up one player - Napoleon, perhaps making
the French Victory Conditions more than just a trifle unachievable.
Oh, well, cannot win them all (sorry Seth!).
In
organizing the campaign, there were several things I wanted to
accomplish:
1)
Players should all have a good time, all have authentic reasonably
historical military challenges, and that operations should reach some
reasonable conclusion by the end of the day. Ideally, both sides
would have an authentic (but not necessarily equal) chance for
victory.
2)
I wanted to try out several game mechanics such as the Deployment
Zone concept with players self-navigating among tables without GM
assistance, the use of 15mm troops on The Portal's small tables,
tracking casualties via the casualty rings rather than the
paper-and-pencil OB rosters, and self-regulated play with players
largely able to conduct battle without a GM constantly present.
3)
Allow each side to organize itself, develop plans, and consider
contingencies the week before the game with a view to expanding the
player experience to beyond just the one day.
You
all can judge for yourselves how well this all worked.
Major
organizational elements of the campaign required that (as far as I am
concerned) I read at least two campaign histories in depth (Petre,
1906; Arnold, 2007), get and then develop a good map, develop
historical OBs, obtain and organize the figures (I only own
Prussians), develop table maps and recruit guys to dress tables, and
lord knows what other myriad details were required. I undertook this
all both because every now and then (say every two years or so) I
really enjoy a massive project like this, and as I indicated above,
there were some things I wanted to try.
Crisis in the Snows, by James Arnold (himself a wargamer).
This, like his earlier Crisis on the Danube, is a great book. It is pricey but well worth it.! I still need to but the sequel on the Spring 1807 campaign, and for that matter, the second half of the 1809 campaign. I lent my copy to James as a source for background material for the campaign - I agree with him as far as reading at least 2 in depth sources as part of the planning process for this kind of event.
The
Campaign Map
I
needed a map which did several things: Showed an authentic road and
maneuver network, showed where table boundaries, showed table
inter-connections within the area of operations, and showed the
terrain for each table. I located a game called the The Eagles
Turn East, which covered exactly the campaigns in eastern Poland,
scanning its game board and adapting it to an electronic form. For
what it is worth, the campaign operations area was almost exactly the
same size and shape of Connecticut (allowing you must rotate
Connecticut by 90-degrees). This is roughly an area 175 miles
north/south by 90 miles east/west, remembering this is all in the
bitter cold and deep snow of eastern Poland in February 1807. I
actually used probably a third of the roads and towns from the game
board (that board being a 5' x 3' hex grid - massive detail !!).
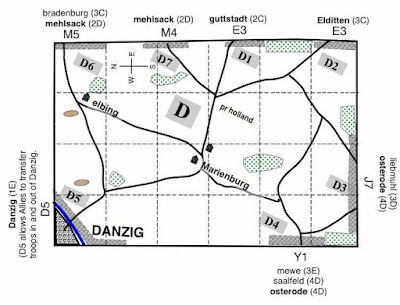
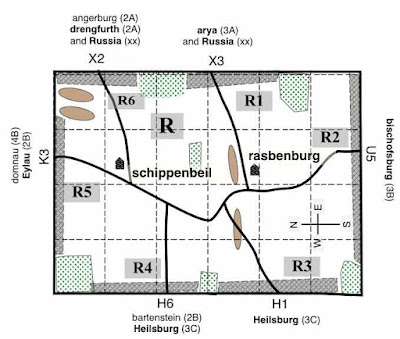
The
Operations Map Showing Road Net and Table Boundaries
This map gives you an idea how crafty James was in both using natural barriers as "off table" barriers, as well as the spaces in the map between tables. This definitely threw most of us off, as in the past there have been distortions, but major towns on the player map always appeared on the table - not so here!
For
criteria as to how I wanted my final operations map to look, I had
decided to shoot for a dozen table tops (that's what we had for the
Waterloo game last year), and I wanted enough roads to create a
maneuver network allowing at least two or three ways to reach any
given destination. In addition, since the entire operations area
could not be modeled on just a dozen tables, I decided the tables
themselves would represent (as Russ intuited) "interesting"
areas where battles might occur. Rivers would lie along and just off
table edges, justifying why battles were fought at the given locale -
you fight adjacent to, not in the middle of rivers.
I
deliberately located table boundaries around significant road
junctures and then I artificially shmushed rivers around a bit to
bound where I figured I wanted tables to appear on the Op map. That
left some towns unreachable by players as they maneuvered across tables.
To deal with this, I marked roads leading off tables as going to
these "unreachable towns" with the net effect that it was
possible to "walk through" any location on the road map,
but you could not necessarily stop there. For example, a road leaving
Table A might say that you were heading onto Table B, along the way
getting to say the town of Depper. However, when you got to Table B,
the Table B map would tell you Depper was exactly back the way you
had just come. Probably a bit of cruel GM joke this, but I figured it
a level playing field (both sides equally affected), and frankly, I
did not want the player's maneuver map to show only the table top
towns - such would make map reading less authentic. Side commanders
had to assign routes of march and destinations based on their maps
and players then had to figure out how to navigate the actual
territory (a la the principle that the map is not the territory).
The
net result was that few tables had rivers, a good thing because they
were frozen anyway and tabletop rivers steal precious table space.
Most significantly, if a GM runs a river through a table, guaranteed
one side or the other on that table will rest a flank on the river
with the table space on the far river side typically unused and
wasted. Therefore, my logic that rivers were "just off board".
To allow that rivers (and unplayable forest areas) create defiles
leading to bottlenecks, I tried to make Deployment Zones proportional
in size to the connected off-table terrain features. A small DZ
connected to an off-table river crossing constrained the number of
troops that could enter a table from the given direction just as
debouching from a bridge or forest road defile would so constrain
deployment into battle.

As a player, THIS is the map I would love to have had - all thirteen tables with their road connections! Actually, there were even 2 MORE tables, "X" representing the Easternmost road network, and "Y", representing the Westernmost road net.
I
should note that there are two "holes" on the campaign map
(large areas without a corresponding table top presence) - one being
the area surrounded by Tables R, H, E, and K, and the other area
being smaller, covering the map area between Tables E, J and D. These
gaps existed because I wanted to foreshorten the Heilsburg table to
better represent this actual historical battlefield, and there simply
was otherwise too large a map area to cover without using another
table or two. Note also that the ground scale on the N and S tables
(French setup tables) covers about twice as much real world space as
do the other tables, again, because it was the easiest way to address
the needed table / map coverage and this area was unlikely to see
combat. The net effect of these various distortions was that the
French probably had a good 30 miles less to travel (relative to the
historical French) when marching from Warsaw to Danzig or
Koenigsburg.

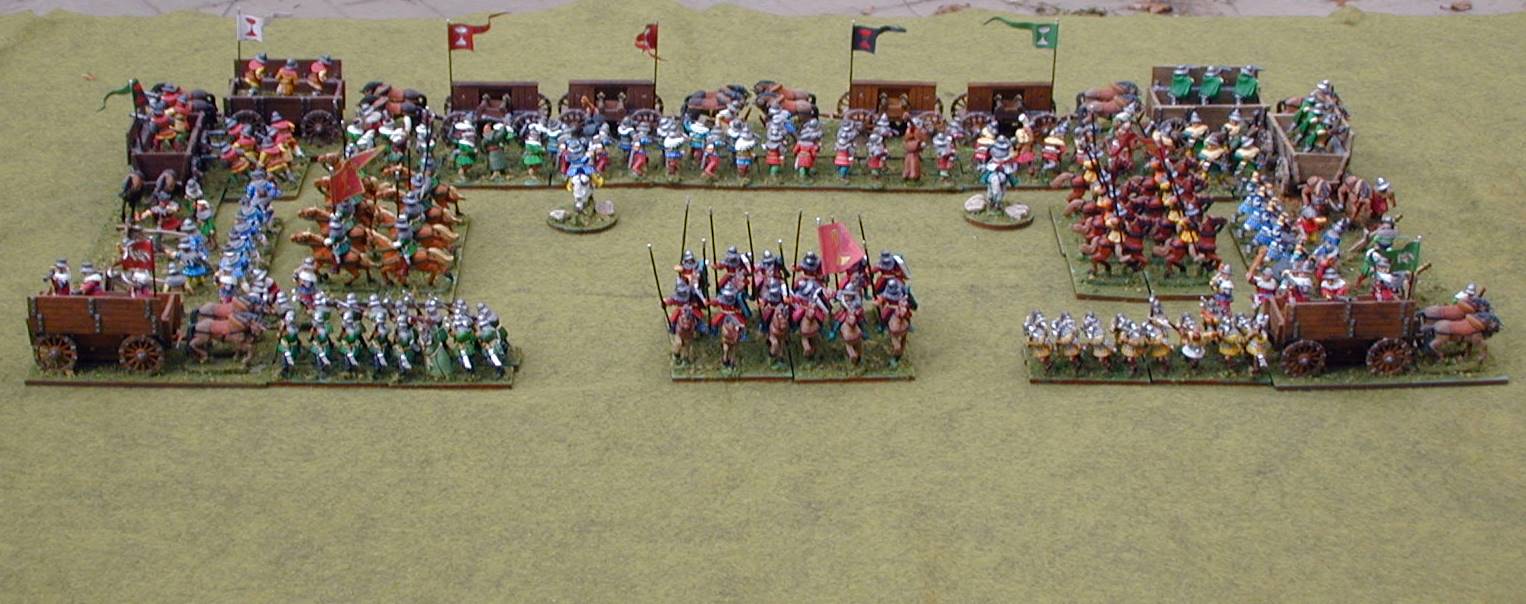
Miniatures of all fifteen tables! Next are larger versions of each, alphabetically...


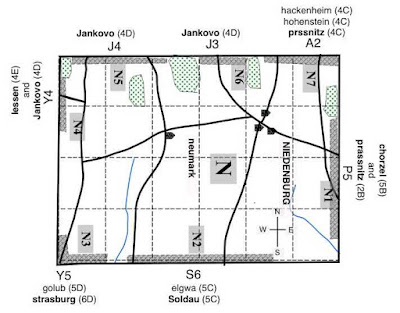


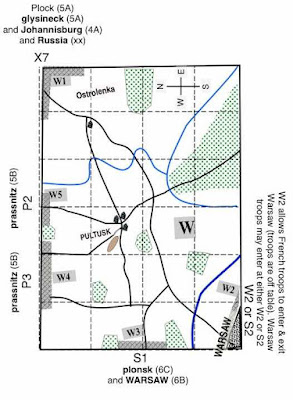
DEPLOYMENT ZONES (DZ) rules
for Troop Movement Between Multiple Tables:
DZs are “ transfer sites” between tables.
- Tables have printed maps showing DZs & table interconnections (see diagram).
- Example: On Table W, zone W4 connects to
the town of Prassnitz via the P3 zone on
Table P, zone W3 connects to zone S1 and
the town of Plonsk on Table S, etc.
- Another way to put it is that troops moving
into the W4 DZ would transfer to Table P,
entering at its P3 zone, thereby getting to Prassnitz. Units coming from the city of Plonsk via the S1 zone on Table S would
enter Table W at the W3 zone, etc.
DEPLOYMENT ZONE MOVEMENT RULES
1) WHEN UNITS WALK INTO A DZ:
On next turn, they must transfer to other table OR reenter current table.
Players get a free set up of the transferred units in other table’s DZ.
2) WHEN UNITS HAVE BEEN TRANSFERRED TO A DZ:
A) TURN SEQUENCE: Units join table’s current turn sequence,
BUT only after opponent has had a full normal move phase.
B) EXIT! A Unit must exit a DZ as soon as it may move.
It could transfer back to its original table.
NO ping ponging between tables!
C) SAFETY: Units may not be attacked in nor attack from within a DZ.
3) SPECIAL SITUATIONS: Get the GM if you have questions.


Scenario
Specific Rules
I
opted to make all command radii 18" for simplicity and because
18" was a major leash in the supply rules (it being the max
distance a supply wagon could feed a unit). I know the 18"
Russian command radius tremendously favored the Russians (versus had
they been saddled with the game's 9" Russian command radius).
However, quite simply, as a GM, if I made the Russians use their
9-inch "historical" radius (Russ - do note the scare
quotes :), how do I compensate them for game balance? Is their
coordinated starting position compensation (see below)? Do I give
them easier VP (victory points)? Do I give them more troops and if
so, how many points more? Since I had no idea how to balance this
out, I chose to make it a non-factor.
Snappy Nappy, by Russ Lockwood.
There is a lot more information on Snappy Nappy
here, along with purchase information.
By
the same token, for simplicity and frankly as a bit of GM personal
preference, I allowed units out of command radius to roll their
morale to get a normal move and get a formation and/or facing change
with no move if they failed (the Rules as Written say 1/2 move on
success, no move whatsoever on failure). As far as I know, this never
entered play, but I suspect both sides left several cavalry units
screening their rear areas to act as a slightly mobile "trip
wire" should enemy make an appearance. I suspect the respective
side commanders were more comfortable leaving these penny packet
forces behind because of the easier out-of-command rule (and as a GM
I like seeing attention to such rear-area security).
For
the same reason of promoting game balance, I gave both sides roughly
equal sized troop point totals and roughly comparably sized forces
among players. The one bias I did make was to give the Russians three
guns for every two guns the French had, but Russian guns were
Seasoned versus French being Veteran. This was because the French
historically had a terrible time getting their guns all the way to
the battlefield (horrible bogging problems), and the Russians tended
to have way more guns in the actual battles. However, if you do the
math the 3-to-2, Seasoned-to-Veteran ratios turn out to be pretty
close to a fair fight. (Here's the details: 21 points of Russian guns to
16 points of French; French guns take 11 hits to kill the two stands,
Russian guns take 10 hits to kill the three stands; the French get
25% more hits per gun. Not quite even, but not completely unmatched
either.)
Both
sides had pretty close to the same number of troop quality bases
(same number of Veteran, Elite, and Guards), excepting the 350-odd
points of Russian Seasoned guns was balanced against 350-odd points
of French Veteran stands (a net plus of maybe 150 points to the
French in my estimation).
I
chose to play without Snappy Nappy's formation orders system (p. 16 -
Attack / Probe / Screen / Maneuver / Defend / WIthdraw / Rally).
Quite simply, across a dozen tables and upwards of 20 guys, as a GM I
find it virtually impossible to consistently and fairly enforce the
orders on players. I did allow players to Rally to recover morale
loss.
All
roads were primary roads for simplicity. In addition, players could
converse if on the same table and otherwise had to use written
messages.
Supply
My
readings of the campaign histories (Arnold & Petre) indicated how
uniquely severe was the issue of exposure and supply in this
campaign, short as the campaign was. As such, I spent an undue effort
trying to develop and boil down reasonable supply rules, bouncing
ideas off Peter, Russ, Phil, and Mark H., all of whom I can
absolutely credit with helping me get down to something that in fact
might have been reasonable. Oh - I should also mention that Peter
took it upon himself to create some FORTY-TWO supply wagons and some
dozen depot markers in anticipation of my needs. Turned out all was
for nought, as, come the day, I chickened out in order to get the
game moving in a timely way. In retrospect, it probably would have
been easy enough to play with the supply rules, but as I think Peter
has said somewhere, it is not clear the supply rules really would
have made much difference. Then again...., maybe we will get to see
and try them out some other time.
(For
a quick summary of the supply rules: Supply required each player to
drop a "Line-of-Communication marker" where he entered a
table and another one where he exited the table, making a string of
markers across tables that showed where his LOC traced. An enemy
interrupting this trace would be a bad thing, leading to a player who
lost his LOC having to start making one-shot morale checks for his
units.)
I
should note that supply and the risk to LOCs was one of the factors
I' had hoped would influence overall strategy and maneuver between
each side. Dropping the supply rules meant Napoleon did not quite
have that arrow in his quiver with which to threaten a deep Russian
advance (but then neither did Benningsen have such against Napoleon).
C'est la vie!
Historical
Set-up and Player Assignments
The
historical campaign situation demanded the French start "wrong
footed" (this expression being Peter's) with two French corps
out on a limb to the north, and the rest of the French army being far
to the south in and around Warsaw and Thorn. Historically, Bernadotte
(French I Corps) was covering the isolation of Danzig, while the
historical Ney (French VI Corps) had chosen to advance his forces
halfway across the map to as far as Schippenbeil (grid cell 2B on the
road map).
I
knew these historical French assignments were going to be horribly
challenging to the assigned French players, so I arranged for two
very experienced players (Mark M. as Ney and Robert - last year's
Napoleon - as Bernadotte). I also had standby players planned in case
one of these two could not make it. Unfortunately, Rob and the French
standby both had last minute issues keeping them away, which left
Mike getting slotted into the meat grinder that Bernadotte's command
suffered through.
If
truth be known, I had originally planned (heh, heh) for Russ and Dan
to be Ney and Bernadotte. However, when player requests came back,
pretty much a full slate of pre-registered players wanted to be
French, which bumped Russ and Dan to the Russians (they willing to
play either side).
Since
the historical Ney was actually rather out of touch with Imperial HQ
regarding his whereabouts and his plans, I had decided that initial
communications between between Ney and Napoleon would incur a
30-minute communication delay. This was just my best guess as to what
was fair, what would allow the situation to appropriately develop,
and whatnot. Bernadotte's messages would have the 15-to-20 minute
delay I used for most of the day with all messages.
The
historical Benningsen wanted to perform some sort of aggressive move
against Napoleon, but in fact knew little if anything of Ney's
advanced position and little of Bernadotte's (Bernadotte was just
arriving into position when the Russian onslaught hit him). As such,
the historical Benningsen marched rather far afield across what is
the top of the Operations map, striking westward (down on the map)
into Ney's position around Heilsburg and then into Bernadotte,
hitting both more by luck than design. I had no way to completely
keep Benningsen (the player) in the dark (I had borrowed the Arnold
book from him after all), but I of course told Peter little of the
French deployments, and he was a gentleman in not informing his
players what to possibly expect.
Because
I did not want to artificially constrain the Russians (I did not know
how to reasonably do so), I allowed them to enter however they wanted
from the top of the map (excepting the Johannisburg - Williamburg
road which they knew was out). [GM note: bit of a map screw-up on may
part - I failed to early catch that this road connected three DZs - a
distinct no-no, which I patched by shutting the road down.] Because
of the Russian flexibility in entering the playing area in a highly
coordinated way across a wide area of the map, I did try to
compensate the French. I made the Russian victory conditions require
they fight far to the west to obtain their most lucrative victory
points, thereby exposing the Russian LOC to potential thrusts by
Napoleon. Of course, dropping supply rules meant lessening the
seriousness of this threat.
Opening
Moves
Literally
knowing absolutely nothing of the either the Russian or French
pre-game plans, I still knew opening moves would almost certainly
follow a particular pattern, with Ney and Bernadotte being badly
surprised. As GM, I made every effort to insure this. The way these
two players reacted would largely determine the early part of the
game. As it happens, both chose to stand and fight, having no idea
if, when, or if ever succor might arrive or what affect their stand
might have on the game. In 20/20 hindsight, I do wish I had not
emphasized so strongly to all French that they were not allowed to
move off their starting table without Napoleon's explicit orders, as
players have a tendency to believe the GM in these things (to be
fair, I also qualified the restriction by saying, "No
moving..unless facing overwhelming odds", where to my mind, 2:1
is starting to get pretty overwhelming).
[As
an aside, I have to say that, myself, if the GM tells me I have to do
something that I consider military idiocy, I will risk being thrown
out of the game rather than follow his strictures. About once every
year or two I actually retreat my forces off table when it is my
judgment as a player that a scenario is unintentionally horribly
unbalanced and retreating is the intelligent response. But, then, I
must allow that's me.]
In
the game, Ney (Mark M.) started at Heilsburg (Table H, map grid 3C)
rather than Neidenburg (Table N) as Napoleon expected, and Ney was
the only French player allowed to move on the first turn (this being
essentially what happened with the Historical Ney). Quite the
surprise that in the first minutes of moving, French cavalry spotted
masses of Russians coming from the extreme east and Russians so
immediately spotted French! The one communication that went awry the
whole game was from the French cavalry spotting these Russians (sorry
Mark - but I'd predetermined it - that cavalry's warning was for YOU to
prepare, and we're only talking 10 minutes here), so Ney's first
report received by the Emperor came from when Russians started to
enter Ney's Table H at Heilsberg.
Shortly
afterwards, Russians maneuvering north of Ney (this would be Russ as
Osten-Sacken with the Russian 3rd Division) and Dan (as Golitsyn with
the 2nd Russian Division) debouched almost simultaneously in front of
Bernadotte on Table D (the Danzig table - are you getting the theme
how tables got their letter IDs?). Bernadotte, so it seemed to the GM
anyway, seemed not well apprised of the overall strategic situation,
he was set up mid-table and not covering his LOC or possible retreat
path. Again, to be fair, because the LOC was made a non-issue, We are
responsible (note due use of the "royal We" here).
Excepting
for a message Bernadotte sent to Napoleon literally just minutes
before the arrival of the Russians (something about the wonderful
brothels his men were finding in the Danzig area), near as I know,
there were no further communications from Bernadotte to Napoleon
informing Nappy about Bernadotte's predicament. However, I may have
this wrong, as Napoleon (Seth) once he heard of the Russian movements
from Ney certainly started to move heaven, earth, and all the French
to Danzig (including trying to order Ney there!). Ney of course was
messaging madly away, but, dang, he was far from where the
established Imperial Courier service routes.
The
net result was that, unlike their historical counterparts who turned
and bolted for their lives, our Ney and Bernadotte dug in and refused
to budge, becoming anvils that the on-coming Russian masses pounded
against.
Development
of the Game
The
opening moves started I believe a tad bit before 11am, with the first
two GM-controlled moves completed I believe around 11:15am. Ney's
scouting cavalry spotted the Russians at about 11:20am, with the
Russians seriously entering Ney's table shortly after 11:30. I would
guess this was about the arrival time of the Russians on Bernadotte's
table also. Napoleon received Ney's first missive at 11:55am, with
French orders going out shortly thereafter.
In
the time lapse video, I notice all French disappearing from their
starting table around 12:15 - 12:20 and quite literally everybody is
off-camera by 12:30pm, indicating they are at least to the Allenstein
or Jankovo tables (Tables A & J), and approaching the Danzig
table. Truth to tell, French movements got really hazy for me as the
GM at this point until so many of them had arrived at the Danzig
table, starting to do so a tad before 13:00 and continuing into
Danzig until around 14:00 (there's a 13:00 message from Soult saying
he is deploying for entry to the Danzig table). Anyway, I make out
that the fight on the Danzig table had been going for a good 90
minutes by the time serious French reinforcements were arriving, and
it was to continue for over a further three hours before I called the
action. It seemed to me, both from AARs and from my sense that the
French were rather bottlenecked on the routes and DZs they used to
get into Danzig. I certainly might have this wrong.
From
messages, there seemed to have been some peeking back and forth of
Allies and French from the Elditten (Table E) and Mehlsack (Table M)
tables, but no serious thrusts.
L'Estocq
(Mark T.) covered the Russian rear at Mehlsack and Danzig, but seemed
to have largely kept himself in reserve, until around 15:00 when he
left half his forces covering the Russian LOC at Mehlsack (I
believe), using the other half of his force to make a half-hearted
move for Jankovo (Table J, a vital victory point for the Allies).
Finding the route unguarded, he slipped into Jankovo thereby
"relieving the isolation of Graudenz" (a 1 VP credit).
By
entering Jankovo, I make out that the Prussians, in addition to
relieving Graudenz, had simultaneously cut the main French LOC
(again, as I understand it and allowing we didn't play with LOCs,
sigh). No gold, but certainly Glory. (Peter - actually, as the campaign rules were written, as long as the forces were "in combat", the supply rules didn't apply as far as having to take morale checks for being out of supply. Thus I personally doubt the supply rules would have made any real difference here)
Meantime,
Ney's remnants had escaped Heilsburg, heading west (downwards on the
Op map) to try to link up with Napoleon at Marienburg (on the Danzig
table). Instead, Ney encountered the Prussians at Jankovo just in
time to prevent the Prussians from moving freely on towards and
threatening Thorn, Warsaw, and the main French depots. However, Ney's
presence recaptured the Glory by blocking the Prussian threat to the
French depots behind him at Neidenburg and further south at Warsaw
and Thorn. Had we played say another two hours, who knows what would
have happened here, but at some point, all good things come to an
end, and night falls. C'est le guerre.
Whilst
all the sturm und drang around Danzig occurred, up at Bishofsburg on
Table U, Max (Davout, French III Corps) and Jim (Sedmoratzky, Russian
6th Division) were having a hammer-and-tongs knockdown, drag-out
fight-to-the-death of their own. I witnessed most of this directly,
helping GM much of it. I
make out that about 12:30pm on Table U at Bischofsburg, Davout
encountered Sedmoratzky. Sedmoratzky's mission was to be the
easternmost blocking force protecting the main Russian army LOC back
into Russia. For almost four hours the two of them went at each
other, with Davout finally out of cavalry and his infantry in
defensive squares. (Davout only had one unit, but Sedmoratzky had two
cavalry units). Sedmoratzky ultimately got the better of the French, in
no small part thanks to the 18" Russian command radius allowing
him to swing his cav wide around and into Davout's.
[As
a sidebar GM comment here: I fear the Duke of Auerstadt failed to
appreciate the quality of his elite infantry, as even when in column
against enemy cavalry, his 3-base elite infantry could have been
quite a match against cavalry. However, to be fair, it was not until
the next day that I realized this myself. Then again, I was not there
and do not really know what happened exactly or how things
transpired. I just know the two of them had one heck of a knockdown
drag-out fight lasting I'd guess at least two-dozen turns.]
A
Note on Messages and Depth of Player Experience
The
Allied commanders were fast and furious in sending messages back and
forth and trying to keep Benningsen informed. In contrast, the vast
bulk of messages on the French side seemed principally from Napoleon,
with relatively few originating from his Corps commanders. To be
fair, Napoleon seemed to have traveled closely with his troops, which
would have allowed him to command without messages and without
needing reports from his commanders. However, in contrast, Davout was
strictly a messaging affair with very little information traveling in
either direction (one message per hour or so). On the Allied side
between Bennigsen and Sedmoratzky, there was nearly three times the
number of messages. The point being that in general, the Allies made
a concerted effort to maintain communications. Truth to tell though,
this came largely from the great efforts and experience of Peter,
Russ, and Dan, and we might all profit in future play from the
example. (Peter: there is a log of all the messages sent at the end of this post)
As
another observation that Peter has made to me, the Allies were pretty
good about marching along parallel roads and using different
deployment zones from each other. The French, particularly in terms
of getting to and onto the Danzig table seemed to have some
bottlenecking going on. I give Peter credit (as, ahem does he
himself), for having run three of these campaigns previously and seen
the great import of using parallel routes to avoid players clogging a
common path. That
bataillon carré thing of Napoleon's did and does
indeed work. (Peter: you took the words right out of my mouth about the "battalion carre". Oh, and that was Bennigsen patting himself on the back... sorta!)
The
Might Have Beens
This
is the Wild Speculation Section, with no necessary justification for
being right, merely for being a bad historian and slinging historical
mud at the respective commanders for all their supposed missed
opportunities. I trust you all take it with an appropriate grain of
salt. :)
The
first might-have-been I saw was Osten (Russ) continuing to make his
way down to Danzig when, having spotted Ney to his south, he might
have cut in behind Ney, completely taking him in the rear while Ney
was being bludgeoned by the massive assault to his front. Instead of
a three-hour battle, it might have only been 90 minutes. Even Ney's
magnificent morale dice could not have mastered charges into his
rear. But, no, Osten-Sacken had to follow orders and continue to
Danzig, there to annihilate Bernadotte. (Peter: Yes, he was following orders, and if you check the messages, you will see that at one point I suggested this course to him. By the time the delays in messages had taken it's toll, it was LONG past the point where this would have been possible even when I wrote it.)
As
for Ney, Bravest of the Brave, Zaniest of the Crazies, truly a
magnificent fight. I make out he single-handedly held open the French
army's main route into Danzig (as far as I understand the matter at
the moment).
If
I understand it properly, most of the French coming from Warsaw and
Soldau (Tables W & S), heading towards Danzig, had to travel
through either Allenstein (Table A) or Jankovo (Table J). (But not
Murat from Thorn as I know he took the "Vistula scenic route"
via Table Y to get to Danzig, though it appears to me he did transit
through Jankovo himself?)
Had
Ney withdrawn early, the Russians would likely have advanced to Table
A at Allenstein, making a French advance through Table A or through
Jankovo to Danzig highly unlikely. The big fight then likely
occurring around Allenstein [a GM original expectation, if truth be
known]. So, kudos to Ney for holding open the door for the French
move on Danzig.
On
the other hand, whilst Bernadotte would surely have been sacrificed
had Ney fallen back, Ney would have met up with the main French army,
then turning to take on the forces chasing him. I expect the French
would have enjoyed a decided superiority in force on Table A (or
possibly Table N), at least until Osten and Golitsyn could finish
munching Bernadotte and arrive to help. A big fight on Table A might
also have allowed forces to be sent to Davout's aid to turn the
Russian eastern flank (or vice versa - Russian forces to aid
Sedmoratzky to drive Davout back and then perhaps slipping into
Neidenburg (Table N) behind the French fighting on Table A. Ah, so
many possibilities.
Then
there is Ney's retreat at the end, fortuitously blocking Allied easy
movement against the French depots. Without Ney retreating when he
did, the door to the French larder would have been all but open to
the Prussians. T'is better to be lucky than good, so I've heard it
said.
As
for other might-have-beens, there are some interesting ones.
At
14:20, I surveyed the tables, marking the forces on a map (see photo
- cannon indicate major battles, infantry stands indicate a screening
force). There were major battles at:
- Table U (Bischofsburg)
- Davout & Sedmoratzky,
- Table H (Heilsburg) -
Ney's battle,
- Table D (Marienburg) -
Bernadotte's battle,
Screening
forces at:
- Table E (Elditten) -
Allied screening forces
- Table J (Jankovo) -
French screening Lt Cav
- Table N (Neidenburg) -
French screening Lt Cav
James Overview map as of 14:20
The
above configuration in fact precluded either side trivially walking
across the other side's LOC without detection. However, any player's
force could easily have brushed aside the above screening forces,
allowing a direct threat to the enemy rear. This is strictly my
general perception and without any detailed knowledge of the specific
tactical or operational considerations.
About
15:00, I took Benningsen and Napoleon both aside, to pointedly
indicate there likely were still maneuver opportunities across the
tables. I just wanted to make sure both commanders did not let
opportunity slip for lack of considering the map and the
possibilities. Perhaps a bit intrusive as the GM, but I figured it a
level playing field - both sides had equal opportunities (though I'll
allow I did not know what), and I brought up the point with the two
of them present together. As it happens, both demurred, feeling they
were fully committed and happy with their current deployments. I
raise this matter so players know that things did not happen by
default but that both commanders were fully cognizant and in command
of the situation. Kudos to them. :)
(Peter: It was clear that unless relief was forthcoming for Golitsyn and Osten-Saacken, "bad things" were going to happen for the Russians at Danzig with them facing Lannes, Soult, Murat, and later Augereau and the Guard! Thus I sent Ostermann-Tolstoi on to the Danzig/Marienburg table via a new route, opening up a new front on that table and pretty much guaranteeing that many hours of fighting would be needed for any real resolution - fine by me, as we had already accounted for Bernadotte and Ney (sort of). Once I realized that the situation at Marienburg/Danzig was going to be an extended deadlock with Ostermann-Tolstoi added to the mix, I counter-marched the Guard to Uertelsberg/Bischofsburg ("Benny and the Jets!"), where it seemed likely that the appearance of even 4 units of Fresh, elite troops would probably suffice to end the stalemate there between Sedmoratsky and Davout, and thus possibly eliminating yet a third French Corps from play. Then Sedmoratsky and I might have had the chance to press on to Warsaw. If I'd thought of this earlier, and headed that way initially from Heilsberg after Ney's defeat, instead of following Osterman-Tolstoi towards Danzig, I might have had sufficient time to make that plan come to fruition by the end of the game. Couldda, Wouldda, Shouldda!)
At
15:30, I again surveyed the tables to lay out a map illustrating the
overall situation (see the other photo).
James Overview map as of 15:30
The
situation is much the same as at 14:20, but the Heilsburg battle had
ended and Allied forces had moved into Allenstein (Table A), with
Ney's force doing it's blocking effort down at Jankovo against the
Prussians. The Allied force at Allenstein (Brian - Tuchkov's 5th Div?)
could have pushed on into Neidenburg (Table N) against the light
French screen there (say, leaving a covering force at Allenstein to
protect the Russian LOC back through Elditten and Mehlasck). Instead,
this force turned west (downwards on the map) to chase Ney. Not an
unreasonable decision as the Prussians (to me) looked like they were
getting beat up by Ney's remnants until Brian arrived. Even then,
Ney looked like he was full of fight, again out numbered some
three-to-one. Ah, you got to love the crazy fool.
(Peter: actually, Brian had specific orders to pursue Ney, and if possible, come upon the Danzig table from behind via table J, i.e. via the J7/D3 Deployment zones. The appearance of the new "reserve" French Corps from Warsaw under Rapp (Mike), and Ney's aggressive actions prevented that from happening. However, Lestocq did manage to sneak into Jankovo, relieving Graudenz and scoring another VP - good opportunism on his part! As for Ney, he truly deserved the "Bravest of the Brave" sobriquet that day!).
Anyway,
I am heading off to the Huzzah convention tomorrow in Portand, ME for
the weekend. Hopefully, I will see (have seen?) some of you there and
we can continue hashing the glories.
Thanks
all for what I truly found has been a very enjoyable time and
project. And again, particular thanks to Peter for his efforts and
support.
James
(Peter: Thank YOU, James! You did a super job, and put in a heck of a lot of hard work. It very much showed in the final product! Best of all, I didn't have to do it this year, and maybe Dan will do it next year! Hope you have a great time at Huzzah! Perhaps I'll make it there some year if I don't go to Historicon. I am increasingly thinking of doing a Snappy Nappy Campaign in a Day there at some point - maybe 2018?
Thanks also to Greg who did a great job "dressing" 3 tables, and Joe and Mark who each did one as well. That's a HUGE help, guys!)
The Winter 1807 Campaign Message Log
| # |
From |
Location |
To |
Message |
Deliv |
Sent |
|
|
|
|
|
|
|
| 1 |
Golitsyn |
Eylau |
Bennigsen |
Ney's cavalry appear at Eylau |
1142 |
1122 |
| 2 |
Ney |
Konigsburg |
Napoleon |
My Chasseurs found Russian army. 6 heavy cav units, 20 inf units. Russians moving west toward E5 [and] M2 |
1155 |
1125 |
| 3 |
Ney |
Heilsburg |
Napoleon |
Lots & lots of Russians marching from Koenigsburg toward Eylau (B2) |
1202 |
1132 |
| 4 |
Ney |
Heilsburg |
Napoleon |
Under attack by lots of Russian cavalry |
1208 |
1138 |
| 5 |
Osten |
|
Bennigsen |
Ney Division at Heilsberg - 5 inf, 3 cav, 1 art |
1156 |
1136 |
| 6 |
Ney |
Rasenberg (B3) |
Napoleon |
Lots more Rus cav & inf leaving Rasenberg going west |
1208 |
1138 |
| 7 |
Golitsyn |
Eylau (A1) |
Bennigsen |
Ney's scout have sighted our commands. Sackens scouts sighted Ney south of Eylau. L'estoc is in front of me. Do you want me to attack Ney's corps. |
1202 |
1142 |
| 8 |
Osten |
|
Bennigsen |
At Guttstadt, passing thru Elditten |
1210 |
1150 |
| 9 |
Bernadotte |
Marienburg |
Napoleon |
The best looking women are here in Danzig!! |
1214 |
1154 |
| 10 |
Napoleon |
Pultusk |
Bernadotte |
Ney reports Russian force approach/[UNREADABLE] from east. Defend Marienburg. |
1220 |
1200 |
| 11 |
Napoleon |
Pultusk |
Ney |
March to Marineburg. Reinforce Bernadotte. [NOT CLEAR IF MESSAGE WAS SENT AS IT WAS CROSSED OUT] |
1220 |
1200 |
| 12 |
Bennigsen |
Rasenberg (B3) |
Golitsyn |
Yes attack Ney & drive him back. |
1221 |
1201 |
| 13 |
Osten |
|
Bennigsen |
French I Corps Bernadotte at Marienburg (near Danzig). 3rd Div (me) & Prussians I Corp arrived, 4th Div (Golitsyn) behind Prus. |
1222 |
1202 |
| 14 |
Napoleon |
Pultusk |
Murat |
March to Liebmuhl via Soldau, Jankovo. Detach one division to screen Warsay at Neidenburg. |
1222 |
1202 |
| 15 |
Bennigsen |
W. of Rastenburg |
Golitsyn |
Yes attack Ney, drive him back/off & proceed on. |
1223 |
1203 |
| 16 |
Napoleon |
Pultusk |
Lannes |
March to Elditten via Prassnitz - Allenstein - Deppen |
1225 |
1205 |
| 17 |
Napoleon |
Pultusk |
Davout |
March to Elditten via Prassnitz - Hatenburg - Heilsburg |
1225 |
1205 |
| 18 |
Golitsyn |
Outside Danzig |
Bennigsen |
L'estoq, sacken, & I have contacted Benadotte outside Danzig. |
1228 |
1208 |
| 19 |
Osten |
|
Tuchkov |
3rd Div (Osten), I Prussian (L'Estoq) & 4th (Golitsyn) are at Marienburg (near Danzig) --> French = I Corp |
1228 |
1208 |
| 20 |
Napoleon |
Pultusk |
Augereau |
March to Elditten via Plonsk - Soldau - Jankovo |
1210 |
1205/1210 |
| 21 |
Bennigsen |
W. of Rastenburg |
Osten |
Have you made contact w/ Lestoq? If so he should march on Danzig ASAP |
1231 |
1211 |
| 22 |
Bennigsen |
W. of Rastenburg |
Golitsyn |
Where is Lestoq? Have him report and L'estoq should press on to Danzig to raise [??] it |
1231 |
1211 |
| 23 |
Bennigsen |
W. of Rastenburg |
Osten |
Attack Bernadotte and relieve the siege [sic] of Danzig |
1237 |
1217 |
| 24 |
Osten |
|
Bennigsen |
Engaging Bernadotte to try and relieve Danzig. Prussiand & 3rd Div deployed. 4th Div. Coming on. |
1238 |
1218 |
| 25 |
Ney |
Heilsburg |
Napoleon |
Facting two Russian Corps. 6 cav units, 12 inf units, 6 guns. Will hold as long as I can. |
1240 |
1220 |
| 26 |
Sedmoratzky |
Bischofsburg |
Bennigsen |
Battle sounds heard coming from Heilsburg. Should I reinforce our troops, privide back up, what? Sir? |
1241 |
1221 |
| 27 |
Bennigsen |
Heilsburg |
Osten |
If you are not engaged and can march East to Heilsberg you can do so if feasible. |
1250 |
1230 |
| 28 |
Ney |
Heilsburg |
Napoleon |
A third Russian Corps just showed up (see map on reverse) |
1250 |
1230 |
| 29 |
Ney |
Heilsburg |
Napoleon |
Received your order from noon to march to help Bernadotte. Unable to do sor for nowas am facing 3 Russian Corps. |
1255 |
1235 |
| 30 |
Davout |
Zandy |
Napoleon |
Russian 6th Division blocking road to Heilsberg. Advancing to engage. |
1256 |
1236 |
| 31 |
Golitsyn |
Outside Danzig |
Bennigsen |
L'estoq, Sacken & I are triple teaming Bernadotte. |
1257 |
1237 |
| 32 |
Murat |
|
Napoleon |
Only my Lt Cav Div at Niedenburg. No enemy, do I stay put? |
1304 |
1244 |
| 33 |
Bennigsen |
Heilsburg |
Osten |
If you can march East on Heilsberg to take Ney in rear, do so. Otherwise attack Bernadotte to relieve Danzig. |
1305 |
1245 |
| 34 |
Bennigsen |
Heilsburg |
Golitsyn |
Attack Bernadotte & relieve Danzig |
1305 |
1245 |
| 35 |
Lannes |
Allenstein - Jankovo |
Napoleon |
No contact yet. |
1305 |
1245 |
| 36 |
Osten |
|
Bennigsen |
Soult (IV Corp) entered Marienburg - Danzig table. 3rd Russian Cav presses (??) past M'burg.4th Div (Golitsyn) pressing towards Danzig. Both advancing. |
1305 |
1245 |
| 37 |
Bennigsen |
Heilsburg |
Sedmoratzky |
We have 4:1 advatnage at Heilsberg. Hold your postion. |
1308 |
1248 |
| 38 |
Osten |
|
Bennigsen |
Fully engaged w/ Bernadotte and Soult is on my flank (came from Oserode/Liebmul). I Corp Prussians are marching to intercept Soult. |
1313 |
1253 |
| 39 |
Soult |
Marienburg |
Napoleon |
I marched thrugh Jankovo (4D). I am deploying at Marienburg in support of Bernadotte, on the flank of Russian I Corps Lestoq. |
1320 |
1300 |
| 40 |
Lannes |
Elditton/Gutstadt |
Napoleon |
Prussians coming up the road from Mehlsack [UNREADABLE] |
1323 |
1303 |
| 41 |
Bennigsen |
Heilsburg |
Sedmoratzky |
Ney is gradually being defeated. What is your status? |
1325 |
1305 |
| 42 |
Osten |
|
Bennigsen |
French I Cav Corps comng on M'burg - Danzig table behind Soult. Prussian I Corp left. |
1329 |
1309 |
| 43 |
Napoleon |
Jankovo |
Lannes |
March to Pr Holland |
1332 |
1312 |
| 44 |
Ney |
Heilsburg |
Napoleon |
Have you not received my messages? Have been facing 3 Russian Corps since 11:38 - cannot disengage. |
1339 |
1319 |
| 45 |
Bennigsen |
Heilsburg |
Osten |
OK, continue to attempt relief of Danzig & defeat French. 2 Russian corps assalting Ney near Heilsburg - stubborn defense. |
1340 |
1320 |
| 46 |
L'Estocq |
Guttstadt |
Bennigsen |
5th Corp in fight [??] [SCRATCHED OUT MATERIAL] Mehlsack at threat! I will fall back! 2 Russian corp fighting at Danzig! |
1342 |
1322 |
| 47 |
Sedmoratzky |
Bischofsburg |
Bennigsen |
Sir - I'm holding 3rd Corps French and slowly being worn down - will fight to bitter end if [UNINTELLIGIBLE] |
1342 |
1322 |
| 48 |
Bennigsen |
Heilsburg |
Sedmoratzky |
I hear gunfire from Bischofsburg. What is your status? |
1350 |
1330 |
| 49 |
Ney |
Heilsburg |
Napoleon |
The Tsar and Guards are here now - still fighting. |
1353 |
1333 |
| 50 |
Osten |
|
Bennigsen |
IV Corp & I Cav Corp on table in M'burg. L'estocq [??] towards Danzig. Possible 3rd Corp coming too. |
1356 |
1336 |
| 51 |
Lannes |
Guttstadt |
Napoleon |
Prussian Corp retreated w/o fight the way the came (Mehlsack/M3). PURSUE? |
1357 |
1337 |
| 52 |
Bennigsen |
Heilsburg |
Golitsyn |
2 Corps + Guard engaged w/ Ney - valiant defense (rolls high all the time! :)). Continue to defeat Bernadotte & relieve Danzig. |
1359 |
1339 |
| 53 |
Golitsyn |
Danzig |
Bennigsen |
L'estoq left the field. Soult & Murat are arriving to help Benadotte, who is in a bad way. |
1400 |
1340 |
| 54 |
Bennigsen |
Heilsburg |
Sedmoratzky |
Very good, carry on and hold your positon vs 3rd Corps. |
1400 |
1340 |
| 55 |
Golitsyn |
Danzig |
Bennigsen |
Lannes is arriving, so Soult, Murat, and the rest of Bernadottte will be fighting Sacken and I. |
1404 |
1344 |
| 56 |
Bennigsen |
Heilsburg |
L'Estocq |
OK to withdraw gradually. We are attempting to destroy Ney here. |
1405 |
1345 |
| 57 |
Sedmoratzky |
Bischofsburg |
Bennigsen |
Sir, I'm currently heavily engaged in battle with Davout's 3rd Corps |
1410 |
1350 |
| 58 |
Davout |
Bischofsburg |
Napoleon |
Have taken 1/2 of Biscofsburg. Fighting 7th Division. |
1410 |
1350 |
| 59 |
Napoleon |
Marienburg |
Ney |
You may withdraw your corps. Surviving more important than position. Main army at Marienburg. |
1411 |
1351 |
| 60 |
Bennigsen |
Heilsburg |
Osten |
Believe 3rd Corps engaged with 6th Div at Bischofsburg. We remain [??] slowly grinding down Ney. |
1413 |
1353 |
| 61 |
Napoleon |
Marienburg |
Lannes |
March to Heilsberg to support Ney. |
1414 |
1354 |
| 62 |
Osten |
|
Bennigsen |
French V Corps arrived from Guttstadt. The collapse is beginning. 3 vs 3rd isn't going to hold. |
1416 |
1356 |
| 63 |
Bennigsen |
Heilsburg |
Golitsyn |
Carry on w/ defeat of Bernadotte & relief of Danzig. |
1418 |
1358 |
| 64 |
Napoleon |
Marienburg |
Davout |
Report? |
1428 |
1408 |
| 65 |
Ney |
Heilsburg |
Napoleon |
Position critical - can only hold a few more turns - will hold on as long as I can. |
1430 |
1410 |
| 66 |
Bennigsen |
Heilsburg |
Golitsyn |
We are completing destructon of Ney and then should be able to release some forces. |
1431 |
1411 |
| 67 |
Osten |
|
Bennigsen |
Osten capture marienburg, but collapsing under pressure of two French Corps. 4th Div. Overruning French I Corps Bernadotte |
1447 |
1427 |
| 68 |
L'Estoq |
Elbing |
Bennigsen |
Me & 1 Hvy Cav, 2 Lt Cav, 2 Inf, 1 artillery proceeding to Jankovo. Rest stays in Elbing. |
1449 |
1429 |
| 69 |
Bennigsen |
Heilsburg |
Golitsyn |
Ney is slowly crumbling but still holding here. |
1450 |
1430 |
| 70 |
Golitsyn |
Danzig |
Bennigsen |
Bernadotte virutally destroyed (2 units left). Danzig relieved - for now. 3 new French Corps are advancing. |
1450 |
1430 |
| 71 |
Osten |
|
Bennigsen |
VII Corp French arriving from south, also heading to Danzig. Got IV Corp, V Corps, VII Corp & I Cav Corp on table heading towards Danzig, will take time, out… [??] |
1454 |
1434 |
| 72 |
Napoleon |
Marienburg |
Ney |
Holding not necessary. Return to Bischanburg [??] or Elditten |
1457 |
1437 |
| 73 |
Bennigsen |
Bischofsburg |
Tuchkov |
Hold your position & prevent French from going for Danzig [??]. I am assisting Sedmoratzky in defeating Davout, then will march to [UNINTELLIGBLE] |
1505 |
1445 |
| 74 |
Davout |
Bischofsburg |
Napoleon |
Fully engaged. No breakthrough soon. |
1510 |
1450 |
| 75 |
Bennigsen |
Heilsburg |
Sedmoratzky |
Ney is defeated, remnants coming toward you followed by Tuchkov's Russians. |
1513 |
1453 |
| 76 |
Bennigsen |
Heilsburg |
Golitsyn |
Ney is defeated, remnants retreating to Biscofsburg [??]. We are marching on Elditten w/ 1 Corp [??] & Guard |
1520 |
1500 |
| 77 |
Bennigsen |
Heilsburg |
Osten |
Ney defeated, marching on Elditten. |
1522 |
1502 |
| 78 |
Bennigsen |
Heilsburg |
L'Estocq |
Ney defeated, withdrawing to Allenstein. We are marching on Elditten w/ 1 Corp & guard. |
1523 |
1503 |
| 79 |
Ney |
S. of Heilsburg |
Napoleon |
Have held them for 3 1/2 hours. Have 2 cav, 1 inf left - am going to Marienburg. |
1525 |
1505 |
| 80 |
Napoleon |
Marienburg |
Rapp |
March to Heilsberg via Plonsk - Neidenburg - Allenstein - Queelz. |
1525 |
1505 |
| 81 |
Osten |
|
Bennigsen |
Bernadotte corp overrun & marshal captured! V Corps advanced to M'burg. 3rd Div disintegrating. |
1525 |
1505 |
| 82 |
Golitsyn |
Danzig |
Bennigsen |
Captured Bernadotte. His corps is gone. About to engage Soult, Lannes, & Murat. |
1528 |
1508 |
| 83 |
Bennigsen |
Heilsburg |
Tuchkov |
Move on Amsteffen [??] - Jankovo - attack Danzig from rear in person [??] |
1535 |
1515 |
| 84 |
Bennigsen |
Heilsburg-Elditten |
Osterman-Tolstoi |
Verbal order - move to Elditten then Preussidche Holland |
1540 |
1520 |
| 85 |
Sedmoratzky |
Bischofsburg |
Bennigsen |
All necessary aid is in smashing the French squares, sir! |
1550 |
1530 |
| 86 |
Bennigsen |
Elditten |
Sedmoratzky |
We are marching on Danzig. What is your status? |
1550 |
1530 |
| 87 |
Bennigsen |
Elditten |
Tuchkov |
We are on flank of French near Preussische Holland. What is your status? |
1555 |
1535 |
| 88 |
Sedmoratzky |
Bischofsburg |
Bennigsen |
Sir, cavalry turned Davout's right flank & are rampaging through his rear, casualties on both sides mounting. |
1556 |
1536 |
| 89 |
Bennigsen |
Elditten/Danzig |
Sedmoratzky |
Very good, my general. Do you require any assistance? |
1605 |
1545 |
| 90 |
Tuchkov |
Jankovo |
Bennigsen |
Am outside Jankovo. Have contacted one full [??] Fr. Div. Plus 2 cav & 1 inf [UNINTELLIGIBLE] from shattered Ney Fr. Corp. |
1609 |
1549 |