


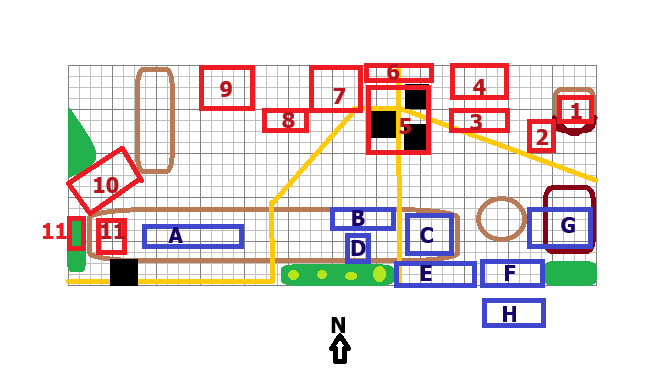
Battle of Salamanca, July 22, 1812
Allied Army: Wellesley (Exceptional LD 12+1) 31 units
7 - Cavalry Division: Stapleton Cotton/Anson (Skilled LD 12)
Two Dragoon units (DD 8, CD 12) #
One Light Dragoon unit (DD 6, CD 12) #
11 - D’Urban: (Average LD 10)
One Portuguese Cavalry unit (DD 6, LD 10)
One Hussar unit (DD 6, CD 12) #
10 - 3rd Division: Packenham (Skilled LD 12)
Two British infantry units (DD 8, CD 12)
One Portuguese infantry unit (DD 6, CD 10)
One Horse Artillery battery (DD 8, CD 12)
3 - 4th Division: Lowry Cole (Poor LD 8)
One British infantry unit (DD 6, CD 10)
One British infantry units (DD 6, CD 10) (at 1)
One Portuguese infantry unit (DD 6, CD 10)
One Foot battery (DD 6, CD 12) (at 1)
Note: 4th Division had taken heavy casualties at the assault upon the Trinidad breach at Badajos in April).
5 - 5th Division: Leith (Skilled LD 12)
Three British infantry units (DD 8, CD 10)
One Portuguese infantry unit (DD6, CD 10)
One Foot battery (DD6, CD 12)
4 - 6th Division: Clinton (Skilled LD 12)
Two British infantry units (DD 8, CD 10)
One Portuguese infantry unit (DD 6, CD 10)
One Foot battery (DD 6, CD 12)
6 - 7th Division: Hope (Skilled LD 12)
One British infantry unit (DD 8, CD 10)
One Brunswick Oels infantry unit (DD6 CD 10 Light Infantry)
One Chasseurs Britannique infantry unit (DD 6 CD 10)
One Foot battery (DD 6, CD 12)
9 - Spanish Division: Espagnac (Skilled LD 12)
Two Spanish infantry (DD 6, CD 10)
2 - Pack’s Brigade: (Skilled LD 12)
One Portuguese infantry unit (DD 6, CD 10)
One Portuguese Cacadores SK infantry unit (DD 6, CD 10 Light Infantry, Rifles)
8 - Bradford’s Brigade: (Average LD 10)
One Portuguese infantry unit (DD 6 CD 10)
# These British Cavalry units are subject to “pursuit”; if they win a Melee on an Odd roll, they lose UI equal to
French Army: Marmont (Average LD 10) 31 units
Note: Marmont was seriously wounded on the Greater Arapiles sometime after 3pm and was replaced by
Bonnet when Clausel couldn't be found. Bonnet was seriously wounded soon after and replaced by Clausel
who had reappeared after going to get an injured heel dressed. In effect, command of the army changed
three times in an hour and confusion reigned in this vital period immediately prior to Wellington's attack.
F - Heavy Cavalry Division: Boyer (Average LD 10)
Two Dragoon units (DD 6, CD 12)
One Horse battery (DD 8, CD 12)
D - Light Cavalry Division: Curto (Reliable, 4 DMP)
Two Chasseurs a Cheval units (DD6, CD 10)
C - 2nd Division: Clausel (Average LD 10)
One French Leger unit (DD 8, CD 12 Light Infantry)
Three French Line unit (DD 6, CD 10)
One Foot battery (DD 6, CD 12)
G - 4th Division: Bonnet (Average, LD 10)
One French Leger unit (DD 8, CD 12 Light Infantry)
Three French Line units (DD 6, CD 10)
One Foot battery (DD 6, CD 12)
B - 5th Division: Maucune (Average, LD 10)
One French Leger unit (DD 8, CD 12 Light Infantry)
Two French Line units (DD 8, CD 10)
Two Foot batteries (DD 6, CD 12)
E - 6th Division: Brennier ((Average, LD 10)
One French Leger unit (DD 8, CD 12 Light Infantry)
Two French Line units (DD 6, CD 10)
One FootI battery (DD 6, CD 12)
A - 7th Division: Thomieres (Average, LD 10)
One French Leger unit (DD 8, CD 12)
Two 4UI French Line unit (DD 6, CD 10)
One Foot battery (DD 6, CD 12)
Note: The French Line unit closest to the British is surprised, and probably in panic. This is represented by a
disordered column of attack.
H - 8th Division: Sarrut ((Reliable, DMP)
One French Leger unit (DD 8, CD 12)
Two French Line units (DD 6, CD 10
One Foot battery (DD 6, CD 12)
Note: This division starts the game off table. It cannot arrive before the second MOVE card.
See Time and Arrivals.
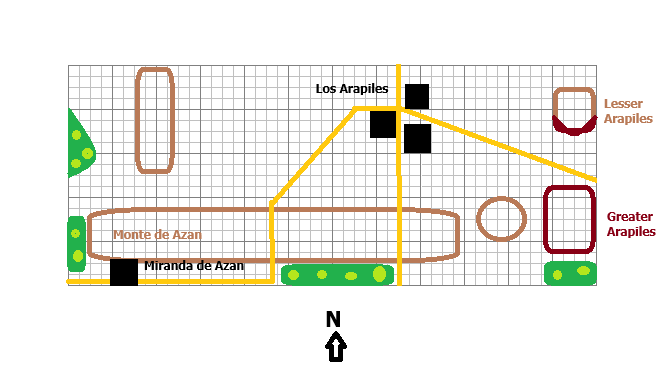
TERRAIN
Lesser Apariles: At the eastern end of the field, and in British possession, is the Lesser [or Southern] Arapiles.
This is a cone that rises out of the plain and is rocky and steep on its northern facing slopes (Class III terrain) but
much less so on its southern facing slopes (Class II terrain).
Greater Arapiles: Opposite the Lesser Arapiles, and in French possession, is the longer, Greater Arapiles. This hill is steep and
rocky on every side topped by a natural terrace supported on a 1m to 2m high vertical cliff face (Class II terrain).
Infantry (line deployment only) and artillery on the terrace can fire down from a superior position, count as
obscured to fire from below the rim, and will count as defending a fortification if charged.
Note: Artillery on the terrace had insufficient gun depression to fire on any troops climbing the hill’s slopes.
Los Arapiles: Directly west of the Lesser Arapiles, and centrally placed within the British deployment, is the
village of Los Arapiles. This linear village runs east to west and comprises stone buildings (Class II terrain and cover).
The Monte de Azan: Is a low, undulating, three mile long plateau; described as ‘ideal for marching’. The bulk of the French army is
presently deployed on it, or making its way westward on or behind it. It obscures units 3" beyond the facing contour
but does not provide a superior position for fire or defense. Troops marching on top of it gain the 3" rate bonus
for road movement - it's 'The Monte de Azan Superhighway'.
Other terrain features: These include the small village of Miranda de Azan (class III terrain)which stands at the north western end of the
Monte de Azan; two pieces of gently rolling high ground (Class II terrain), one between the Greater Arapiles and the
Monte de Azan, the other extending from the northern edge of the battlefield to the western end of the Monte de Azan)
which provide dead ground to troops behind them; and several areas of open, cork tree woodland that dot the battlefield’s
edges, especially south of the French position (class II Terrain). Lastly, there are four roads radiating from Los Arapiles.
The Los Arapiles to Miranda de Azan road is important in game terms because it serves as a delineating feature for
British victory objectives (see below).
TIME AND ARRIVALS
The game will commence with the armies deployed as they were at about 4.00pm.
Marmont and Bonnet have already been wounded and carried from the field and French command has devolved
Bonnet with 8th Division is holding the Greater Arapiles, Clausel's 2nd Division and Maucune's 5th Division have
Packenham and D'Urban with orders to 'sweep all before them' on the Monte de Azan and are about to assault
received orders to attack (see Victory Conditions below).
Surprise Attack:
The game starts with the British getting an unopposed pre-turn one initiative phase of 4 initiative points. This phase can
only be used to activate D'Urban and Packenham in an effort to take full advantage of their successful 'ambush'
of Thomieres column. As soon as this phase is over any surprise has been lost: The British deck is shuffled - the game
begins with turn one.
Tardy Sarrut:
From the second French MOVE, the French player can start dicing for arrival: On the second card roll D8 Vs D8;
on the third MOVE card roll D12 Vs D8 and if 4th Division rolls higher it can arrive then. It will arrive on the fourth
MOVE card (historical arrival) in any event. Sarrut arrives over the southern table edge between the south eastern corner
and the start of the Monte de Azan.
Game Duration:
VICTORY CONDITIONS:
Each side must bring its opponents Army Morale Points (AMP) to zero - at which point victory is achieved.French objectives:
Holding the Lesser Arapiles is a victory objective for the French: It is worth 4 British AMP. Holding the greater Arapiles
is a victory objective for the French: It is worth 4 British AMP.
British Objectives:
Holding the Greater Arapiles is a victory objective for the British: It is worth 4 French AMP. If an attempt is not
made to storm (charge) the terrace of the Greater Arapiles by the fourth British MOVE card (historically made by
Pack's Brigade), the British will lose 4 AMP. Holding the Monte de Azan (by having more units on top of it, east of
the Los Arapiles to Miranda de Azan road, than the French) at the end of the 4th British MOVE is a victory objective
for the British: It is worth 6 French AMP.
Looks great and with a proper ridge :-)
ReplyDeleteThanks, Garry. I was able to use parts of my Waterloo ridges from earlier this year, but had to make a few new sections as well.
DeleteLove the look of the terrain, and like that set up too!
ReplyDeleteThank you, Mark!
DeleteThe table looks spectacular.
ReplyDeleteYou are too kind, as usual, Richard!
DeleteFantastic looking table Peter...if all augers well for a successful session at the upcoming convention...enjoy!
ReplyDeleteGlad you like it, Keith; hopefully it will!
DeleteExemplary, sir! Here's hoping that the game goes well and that you might treat us to a blog post about it at some future date.
ReplyDeleteMy compliments on the terrain and troops. That does represent quite a lot of time, treasure and talent.
One cannot go far wrong in imitating or borrowing from JR. (He has not posted in some time. I trust that things are OK . . .)
Again, nicely done and good luck with running the game.
Sign me a former Napoleonics enthusiast.
Thank you, Chris; there is yet time to reactivate that Napoleonic bug, you know! :-)
DeleteThat all looks great Peter. From what I remember Wellington was watching the French movement for hours waiting for that gap to appear, which underlines to me what an astute general he was. The new hills look great, even if yuo did run out of flock.
ReplyDeleteEspecially true as hey had ben marching parallel day after day already! More flock is due to arrive tomorrow!
DeleteThat looks wonderful Peter and is clearly Salamanca. Are you gonna have a test run while they are all set up and ready to go?
ReplyDeleteAll the best, James
Thanks, James; I had hoped to do so, but I think the time is going to be too short; I have to pack it up and then do the test set up and pack up the last two games (with To the Stronghest!).
ReplyDeleteNo time for an over-achiever like you Peter 😀
DeleteA massive and wonderful effort once again.
Best wishes, James
LOL, thanks, James!
DeleteVery nice, and good clean map too! :) Will have to add this to my playlist.
ReplyDeleteThanks, Mark! I am looking forwards to running this one,. too!
DeleteThis comment has been removed by the author.
ReplyDelete