I apologize for the delay, but the story of the adventures of Sir Arthur and friends hereby resumes....


 Membrio! They will be appearing in the grey deployment zone in the upper left momentarily! It is not a good day for Beresford!

Silviera's Portuguese marching from Badajoz to Estramoz on Table E

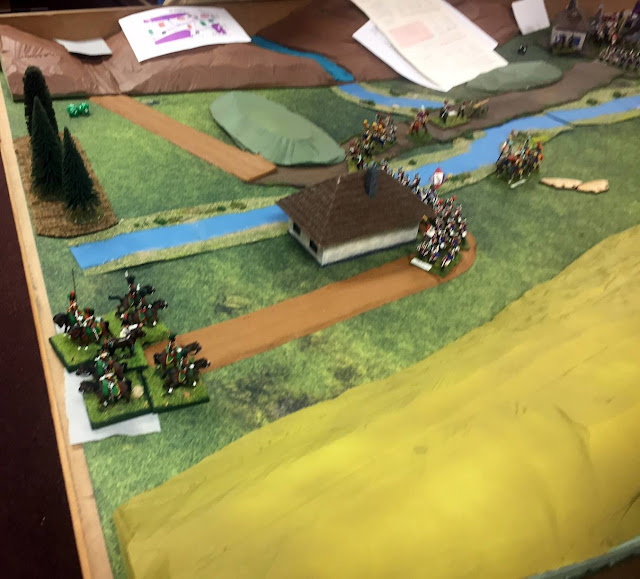
The battle of Membrio between Beresford's Portuguese and Sebastiani's French, Poles, and Badeners continues to unfold.

Soult and his subordinate, Lapisse, engage with Wellesley and Hill near Lisbon.

Silviera whips his Corps into marching shape, as he has been ordered to support Wellesley and company.

French troops waiting to move from Table O (Oporto) to Table L (Lisbon).

Part of Victor's Corps is battling Cuesta's Spanish at Merida, and the other part is trying to move off towards Casas de Don Pedro by way of Miajadas. His subordinate, Zayas, has built a pontoon bridge over the Rio Guadiana to attempt to bypass the bottle neck at Merida.

Milhaud's cavalry divisions are scouring the countryside, seeking out Spanish positions.

La Romana's army is marching through Zamora and Benavente on table P, on the Northern outskirts of the campaign area.

Latour-Mauborg's cavalry have been delayed by Guerrillas ambushes and pacification activities near Talavera on Table T.

"She'll be coming 'round Mijadas when she comes..." Victor's troops, attempting to disengage from Cuesta, get an unwelcome surprise when Cavalry units belonging to Venegas. Vision of another Bailen briefly cross his mind, before he dismisses them.

Victor's rearguard action against Cuesta at Merida.

Marechal Ney's Corps has moved South from Galicia, and is passing through Oporto.

Silviera moves through Estramoz on table E, on his way towards Lisbon.

On the other side of the Deplyment Zone "transporter", Venegas' Spanish army is passing through Casas de Don Pedro on Table R. The transport box lies on top of the road to Miajadas, where his cavalry have just found Victor's Corps.

Hay Carumba! Milahaud's probing Cavalry appear on table R approaching Ciudad Real from the West. With Victor to the East, Vengas has built a pontoon bridge and is crossing the Guadiana into a wild region devoid of roads.

Don Julian Sanchez leads a body of Guerrillas through Vitigudino on Table C. The fortress of Ciudad Rodrigo is in the foreground. Note the fantastic large scale maps James printed up for the event!

King Joseph relaxes, reading "Le Moniteur" in Madrid. Or is that the latest angry and out of date dispatch from his Imperial brother?

Battle lines form up near Membrio and Portalegre on Table H.

Latour-Mauborgs cavalry divisions have finally cleared the Guerrillas out of the are of Talavera, and are moving through Navalmoral, evidently with plans to scout to the East.

La Romana's troops marching through Benavente and Zamora on Table P. The limited Spanish staff capabilities are hampering his movement, so the general is forming parallel columns and using off road movement to keep his large forces under better command control.

Latour-Mauborg's cavalry have entered Table F, heading East through Plascenscia.

Silviera and his Portuguese have arrived on Table S, and are marching through Evora and Montemor. This table is to the South of Lisbon.

French forces deploying on to Table L, with Lisbon to the South. The first of Ney's Corps arrive, making the British outnumbered in this key locale.

The battle of Membrio continues, but Beresford is very displeased to see cloud of dust near Abrantes, of to his West. They don't appear to be friendlies! Sebastiani, on the other hand, is rather more content with developments.

Back at Table R, Milahud's cavalry try to close the gap between themselves and the Spanish of Venegas. The later appears to be planning to utilize the "Spanish withdrawal to safety in the Mountains" rule to avoid combat.

Milhaud has plenty more cavalry behind those, here seen moving from Alcazar de San Juan on Table D, off towards Ciudad Real on Table R.

Cuesta's Cavaleria de la Linea (his best cavalry) charge the Spanish rearguard at Merida. Note the Garrochistas of Zayas' command swinging to the left.

"Hola Amigos!" Latour-Mauborg's cavalry is beset by Guerilla ambushes for the second time! Troops in Road Column *automatically* lose a melee, with 2 morale steps lost and then additional checks to male. Ouch!

Close up of the Ambush!

Overview of the situation on table G. Mark did the terrain for this table and did a superb job - there is even a road through the mountain pass carved into the mountain at the upper right of the photo. Miajadas and Victor's remaining troops are in the foreground, with Cuesta's troops at Merida top left, and Zayas' troops crossing the river at top center. The Garrochistas are using their Light Cavalry speed to threaten the rear of Victor's column.

Paying the piper... After their initial success, the French cavalry proceed to cut down Guerrillas as fast as they can. Militia infantry in the open are no match for the well trained french horsemen. On the other hand, any lost Guerrillas will regenerate in just 30 minutes, elsewhere in Spain.

La Romana's troops, their shoe leather getting thin but their powder untouched, have moved from Zamora, on to table C, and are passing through Fermnoselle. Ciudad Rodrigo is off to the left, out of view.

The French garrison of Madrid, which must be held at all costs. The Gendarmes have bolstered the forces of King Joseph.

Te battle of Membrio proceeds apace!

The dust clouds turn out to be the troops of Mortier's Corps! Their arrival threatens to make the Portuguese the squishy filling in a French sandwich!

The Guerrillas now dispatched, Latour-Mauborg's cavalry regroup and then resume the advance, reaching the village of Canaveral on table F (foreground).

Still one lone French infantry brigade holding up Cuesta and Zayas outside of Merida.

The rest of Victor's Corps, at Miajadas.

The ride of the Garrochistas!

La Romana's troops passing through Vitigudino on table C.

Victor's advance guard appears outside of Casas de Don Pedro on Table R. It appears that Venegas has left behind a substantial garrison blocking the way West.

Latour-Mauborg's cavalry moves through Carceres and off Table F, headed to...
 Membrio! They will be appearing in the grey deployment zone in the upper left momentarily! It is not a good day for Beresford!
Once again impressive system, glad to see everyone in action...and good luck to Beresford!
ReplyDeleteThanks, Phil. Unless he gets "a little help from my friends", Beresford is likely to need more than luck alone - perhaps divine intervention?
DeleteImpressive scale Wargaming
ReplyDeleteThanks, Gary!
DeleteLots of tables, lots of photos....
ReplyDeleteYes, and deliberately a bit fewer troops to allow the campaign to come to a reasonable conclusion in the allotted time.
DeleteAnother wonderful set of photos and descriptive captions Peter. Excellent stuff.
ReplyDeleteThanks, Carlo; glad you enjoyed both!
DeleteGreat looking tables. Looks like everyone is having a good time.
ReplyDeleteThank you, Lee! Some days with these games you wind up fighting all day, others much marching and not that much combat. Most days a mixture of both! I am working on the revisions to the scenario for Historicon this year.
DeleteLooks like loads of fun! Lots of march and counter march with a side order of ambush!
ReplyDeleteBest Iain
It was! It is entirely possible to do a "D'Erlon" and march back and forth without ever fighting!
Delete