Sunday, January 22, 2023

2nd Manassas

On Saturday, Thomas, Nick and I got together for a game at Jared's home on short notice; he already had another game set up in the basement, and his wife was out for the day, so we played on the dining room table!

The scenario was 2nd Manassas (Bull Run), and the rules were Big Bloody Battles by Chris Pringle. Jared had run games with the rules, and I had a copy which I had skimmed a bit, but none of us had ever actually played the rules before! 


We diced for sides, and that left Jared and me with the boys in blue, and Thomas and Nick with the Rebs. The Confederates started with just Stonewall Jackson's command on the table, but well situated on hill with rifle pits at its base. 

Thomas and Jared deployed well, with their 3 batteries being exceptionally well positioned on the hilltop. 

Close up of the troops on Jackson's right. The figures are from Jared's excellent  15mm ACW collection; he says they hadn't been out on the gaming table for at least 10 years

J.E.B Stuart's cavalry were the only troops protecting one of the three Confederate objectives... at least to start. We both knew the other side had reinforcements coming on, but not when or where! The game is wonby taking at ,least 2 of the three enemy positions while holding at least 2 of your own. 


Part of the Union deployment.

The rest of the Union deployment.

Situation after the first Union move; one of our Divisions is moving to seize control of the Bridge over Bull Run and its associated Objective; unfortunately, much of these troops are Raw and thus rather brittle. 


Although we had troops that could have entered on Turn 1, they flubbed their roll and failed to appear. Longstreet's boys showed up nice and promptly for the Secessionists!

On Union Move 2, the bridge is taken with no losses...

because the men in grey have focused all their fire on two of the Union batteries, silencing one; it will have to withdraw to the rear next move, then move up on the following move, before it will be able to fire offensively again! In these rules, "opportunity" fire can be taken during your opponents move at any troops that moved or changed formation. With most of the infantry armed with rifled muskets (range 9"), and the artillery having an 18" range, this can be a real nuisance!


Fire by Johnny Reb's guns have silenced a second Union battery on turn 2!

Still, we Yanks control one Rebel objective; unfortunately, taking a second is not seeming very likely!

Longstreet's men deploy in preparation for an attack on our not very strong center, and our own reinforcement finally arrive! Stuarts cavalry use the swift road movement (troops move TWICE as far on roads, something the author conveniently left off the QRS; what is it about authors and their rules summary sheets? You'd think such a huge factor belongs on it, wouldn't you?!)

Another view of the overall situation at this point. 

Another view of the same. 

Our reinforcements advance, much faster than their first attempt, now that we know about the huge road move bonus! Not the blue chip denoting an objective way out here!


One of Longstreet's Brigades advances boldly upon our center. Our defensive fire? "They couldn't hit an Elephant!"
 
The consequences of their ineffectual fire was an assault by the aggressive Rebs, whose own closing fire disrupted our brave boys. 


In the event, the assault was narrowly repulsed. 

Our reinforcements move up, while Stuart's cavalry attempt an outflanking move!

Overview of the action, Stuart's cavalry having redeployed to their right. 

Stuart's cavalry charge, the boys in blue once again failing to have any impact with their defensive fire. Grr! At least the Confederate infantry behind them, which was planning to support the attack, rolled a half move and lacked sufficient legs to join the fight!

First and ten, do it again; Rebs from the Palmetto state, having shaken off their disruption, charge again.  Had I realized it, if the unit behind them been in contact with the unit to their front, this would have given positive melee modifiers for depth and numbers. This time the Yanks are pushed back, and both units are disrupted. 

Quite mess on the Union far left; bringing our superior numbers to bear has proved very challenging!

Judging the time right, Jackson's infantry move of their defensive positions, and move to the attack!

Close up of Jackson's advance - veteran troops supported by artillery, and facing off against Raw; this will go well... not!

Their supports, our sole Veteran brigade, get shot up by rifle and artillery fire, losing a base and becoming disrupted. Ugh!

Longstreet (played by Nick) continues his aggressive push up the center; this time the attacking unit is supported by a second unit in Depth behind them; this gives positive modifiers for  Depth and 2:1 outnumbering. Yuck! Not surprisingly, this time my Yanks are forced back 9" with disruption and the loss of a base. 

This allows the victorious Rebels to make a breakthrough move and continue to attack!  Now worries, 2 batteries of artillery firing at cannister range should rip them to shreds! Eh, what's that? NO defensive fire at breakthrough charges? Hellfire and damnation! Who wrote these rules?  :-)

My batteries rolled very well to escape with "retreat 3 inches, silenced! At least only ONE breakthrough assault is allowed per unit per turn. Phew!

Final charge of the game, Confederate infantry supported by their cavalry, charge Jared's infantry. Once again, they fail to hit anything, while the Rebs fire achieves a disruption. Yeah, they're gonna win that one - NOT! At this point, it was the end of Turn 5; mercifully, for the Union cause, night fell and the fighting died off. 


The photos are a combination of mine and those by Thomas. He had a number of funny quips following the game:

"Thomas just about polished off all the chips. Thank God he missed the poker ships on the table!"

"Gotta prep for Church tomorrow, Nick!"

Jared says "Let's see... if I order pizza I bet I can get Peter to start liking this period. I'm gonna try!"

Peter says "Nice try, Jared (though the pizza was delish), but  no, that's not for me! Not enough color on these troopers, and where is combined arms warfare? dragoons who can't even follow through on a decent saber attack?!"

In truth I had a great time, with great guys! Learning a new set of rules is always an experience. I prefer Field of Battle/Battle Command, but I'd play these rules again, too! 

Tuesday, January 17, 2023

Spanish Napoleonic Limber

I finally got around to painting this mule drawn Spanish limber.


I was hoping to have it ready for the Ocaña game on 12/31, but couldn't quite get it ready by then.


Attaching the cast "ropes" was a nuisance, but worth it in the end!


Model is by Perry. 

Saturday, January 14, 2023

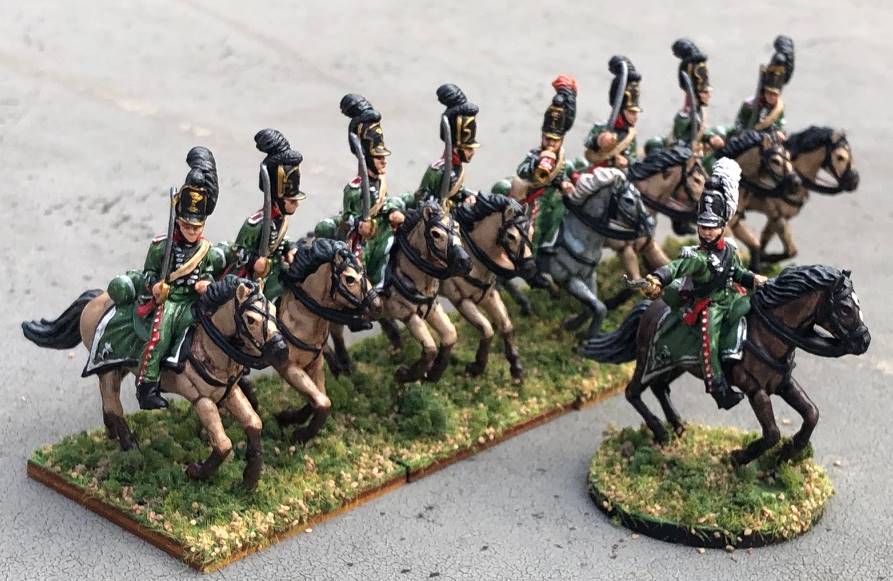
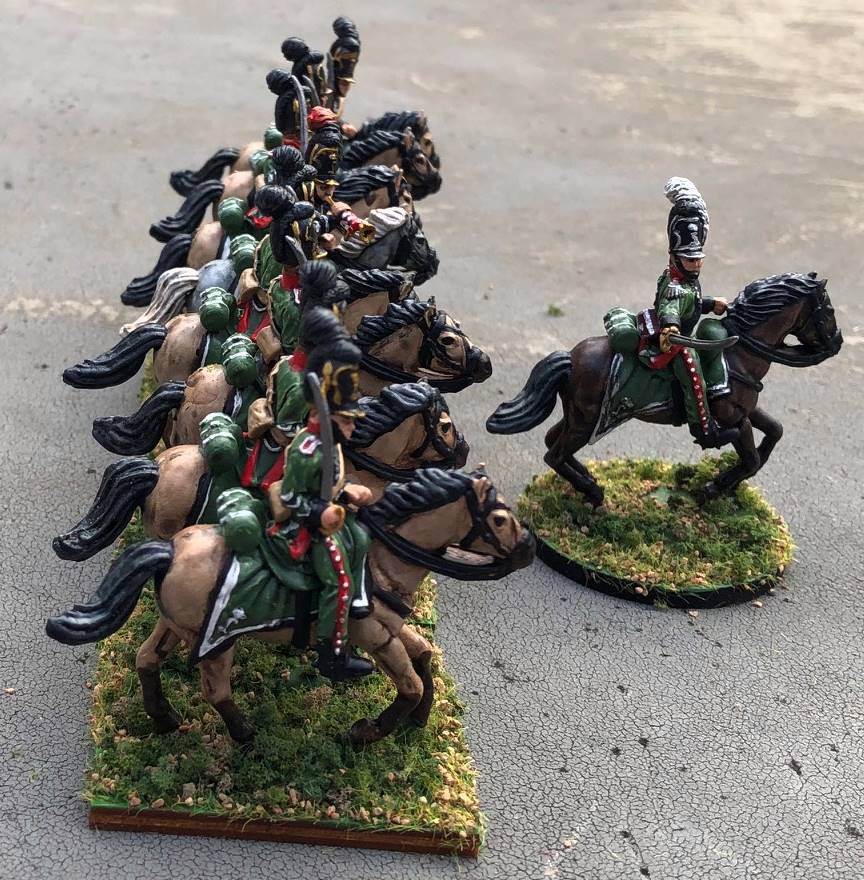
Hessen-Darmstadt Chevaulegers


The origins of the Regiment date back to 1791. Ludwig X became Ladgraf of Hessen-Darmstadt in 1790, and was concerned about the lack of a cavalry arm in his small but well respected army. He ordered the creation of a new Light Cavalry regiment, the Hessen-Darmstadt Leichte Kavallerie Regiment.  By 1792 the Regiment was up to 4 squadrons, and when Hessen-Darmstadt joined the 1st Coalition against Revolutionary France that year, the regiment particiapated in a number of actions through 1795, generally performing with distinction. Hessen-Darmstadt thereafter adopted a policy of armed Neutrality, and sat out the wars from 1796 - 1805. In 1806, Hessen-Darmstatdt was one of the founding members of the Confederation of the Rhine, with the state being elevated to a Grand Duchy, and Ludwig assuming the title of Grossherzog Ludwig 1. With that came a renaming of the Regiment as  the Gardes-Chevauleger Regiment. In late 1806, part of the Regimnent was senty to support French forces in Prussia, where it acquired several stains on its reputation, including a duel involving the commander of a 50 man detachment escorting 3,000 Prussian prisoners of War, the confusion caused by which allowed almost half of them to escape, and then the looting of a supply train of flour! By 1807, the regiment was back in better form, serving first under Marshal Lefebvre around Danzig, and later participating in the siege of Swedish held Stralsund, and the capture of the associated island of Rugen. Marshal Lefebvre commented "... they shall say no more brave as a Frenchman, but shall now say brave as a Hessian!"


In 1809, the three squadrons of the regiment were brigaded with the Baden Light Dragoons as part of the light cavalry Division of Maraluz, during which they participated in many minor engagements, Marshal Davout commenting "France could not be better served than by these troops". In 1812, the regiment was increased to 4 squadrons and served in Russia as part of the 31st Brigade in the IX Cavalry Corps under General Fournier. They again fought with distinction in actions around Smolensk and Borodino. The regiment famously participated, in company with the Baden Hussars, in the Death Ride at the crossing of the Berezina, their charges holding off the Russian cavalry and allowing the escape of many French and allied soldiers. Only 88 men and officers made it back to their depot in January of 1813. The regiment was recruited back up to a strength of 4 squadrons, and formed part of General Beaumont's cavalry Division in the VI Corps, It fought at Dresden, and sustained heavy casualties there. It was subsequently sent to oppose the Swedes, Russians, and Prussians in Pomerania, and fought against them until after the battle of Leipzig in November, whereupon the regiment returned home, Hessen-Darmstadt having switcher her support to the Allies opposing Napoleon. The regiment saw no action in 1814, but formed part of the Hessians serving in the Allied III Army Corps under the Crown prince of Wurttemburg. It operated on the Rhine, ultimately confronting General Rapp's Frenchmen, who were ultimately compelled to retreat to the fortress of Strassbourg. 


From 1790 to 1808, the Chevaulegers wore a helmet (kasket) similar to that worn by the British Dragoons in the 1770's and 1780's. Starting in 1806, a new helmet similar to the Bavarian Raupenhelm was introduced; the transition was probably complete by the end of 1808. A somewhat shorter version was introduced in 1812. The jacket was grass green with black cuffs and lapels, and was extensively ornamented with white lace. The collar and turnbacks were bright red. Shoulder straps were red piped in white. the breeches were originally straw colored, but were changed to grass green in 1809. Unusually, the belts and ammunition pouch were all buff leather. Saddlecloths were grass green, with black border, piped white on the inside edge. Trumpeters wore the same uniform as the men, but with a red tip to the plume, and (possibly) black "swallows nests" on the shoulders, piped white. Trumpet cords were red, probably mixed with white. Officers wore much the same uniform as the men, but with silver metal on the raupenhelm in place of brass, silver lace in place of white, and the silver mixed with red sash of the Hessen-Darmstadt officer corps. The uniform information come from Rawkin's book on the Army of Hessen-Darmstadt, which devotes over 30 pages to this unit. 


The chevaulegers were never issued any flags. I have been eager to have a unit of these fellows for quite some time, but their uniform is fairly unique, and as far as I know, no one has ever done them in 25/28 mm before. Lucas and Piano Wargames have now corrected that deficiency in fine style! 


I chose to mount the regiment on light bay horses, chiefly because it contrasted well with the uniform; the trumpeter rides a grey. I think they look quite magnificent!

Wednesday, January 11, 2023

Hessen-Darmstadt Foot Artillery

The Army of Hessen-Darmstatdt included a Corps of Artillery. During the Napoleonic Wars, it was initially it was organized into "batteries" of  (usually) 2 x 6 lber guns each, and intended as sort of Battalion artillery for the infantry units. The woodwork of the artillery carriages was painted light blue, with the metalwork on the carriages painted black. 


By 1807, the total strength of the Artillery was up to 8 x 6 lber cannon and 2 Prussian 7 lb Howitzers. An artillery company fought with the Hessian infantry contingent during the invasion of Russia in 1812; 3 gunners, 1 gun, and 3 caissons actually returned to Darmstadt.  As can be seen, the uniforms of the gunners were dark blue, with black cuffs, collars, and lapels piped red, and decorated with white lace. That lace must have been a bear to keep clean when working around black powder!  The turnbacks, like that of the infantry, were red. Shoulder straps were dark blue piped red.


In 1809, the Hessian contingent formed a brigade of 6 battalions within the Division of Cara St. Cyr (not to be confused with the future Marshal), as part of Massena's Corps. They were especially heavily engaged in the intense fighting around Aspern. An artillery contingent accompanied the battalions sent to Spain in 1809 as well. 


For the 1813 campaign, the artillery was greatly expanded to 4 companies, each equipped with six 6 lber cannons and two 7 lb Howitzers. The ginners wore a black shako with a white metal plate on the front, and short black plumes. The national cockade was white with a red center. 


Hessen-Darmstatdt was one of the founding states of the Confederation of the Rhine, formed in July of 1806, and supported Napoleon and France until after the Battle of Leipzig in November, 1813, at which point it joined the Alliance against France. Trousers were dark blue, and black "Hessian" boots with red trim were worn. 


The guns and crews are white metal, digitally sculpted by Lucas Luber of Piano Wargames, and cast in Germany. Marvelous stuff, and I am not aware of anyone else who has done figures for the Hessian artillery.