Contributed by Jared Fishman
Historical Background:
With the First World War just getting underway, the Austro-Hungarian army was faced with war on multiple fronts- one of which was against Tsarist Russia in modern day Poland and the Czech Republic. The first major encounter in this region was fought as multiple Austro-Hungarian armies moved into Southern Poland, crashing into a similarly arrayed series of Russian forces. Both sides “blundered” into one another, and where else but a good friend’s blog utilizing the same word in its title should the action be discussed?
Background of the Game:
I run a game club at my school, Hackley, for numerous students who all have been itching to roll dice (including its fearless leader- me!). After putting word out, it was clear that a dozen or so players were interested. After getting the go ahead to a) put a small gaming table in my campus home and b) allowance to get some supplies out of my on campus storage site, I began to think about how exactly to run a remote game via Zoom, the platform I use to teach. The first thing that came to mind was games that function on a grid, like a board game. Games like this, that don’t require finicky movement, would be the simplest to control and could be easily understood by the players, especially if they had a map ahead of time.
Coincidentally, I’ve been teaching my unit on the First World War to my “Topics in the History of Warfare” seminar, which led me to create a series of podcasts in lieu of our regular class meetings, given the pandemic and closing of our buildings. I couldn’t help but pull out my old Square Bashing rules by Peter Pig, and it was this format I’d use for the game.
After a week or two of pondering, I created the map, sent the materials to the players, and recorded videos to explain the rules. All of these materials were dumped in a google folder of which the students had access to. OOBs would be sent directly to the players.
To better aid the players, I used a labelled grid to delineate the squares, akin to the way players used to play chess by mail many years ago. This made things easy for the players, which I’ll improve upon by actually labeling the board for our next series of game turns.


I set up the actual game tables right next to my painting desk, which has an 18” tower I use to hold my paints.


I put my laptop on top of this tower, which enabled me to get the right angle to project the board.


Zoom turned out to be an excellent platform for the battle, and I had no internet issues during the game, thankfully.
Given that I had never done this before, and don’t find myself to be the most techy person, our players and I ventured off into the unknown world of remote gaming. What we found was that it was an enjoyable experience- a welcome respite from our pandemic threatened community, of which we are directly in the epicenter of.
Scale, and the OOB:
I run Square Bashing as a grand tactical game. My board was broken down into roughly 5 ½ by 3. With 6” squares (similar to TTS, which Peter and I like quite a bit), this breaks down to 11 by 6.
I view each square as roughly a mile of territory. Thus, this battle was being fought over a very large front- a point very common during the First World War and even more so in the Eastern theater.
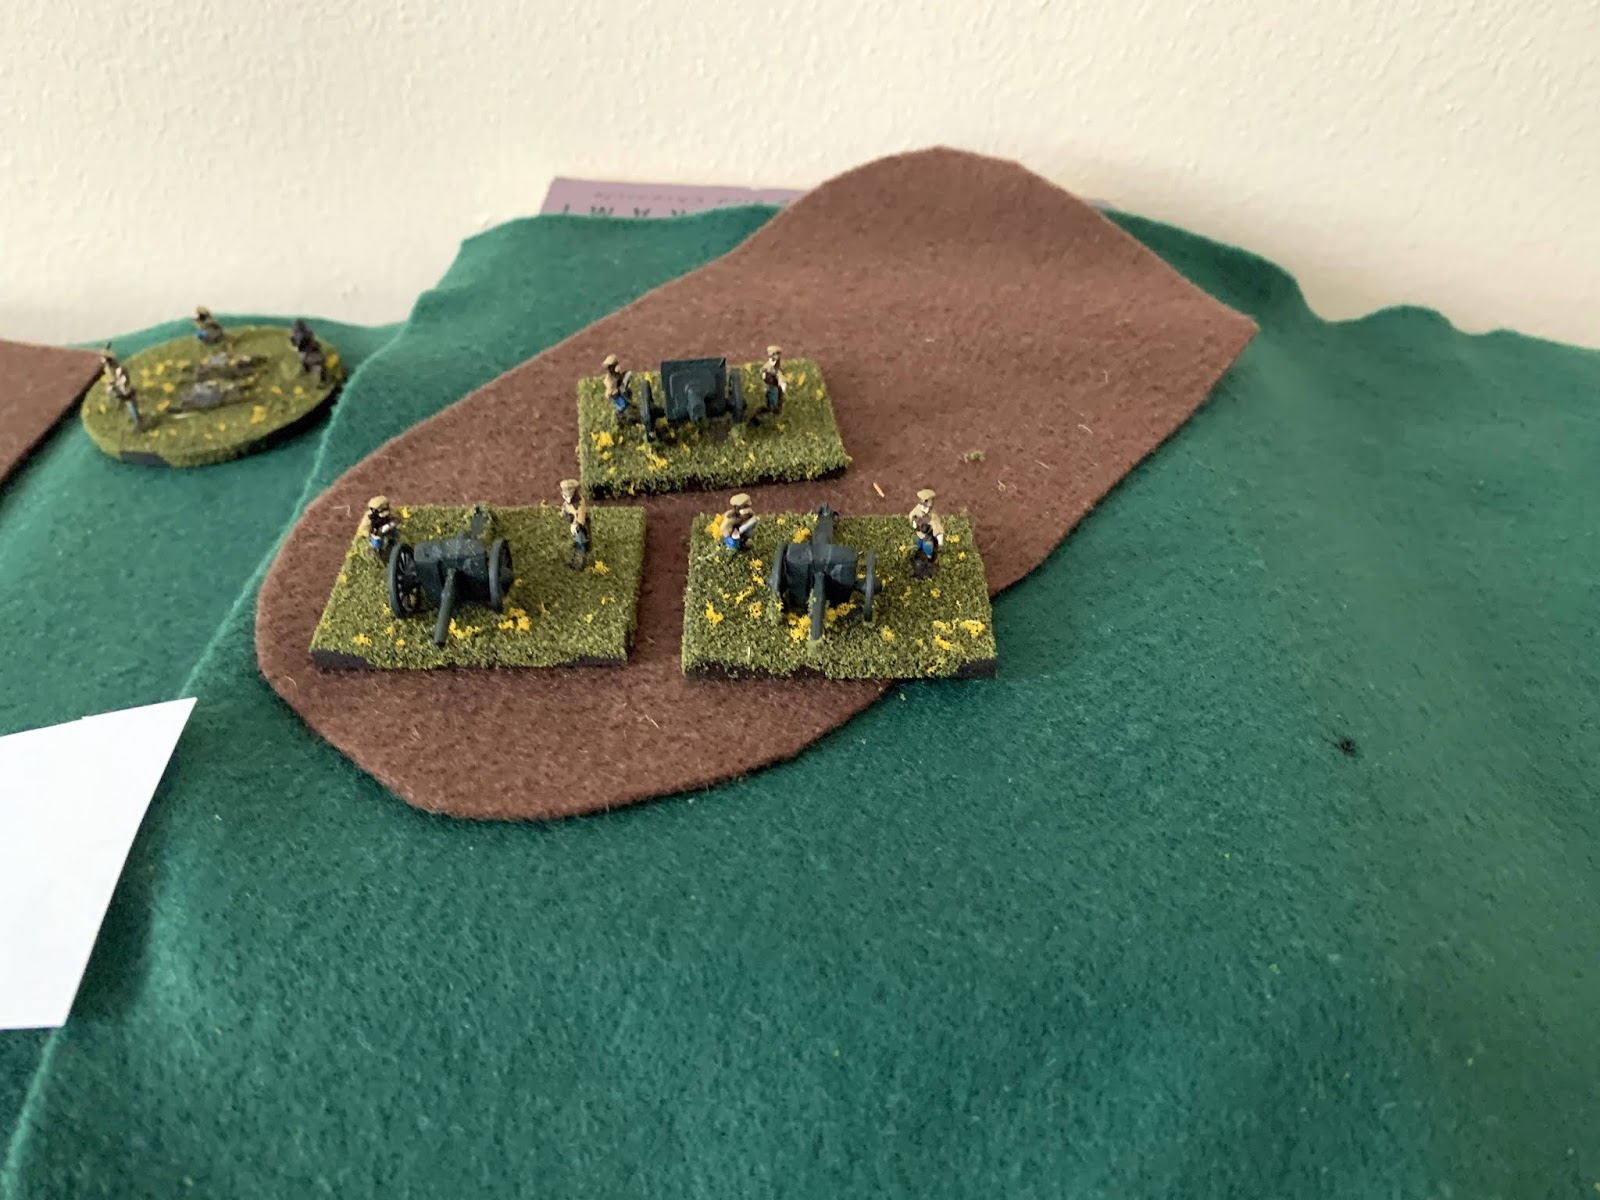
Each infantry unit is a battalion, each artillery piece is a battery, and each machine gun represents a company. While the Austrian and Russian armies did not gather their MG into companies at this point, I look at these stands as the collective firepower of MG’s across the whole fighting square.
Each team is in command of a full corps. While the Russians had more infantry battalions, the Austrians have a major advantage in artillery. To be specific, here are the numbers:
Russian Corps:
1 corps commander
2 divisional commanders
32 infantry units in 8 regiments
8 machine gun units
10 Artillery units, 2 Howitzer units
Austrian Corps:
1 corps commander
2 divisional commanders
28 infantry units in 8 regiments
8 machine gun units
12 Artillery units, 4 Howitzer units
The players: from left to right
Russians:
Jared, Cameron, Eoin, Carter M, Aiden, Arjan
Austrians:
Will K, Will G, Carter H, Sam S, Sam P
Plans:
Before the game, the players were given the task of crafting a battle plan without knowing exactly where the enemy was arriving and in what numbers. I gave the teams a bit of assistance, in some cases serving as a quasi- CinC.
You can look at the maps with initial orders here. Given that the game is ongoing, I won’t explain all the nuances of the plan. Instead, we can take a look at the initial dispositions of the troops.

The Austrians have massed a ton of artillery on their right flank and seem to be heading towards one of the many small villages which dotted the terrain of Krasnik.
More infantry are posted in the center and on the left, with the Austrians crossing a bridge over a small waterway, heading towards one of the main roads on the battlefield. They are threading a needle, moving through a wooded area and hill.

The Russians also deployed 4 regiments on the battlefield, utilizing two squares on their starting line to post their artillery. The Russian deficiency in artillery is prominent. Also, given that the Austrians would get the first turn, the Russians would be fighting somewhat defensively just as they did in real life. That said, would they counterattack like they did in real life as well?
The Russians posted a veritable horde of infantry in their center headed directly for the road and village. Given that there is a 3 unit limit per square, and given that the Austrians deployed so much artillery, the Russians feel as if they have far more troops on the battlefield- which also means that the likelihood of the Austrians planning something dastardly is likely.

The Rules:
Square Bashing, written by the RFCM team at Peter Pig, has been around for about 20 years or so. Personally speaking, I remember playing SB for the first time at Cold Wars 2001. The rules were a bit different then, with much bigger squares and a somewhat different turn sequence, the biggest difference being that there was no shooting except for artillery.
A number of years ago, a second edition of the game was published which, in my opinion, strengthened an already good rule set significantly. I’ve made a few slight changes to suit my own particular taste.
Also, it is worth pointing out that I also incorporated some degree of “orders” in this game, similar to that found in Great War Spearhead II, another WW1 game that I find enjoyable.
The turn sequence, with a short description, goes something like this:
a) Orders- if regiments need an order change, or if the active team wants to spend asset point, this is done now. We opted NOT to use asset points as it would overly complicate the game. Asset points, allotted to each army depending on the year and theater of war, are used to purchase things like artillery barrages, dig trenches, order a shock assault, etc.
b) Morale- if any square has morale markers in it, the active side must test. This is an interesting part of the game, as you don’t know how bad of shape you’re in until the following turn!
c) Movement- Units move from square to square at a rate of 2 squares for infantry, and 1 square each for MG and artillery. To reflect the difficulty of moving during this period, units must pass a die roll when LEAVING difficult terrain. In the case of MG and artillery, which were notoriously difficult to maneuver during WW1, must test even if they are leaving open terrain. If the divisional commander or corps commander is adjacent to the square attempting to move, a +1 is granted to each die roll. Units may not move on a diagonal. If a unit has the movement to do so, they may assault an enemy square. Assaulting is the primary way to damage the enemy and dislodge troops from a square in order to take it.
d) Shooting- This is the enemies opportunity to fire. Notice that you do not fire on your own turn, another feature I really like. Firing occurs from square to square, and troops may incorporate 1 diagonal when counting out their range. Infantry and MG fire at a range of 1 square, while artillery and howitzers fire 4 squares. Infantry roll 1D6 per unit, MG 2D6, and artillery 3D6. There are also some modifiers which never increase what you need to hit (that is always a “6” on a D6), but rather adds or takes away dice. For example, I give artillery +1D6 if they can physically see and draw LOS to their target, to represent the power of quick firing guns firing over open sights.
After hits are determined, hits are allocated starting with the shooter (who can place the first 2 hits) followed by the target, who can place the remaining hits.
Saves are taken. Infantry save on a 4+, MG on a 3+, and artillery on a 5+.
Each unsaved hit is marked on the targeted unit, and morale markers are placed in the square. Infantry can take 8 hits before being removed from the game, while MG and artillery are much more fragile only being able to take 2 hits each.
e) Assault- Any units that assaulted in the movement phase now must fight their battles (also, the enemy cannot shoot at assaulting units in the shooting phase). This is done similarly to shooting except a chart is consulted with fighting factors. For each point, roll a D6. For example, full strength, assaulting infantry units earn 3 points, while adjacent, friendly supporting squares earn 1 point. Hits are caused on 5+, and allocated the same way as shooting. Saves are taken the same way as shooting as well. Whichever side causes the most unsaved hits wins the fight. The loser may fall back if they were defending, or stay put if assaulting. Automatic hits are accumulated by the loser to reflect casualties on the retreat. Remember to place morale markers for each unsaved hit, which are tested for on the following turn.
f) Reinforcements- The active side decides whether or not to bring reserves in, which need a 3+ to happen on time. Roll a D6 per regiment that wants to hit the table. On a failure, you may roll again the following turn, this time on a 2+. Reserves may only arrive in the deployment zone. Flank marching is a bit more difficult, and needs a 4+. Before the game, each side was told where their flank march could arrive if they chose to take the chance.

How the Game Played:

Much like the real war, this table top recreation was savage in the early going. The Austrians moved first, pushing their infantry up and in some cases, moving artillery forward.

Russian artillery took an immediate toll on the Austrian troops, especially the few battalions which reached a wooded area on the the Austrian left flank.


During the Russian turn, most of their troops advanced up to the road, forming a solid line of the defense. All of their artillery was placed on hills, which gave them an excellent vantage point to bombard Austrian positions, while the Austrians struggled to return fire due to the heavy concentration of woods on their right flank.

The main fighting kicked off when several Austrian battalions made it to the village, which elicited tremendous fire.

Reserves were immediately brought up in the form of a single regiment.

On the Russian second turn, several assaults were made, one of which was successful and one which was beaten back by the Austrians.

Thus, to this point, the armies are just getting into the thick of things.
A few observations by the GM:
The Austrian right looks a bit thin, as they posted mostly artillery over there. Their hold on the village seems tenuous at best, given that there are 3 adjacent enemy squares plus a hill bristling with artillery within LOS.
On the Russian left side, it looks like their commanders are getting aggressive and they certainly took the word “counterattack” to heart, pushing forward with all troops and heading straight for the bridge.
We completed 2 turns, and are about to begin turn #3.
Impressions:
I quite like gaming on Zoom and thoroughly enjoyed pushing all that lead. On that note, these armies are strictly from Pendraken’s 10mm Great War line. Leon is an awesome guy that has always taken good care of my club with great deals!
As a GM, I find Zoom to be really efficient and a far less chaotic format than the usual large game with 10+ players.
While that may be the case, an obvious loss is the camaraderie at the table, with all the banter associated with the rolling of dice. A lot of my students were still able to communicate via chats and text message, and given some of the tactical moves during the battle, I have to assume they used a few different means to be on the same page.
I do find the game to move a bit slower. We played 2 turns in exactly 2 hours of play. We’re currently thinking of ways to allow the players to work out their own combats instead of the one at a time format we used for this battle. This is possible as I can create breakout rooms for players to go into. As Will K pointed out, it does mean more onus is placed on the players, and we’ll need to find a way for them to have a good enough caption of the board to see what they’re doing.
All in good time. Thanks to Peter for posting this write up, along with the photos of the battle. If you have questions, feel free to put them in the comment section and I will find a way to respond.
---------------------------------------------------------------------------------------------------------------------
Peter:
I think the above is just great! To show that even us much older types are getting into gaming by Zoom (and similar platforms), while Jared and his students were doing this, I was simultaneously playing a game hosted by Tim Couper (who is very tech savy), with he and my opponent, David Knight, both located in Scotland!

With the era being the Wars of the Roses, I added a few props for mood to my location in the dining room.

I used my Ipad to view the action. My unit of men at Arms did sterling service (as opposed to the pewter goblet), and were granted an extra ration of mead after the battle!

David rather outplayed me, but in typical FoB fashion (in this case, FoB3, sort of), we were both at zero Morale points, and David turned the Army Morale Card first, and failed his check miserably. A narrow victory to the supporters of... Hmm, who the heck was I supporting this time? Never mind... off with his head! :-)
The grid system type rules should be easier to play remotely, but great to see FOB action. Must have a delve into these Zoom type apps.
ReplyDeleteZoom is free for !:1, otherwise you're limited to 40 minutes for Free. Both Tim and Jared have other reasons to use Zoom to host things, so for them there's no added charges to host multiplayer events.
ReplyDeleteGreat idea, and I wish we had done something like this. Things seem to be relaxing a bit for us in Australia though, fingers crossed, so we may be back gaming again in a few weeks.
ReplyDeleteHopefully if they ease off, it will stay eased off; that's the real challenge!
DeleteInteresting WW1 grid battle the war of the Roses game sounds great! I'm sure it was your inspiring leadership that won the day,no need to downplay your abilities here! I've been thinking of having a go at TtS!remotely just as it's a grid based game ,not that I'm tech savvy in the least!
ReplyDeleteBest Iain
Thanks, Iain. TTS is definitely on my mind to play by Zoom or similar as well.
ReplyDelete