Test of Resolve Playthrough - Stoke Field, June 16, 1487
Test of Resolve is a new set of rules (just released May 2021) for miniature wargames set in the era of the Wars of the Roses. I have had the pleasure of playtesting these rules and the 16 scenarios developed for them via countless Zoom games during the past Pandemic-blighted year with David and Tim. Those games have been the brightest spot of that year! Last week we played a game to test one of the last scenarios, Stoke Field, fought on June 16, 1487. We used that game to generate a detailed walkthrough to give gamers a taste of how they work.
From the introduction to the rules:
The Wars of the Roses
In the period from 1455 to 1487, England saw a dynastic struggle between the Houses of Lancaster and York for control of its throne. The cultural setting is Britain. For the previous century, men from Britain had fought in France, primarily on foot when engaged in set-piece battles, combining those fighters equipped for close combat with skilled, disruptive archery. This pattern continued unchanged into a period of intermittent warfare which, some centuries later, became known as the Wars of the Roses (WotR).
A WotR army was typically divided into 3 “wards” — van, main and rear — each of which would form one division, or “battle”. Each battle had a commander who was often, but not always, the noble who provided the largest number of troops. The choice of commander was as much a political decision as a military one, needing to strike a careful balance between status, influence and military skill.
Each battle fought more like an autonomous armed mass (with some distinguishable groups), rather than the recognisable regiments or battalions which reflect the command and control structure of later centuries. Within a battle, elements can be identified from the viewpoint of arms, attire, armour and role: plate-armoured men-at-arms and other foot melee troops, archers, and, less commonly, mounted troops — men-at-arms and scurrers. Additionally, there were mercenaries bringing further weaponry: handgun, crossbow, pike and dart.
It was noticeable that the longbow was only used significantly at the start of an engagement at the front of a battle. While this appears similar to skirmishers in later centuries, the density and weight of longbow firepower seems to have had an effect rather more significant than “mere skirmishing”. Indeed, the occasional complete absence of any archers on one side would spell trouble, so merely abstracting this element away does not seem appropriate (and there are those cool figures to get onto the table). Furthermore, their function was not to delay the advance of the enemy, as in later periods, but to give advantage for the subsequent melee engagement through disruption and damage by firepower. Deployed as a front line for the first phase of the engagement, they discharged most or all of their arrows, fell back, and then joined in as lighter melee troops “supporting” their colleagues. It’s important to note that engagements were rarely, if ever, concluded as a result of such fire — even in the instances where archers were only present on one side — and any subsequent missile actions in the latter phases of the engagement were never decisive.
The Test of Resolve wargaming rules use only one twelve-sided die (D12) per side. The game
plays out with a small deck of cards for each army; these cards are designed to introduce an
innovative, realistic and exciting unpredictability to the game flow — and remind the players
that commanders had little control of events when the fighting started!
Test of Resolve successfully achieves the following design criteria :
The rules reflect and encourage the nature of warfare in this period.
Games are playable with figure sizes up to 28mm.
Games are able to be completed in an evening — from 1 to less than 3 hours, depending on the scale of the engagement.
Historical scenarios are playable on a 180 x120cm (6’ x 4’) table with 28mm figures (and, of course, smaller scale ones).
Any historical (or fictitious) scenario has a high degree of replayability.
The rules are very suitable for solo play and for multiplayer gaming.
The Battle of Stoke Field on 16 June 1487 may be considered the last battle of the Wars of the Roses, since it was the last major engagement between contenders for the throne whose claims derived from descent from the houses of Lancaster and York respectively. The Battle of Bosworth Field, two years previously, had established King Henry VII on the throne, ending the last period of Yorkist rule and initiating that of the Tudors. The Battle of Stoke Field was the decisive engagement in an attempt by leading Yorkists to unseat him in favour of the pretender, Lambert Simnel.
From the provisional playtest scenario for Stoke Field:
Order of Battle
House of York
Left
10 BMP
Centre
10 BMP
Right
10 BMP
Schwartz
Lincoln
Fitzgerald
2 Pike
1 Superior Retinue
1 Superior Retinue
1 Retinue
1 Retinue
1 Retinue
1 Handgunner
1 Inferior Array
2 Kern [Mass]
1 Inferior Archer
2 Kern
House of Tudor (Lancastrian for game purposes)
Main
17 BMP
Reinforcements
15 BMP
Oxford
Henry VII
1 Superior Retinue
1 Household
3 Retinue
3 Retinue
5 Archers
3 Archers [Mass]
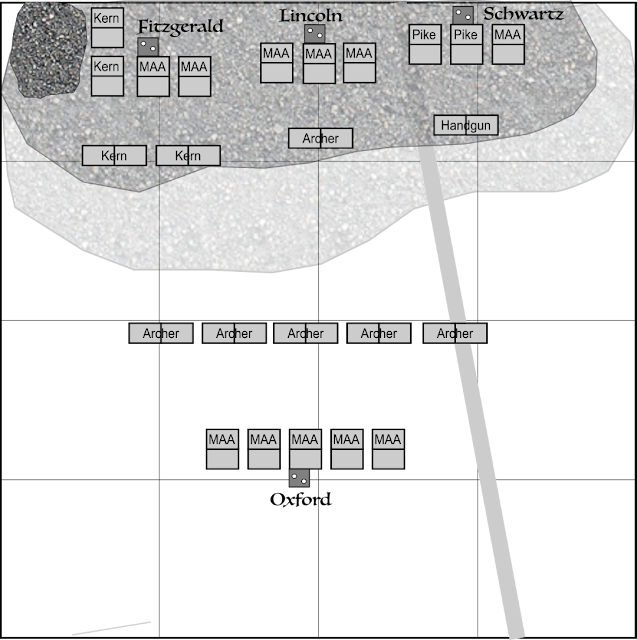
Deployment
And with all of that out of the way, on to the game!
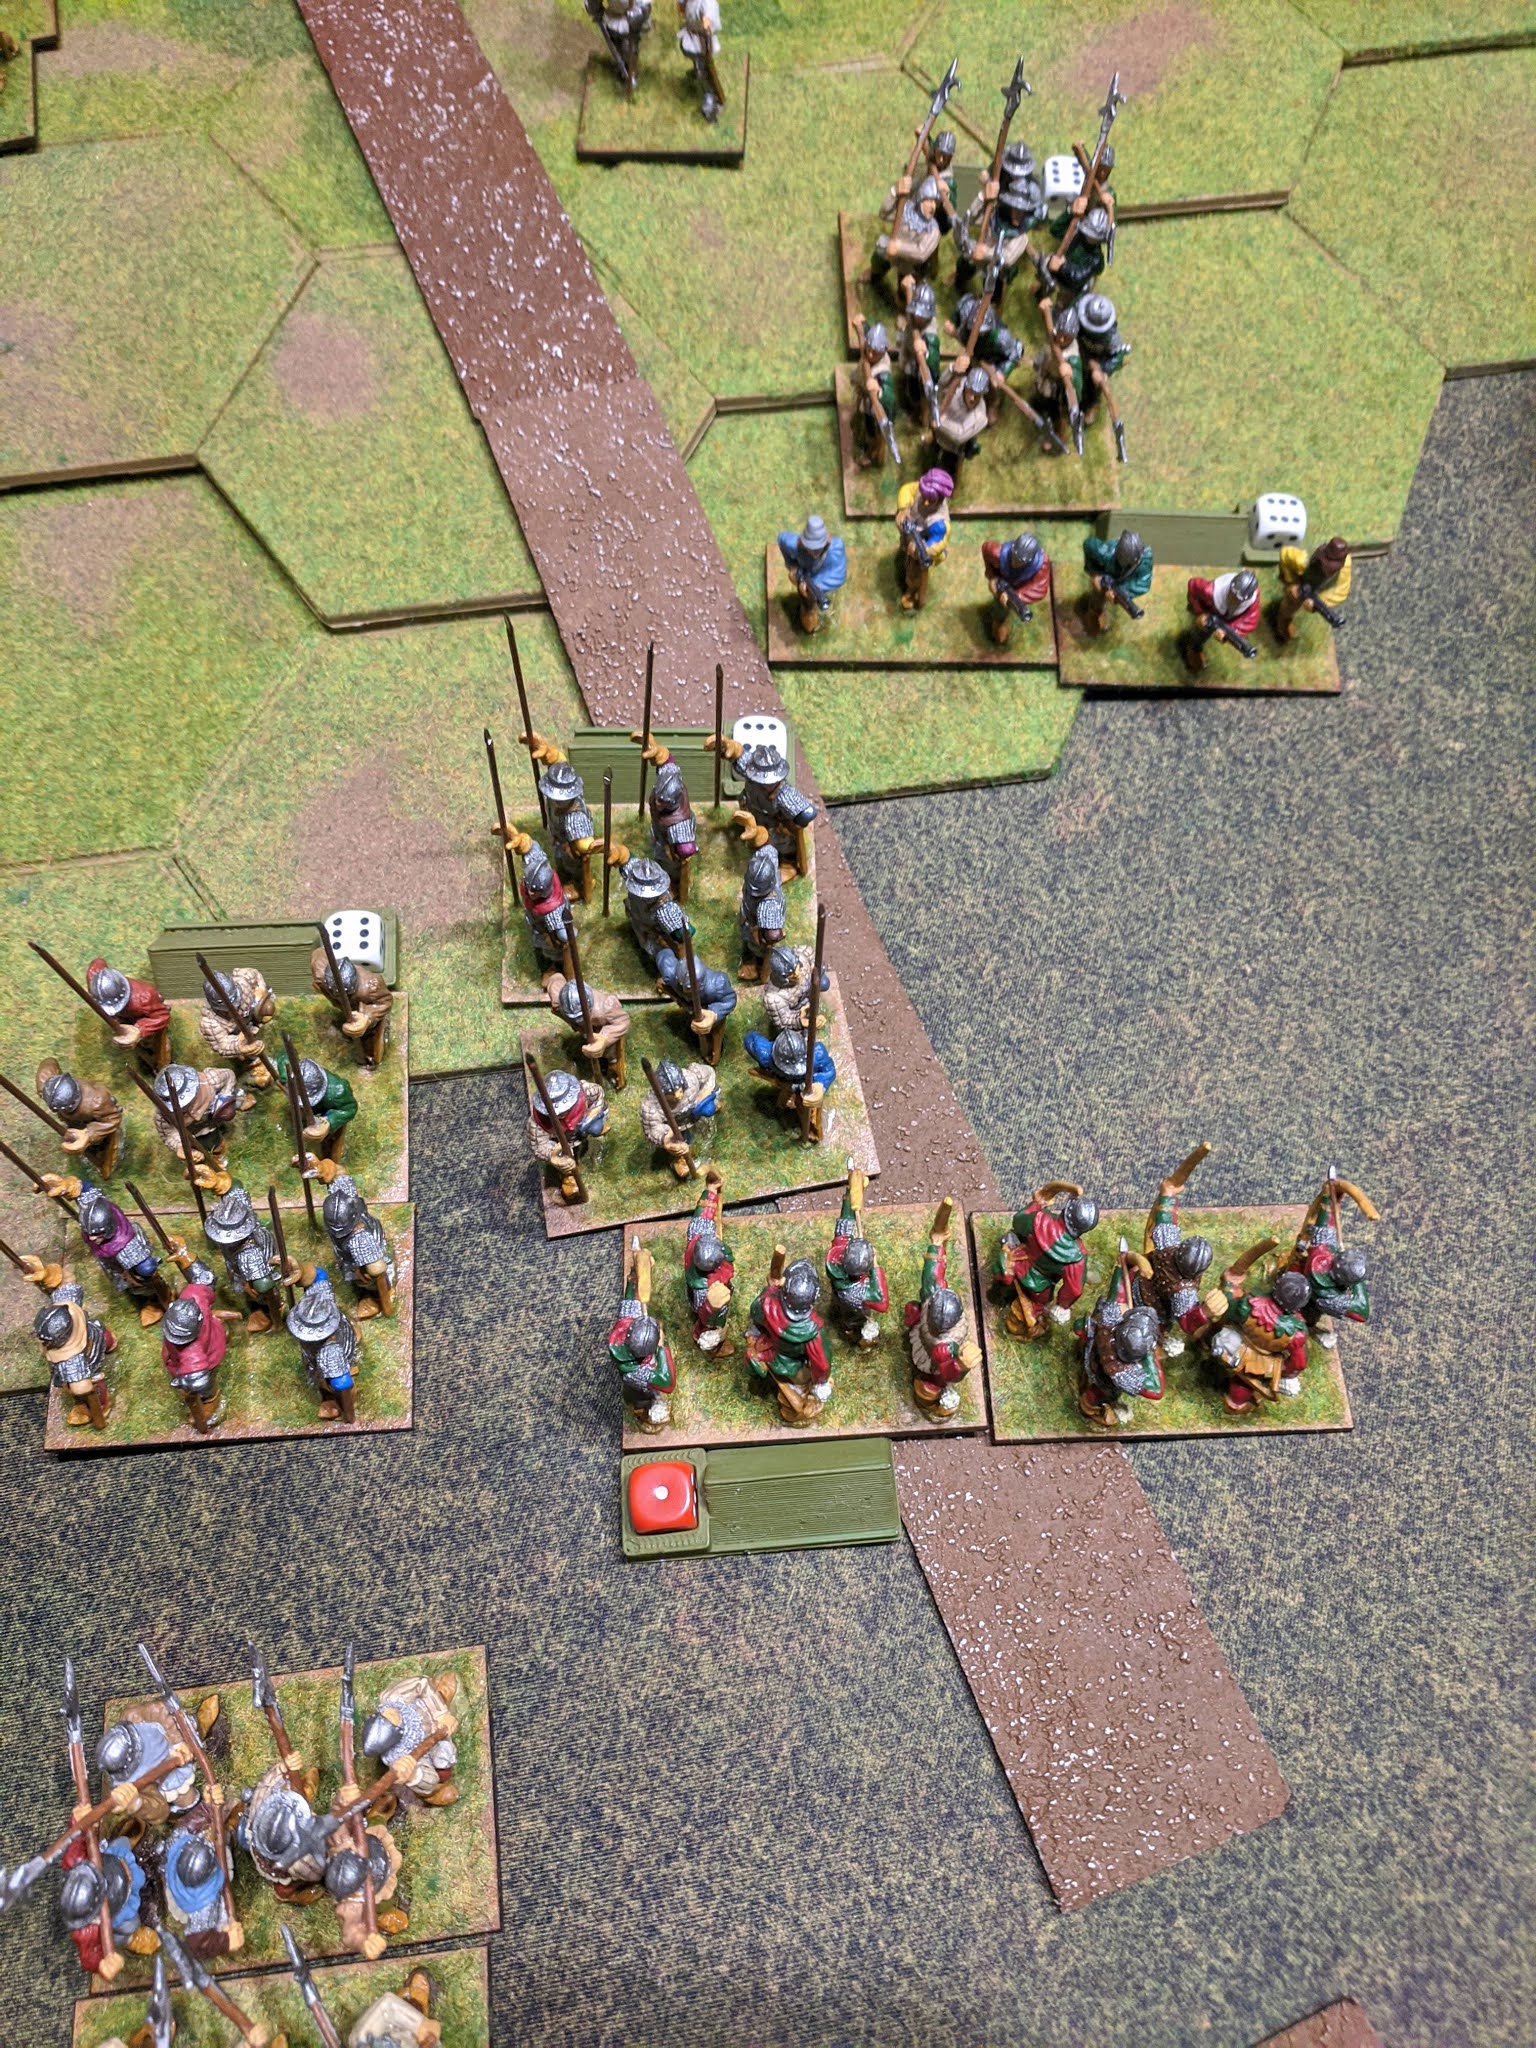
Overview of the set up, with the Tudor command of Oxford deployed to pepper the Yorkists with arrows! The small dice both indicate the number of Resolve Points the Company has lost (6 = zero), but also are color coded by battle (command).
Set up from the Yorkist perspective. Left to right,Schwartz (white dice) with Burgundian-financed German mercenaries, Lincoln (blue dice) with the Pretender and core English troops, and Fitzgerald (green dice - of course!) with the Irish troops and their supports.
Oxford's command is the vanguard of the Tudor army; King Henry VII, with the Main battle is nearby, and expected to join the battle later. His battle will appear on the battlefield when the Tudor "Event" card is played. However, it is left out of the deck for the first turn, and will be added to the deck when the cards are shuffled at the start of the 2nd turn!
Test of Resolve is a card driven game, with a single deck being used for both players. The card backs either have a red banner at the top (Lancastrians/Tudors), or a white one for York. The cards are taken off the top of the deck, in order, until a card of the opposite color is encountered. That run of cards is then played by the appropriate player, who will thus know how many cards they have until their opponent has a chance to act, but not what they are or in what order they appear. They also will not know how many cards their opponent will have to play after theirs. Plus, as we shall see, there are a number of twists that can sow even greater uncertainty. Being a noble supporting either cause was dangerous business... and usually motivated chiefly by self interest!
The top card is red (Tudor), but the next card is white (York). In this game, rules co-author David Knight is playing Oxford and the Tudors, whilst I am playing the rebellious Yorkist host and their allies. Rules coauthor Tim Couper is hosting the game via Zoom in Scotland.
The 1st card is a Tudor Fire/Strengthen Resolve. Four of the five Tudor Archer units have targets at long range; the archer unit farthest to the left of the prior picture is out of range, and cannot shoot, but the other 4 let fly with volleys of arrows! As the Tudors have as yet lost no Resolve Points, the Strengthen Resolve component of the card, which takes place after firing, has no effect.
Fire Table
Fire
Hit: 1 RP loss if: Natural 12; Bow/Dart/Artillery: 9+; Handgun: 8+
Natural 1: Missile: Seek Safety; Organ gun: Destroyed; Artillery: no Fire next time
Natural 12: Target w. Attached Commander makes a Clifford Roll
Hit by Artillery: take Resolve Test: Fail: with 1 RP loss: Turn Tail; 2+ RP loss: Rout
-3
-2
-1
+0
+1
Firer
Bow/Dart v Plate;
Small Company
Bow/Dart v Kern
Missile Range
Longbow: 10 - 15"
Crossbow: 10 - 15"
Longbow: 0 - 10"
Crossbow: 0 - 10"
Handgun: 0 - 5"
Dart: 0 - 3"
Artillery Range
Heavy/Med: 20 - 30"
Light: 10 - 20"
Heavy/Med: 10 - 20"
Light: 5 - 10"
Heavy/Med: 5 - 10"
Organ: 5 - 10"
Heavy/Med: 0 - 5"
Light: 0 - 5"
Organ: 0 - 5"
Orientation
v. Front
v. Flank/Rear
Target
In Cover;
Small Company
Scurrers
Other Mounted;
Friend
Circumstance
Multiple Targets
Per RP Loss
David/Oxford rolls uncharacteristically hot dice (all die rolls in Test of Resolve use a D12), and rolls a 9 and then a 10 shooting at my Kern. Being long range fire, the 9 would have missed most targets, but because the Kern are unarmoured, it hits. Both of my Kern units lose a Resolve Point (note the "1" now showing on their green Irish dice. As a result, Fitzgerald's battle loses two Battle Morale Points (BMP), leaving him with 8. Ach! When a battle goes below zero BMP, Bad Things are likely to happen!
The two remaining Tudor Archers shoot at the lone Yorkist archer in the center battle of Lincoln, rolling a 12 and a 6 - one Resolve Point lost by the target (Melee troops generally have 4 resolve points, Archers and Kern 3, Skirmish Crossbowmen and Handgunners 2, and so on). Note that a natural roll of 12 always hits, regardless of any modifiers. Lincoln's battle loses 1 BMP and now has 9 remaining. Hot shooting, David!
Next are two Yorkist cards; the first one isMove and Melee. Stung by the Tudor fire (and knowing King Henry is on the way with Tudor reinforcements) the Yorkists prepare to advance!
Movement
Foot
D12
Scurrers
D12+4
Other Mounted
D12+2
Kern
D12+1
Fitgeraldrolls a "3", so his Kern, unencumbered by armour, can move 4". Lincolnrolls a "1"; a roll of "1" means no movement at all. "Time for a spot of tea?", enquires Lincoln. Schwartz, rolls a measly "3" as well. Thus the right and left battles move forward somewhat, whilst the center battle polishes their armour. "Not exactly a blitzkrieg there, old bean!"
The situation on the battlefield after the meager Yorkist moves.
Flummoxed!This is a card you never want to turn... except, when as here, it is the LAST card of your run. Why? because all of your remaining cards for this run are turned over to your opponent to play.
Talk about the slings and arrows of outrageous fortune! I am very happy to have this card pass harmlessly... and to know I won't have to worry about it coming up again until next turn!
Next is run of SEVEN Tudor cards. Please, let the first or second one be HIS Flummoxed card! :-)
Uh-oh! Fire/Strengthen Resolve! Second verse, (nearly) the same as the first!
Oxford's Bowmen let fly again. 2 target the Kern of Lincoln's battle... David rolls and 8 and a 7; still being at Long range, only the ( is a hit; another Resolve Point lost by one of the Kern, and another BMP lost by Fitzgerald'sbattle.
The third and fourth companies of Bowmen shoot at the lone Archers of Lincoln's battle - David rolls a 9 (miss at Long range(), and an 11 = another Resolve point and BMP lost from Lincoln's command. It is scant consolation that the 5th Tudor Archer company shooting at the now in range Handgunners of Schwartz's battle miss rolling a "2". (Had they rolled a natural 1, the hapless archers would be forced to "seek safety", taking them out of the shootout). Once again, there is no lost Tudor resolve to strengthen!
The second card of 7 for Oxford.
With all of Oxford's men comprising a single battle, David rolls his D12 - an "11"! His men move up to "stand off" distance for Archers, which is 9"; they may not voluntarily move closer to enemy troops while in "Wide" deployment (firing formation).
Oxford's 3rd card of the run of 7 is Move and Melee - 1 Battle. This is the same as the regular card, except that it is applied to a single Battle of the player's choice. As there is but a single Tudor battle on the table anyway, David need not make a choice! He rolls a D12 - 6! His Archers are already as close as they can come to the enemy, but he can move the melee troops. He leaves the center two where they are, but decides to "shuffle" 3" to either flank. This is to provide the Archers some support. Troops fought close together in this era, and companies without friendly support nearby are considered "isolated" which causes significant penalties in many areas.
(s…
Oxford's 4th card isEnd Turn. When BOTH End Turn cards have been played, the turn ends then and there, and the decks are shuffled. The first card turned has no effect, however.
Ah, Flabbergasted! This card positively modifies the next friendly card that follows (if none such, there is no effect. Fortunately, the Tudors have one more card remaining.
Definition of the Flabbergasted! card from the rules:
A notable incident has occurred. This card impacts the next card to be played in the Play Deck, if there is one:
Move & Melee:
Either: +3 to the Movement Distancedie roll (and can pay the3” Cost),
Or: +1 modifier on the first Melee round.
The choice must be made prior to rolling for movement. It applies to all companies in a battle, and may be different for each battle.
Fire/Strengthen Resolve:
Either: Fire: +1 modifier on fire attempts,
Or: Strengthen Resolve: +2 modifier on all Strengthen Resolve Checks.
The choice applies to all companies in a battle, and may be different for each battle.
End Turn:no additional effect.
Milling Around: becomes a conventional Move & Melee card!
Missile Supply: fire-capable missile companies may Fire!
Flummoxed!: nullifies the Flummoxed! card effect.
Event: +2 modifier on the Event die roll. If a modifier is not appropriate, players should decide on a creative alternative!
Milling Around?!
Consulting the rules, a "Flabbergasted!" + "Milling Around" = "Move and Melee". Satisfied with his dispositions (and hoping for the chance for more bow fire, and the arrival of King Henry and his troops), David declines any action.
Oh-ho! The proverbial worm has turned - six glorious Yorkistcards (and the ill begotten Flummoxed! card out of play for this turn as well).
Peter chortles softly - let us see what the next Yorkistcard is, my precious!
Flabbergasted! + Move & Melee = add 3" to movement, OR fight +1 in all melees... but not both, and the choice is applied on a battle by battle basis. It must be made before rolling the dice. Still needing to get into contact across his front, Peter opts for the +3" to movement for all three battles.
Fitzgerald's battle rolls a "10". Adding the 3" for the Flabbergasted! effect, plus an extra 1" more for the lightly armed Kern, most of his companies can move up to 14"! Kern can use a special "impetus throw" of their darts when they move forwards up to Standoff Distance (2"). The Irish Kern roll a 5 (miss) and an 11 - a hit!
Note the hit marked on the far left Archer unit; 1 Resolve Point down, and one BMP lost for Oxford - his first such. Note also the 2 units of Kern in massed formation moving off to their right, with the retinue moving up behind the remaining Kern in wide formation, as supports. Lincoln's battle in the center rolls a 4, plus 3" for the Flabbergasted!, and moves up to just behind their Archers (they didn't have much more movement left, and the Archers can't move closer than stand-off distance (9") from the enemy in Wide formation, and if the melee troops pass in front of them, the Archers will automatically move to the rear in Mass formation (deep), and can no longer shoot. Finally, Schwartz's battle rolls a 9, plus the 3" for the Flabbergasted!; this brings them up behind the Handgunners (if they pass through them, they will scatter at no loss of BMP's, their job for the battle being done). All of his companies choose to use 3" of movement to sidestep towards the center.
Milling Around!
"Some mead, Milord?"
Fire/Strengthen Resolve - The Kern take another shot each with their darts - one rolls a "10" but misses due to the 2 Resolve Points they have lost previously, but the second rolls a 12 and hits - another Resolve Point and BMP lost by the Tudors. The Archers of Lincoln'sCenter battle shoot and roll a 12! Due their losses, that was the only roll that would have hit. David groans as the lost Resolve Point is marked, and yet another BMP surrendered. Not to be outdone, the Handgunners of Schwartz's Left Flank battle roll a "9" - all they needed was an 8, so yet another Tudor Resolve Point loss is marked, and another BMP surrendered. "Tough luck, that, my good chap!" We almost never see missile fire this effective in Test of Resolve... but Peter is rolling the famed "Jalapeno Die" (it's HOT)!
On this card, in addition to Firing with all eligible units, the player may also attempt to "Strengthen the Resolve" (think Rally) of any of his companies that are showing one or more lost Resolve Points.
Strengthen Resolve Table
8+: Pass
Natural 12: Pass
Pass: Recover 1 lost RP
Natural 1: Lose 1 RP & take Resolve Test
-2
-1
+0
+1
+2
Quality
Very Inferior
Inferior
Average
Superior
Knights
Losses
Per RP Loss showing
Circumstance
Isolated
Commander Impact;
In Cover
Peter rolls for his eligible units (total modifiers in parentheses):
"Not exactly a St. Crispin's Day Speech, eh?" quips the amiable opposition!
Aftermath of the Yorkist shooting, etc., on the Right and Center of their lines
.
and over on the YorkistLeft.
Fire/Strengthen Resolve- "Encore, encore!" "Wait, isn't that FRENCH? We don't want no bloody French here in Merry Olde England!"Lincoln (Peter), his rebellion having been financed by his aunt, Margaret, Duchess of Burgundy, simply rolls his D12's!
Kern 8 miss, Kern 10 hit, Archers 7 miss, Handgunners 6 miss. Another lost Tudor Resolve Point and BMP surrendered.
On the Strengthen Resolve Tests, a 3 - 8 - 2 are rolled, all failing. Evidently there has been little improvement in the oratory skills of the Yorkist leaders!
The 6th and last card of the Yorkist run is just what the Pretender ordered! Fitzgerald's battle rolls a "9" (with the Irish adding another 1" to their movement).
A company of Retinue moves through the Kern to their front and contacts a battered Tudor Archer unit... or does it? This situation calls for a Withdrawal Test:
Withdrawal Table
2+: Pass
Fail: Rout. Natural 12: Falter.
Pass & Haven: Withdraw; Pass & No Haven/Artillery: Scatter
-5
-3
-1
+0
+1
Quality
Inferior
Average
Superior
Losses
Per RP Loss showing
Circumstance
Rear'd
Flanked
Isolated
In Cover;
Voluntary
First, with their melee troops having moved through their lines, the Kern are placed behind them, in Mass formation. They can function as second rate melee troops now, but may no longer shoot for the rest of the battle. Then for the Withdrawal Test for his Archers, Oxford (David) rolls a D12; note that they have already suffered the loss of 2 Resolve Points (RP). He rolls a "6"; the Archers pass, and "seek safety" behind their Haven (melee troops).
With the Tudor Archers having done the "Shuffle off to Bristol", the Yorkist Retinue may continue to move forwards, up to the limit of their total Move distance (9"); here they halt upon contacting an enemy Retinue company. A Melee will ensue!
The second of Fitzgerald's Retinue companies similarly moves through the Kern to their front, and forces the opposing Tudor Archers to make their own Withdrawal Test. David rolls... a 12!
The natural roll of 12 on the Withdrawal Test, causes the Yorkist company to Falter. It halts 1" away from the Archers, and can move no further.
However, the same Tudor Archers are now contacted by a unit of Kern in Mass formation, and must test again. This time David rolls a "2". Because the Archer company already has lost 1 RP, that 2 becomes a "1"; On a modified roll of 1, the company Routs!
When a company Routs in this fashion, it is removed from play, and any remaining Resolve Points are lost (in this case, 2), along with the same number of BMP's. Ouch!
With all of the Movement done for Fitzgerald's battle, it is time to resolveMelees. Ordinarily this would be done after all the battles of that army have moved, but for clarity, we will resolve the one resulting Melee now.
Melee Table
Melee
0-1: Ongoing; Lose by 2-5: 1 RP; by 6-9: 2 RPs; by 10+: 3 RPs
Loser takes Resolve Test: Fail: with 1 RP loss: Turn Tail; 2+ RP loss: Rout
Natural 1: Attached Commander eliminated
-3
-2
-1
+0
+1
Quality
Inferior
Average
Superior
Circumstance
Isolated;
Dismounting [1st];
Surprised [1st]
Flanked/Rear'd [1st];
Any v Plate;
Mounted v Pike
Shock [1st];
Uphill from Enemy
Type
Crossbow/Handgun;
Scurrers
Archer; Kern;
Small Company
Frontal Pike [1st]
Enemy Location
In Established Position
In Hasty Position
Per ...
Per RP Loss
Per Outnumbering Company
Both companies are at full strength (no lost RP's), and the Irish have Shock in the first round (only); both are Retinue of Average quality, so the net effect is +1 to the die roll for Fitzgerald's boys. Peter rolls a 3 + 1 = 4, and David rolls an equally uninspired 3. A difference of 1 is an "Ongoing" melee - neither side takes any losses, and the melee may continue on the next Move and Melee card of either side. Otherwise, successive rounds of melee are fought until it is resolved, or one side decides to "turn tail" and retreat from the melee.
Lincoln's central battle rolls a "2" for its move; if the melee troops advance any further, the Archer unit will have to form up and seek safety behind it, after which it can no longer shoot. For such a short move distance, the melee companies of the battle elect to stand pat.
Shifting our focus to Schwartz's battle on the Yorkist Left, a "7" is rolled for Movement. The rightmost company of German Pikemen moves up to the company of Tudor Archers...
which rolls a "3" on its Withdrawal Test, successfully withdrawing behind its Haven, as seen above. The Pikemen continue to move forwards, but lack sufficient distance to reach the Tudor company of Retinue, who were beyond the Archers.
The second unit of German Pikemen moves forward, contacting another unit of Tudorarchers.
Those Archers also roll a 3, just barely enough to pass the Withdrawal Test, and withdraw behind their Haven as well, and the Pikemen continue onward to the limit of their 7" move. .
Finally, the 3rd company, this time of Retinue, moves forwards. As it passes beyond the Handgunners, the missile troops scatter, and are removed from play; "Our work here is done, thanks for the contract, Gents!" Note that scattering does NOT cost any Battle Morale Points!
Oxford (David) heaves a sigh of relief that the long run of Yorkist cards is over - but it is revealed that he has but one card to play before another Yorkist card (or more) is turned. The card is turned, and is revealed to be Fire/Strengthen Resolve. Obviously, this card would have been far more useful *before* all but one of the Tudor Archers were forced back and thus no longer able to shoot!
Overview of the action at this juncture; noteLincoln's battle well back in the center, enjoying a late breakfast, as it were. Oxford has just one unit of Archers that can shoot, so they do so, rolling a "5",. and miss. There is certainly no shortage of lost Tudor Resolve Points to Strengthen!
He starts with the Archer unit on his far left, and rolls.... a "1"!
On a natural roll of 1 on the Strengthen Resolve Table, the company loses 1 RP (and BMP), and must take a Resolve Test. In this case, having started with 2 RP's lost, the loss of the 3rd is all that an Archer company has, and they are removed from play.
Resolve Table
RP Loss+: Pass
Natural 1: Fail
Fail: Showing 1 RP loss: Turn Tail; 2+ RP: Rout
-2
-1
+0
+1
+2
Quality
Very Inferior
Inferior
Average
Superior
Knights
Losses
Per RP Loss showing
Circumstance
Isolated;
Panic
Commander Impact;
In Cover
The resulting situation looks grim indeed for Oxford's left flank. "Spot of bad luck there, eh?" observes Peter, rather unnecessarily. David tried to Strengthen Resolve on two more Archer companies, but rolls a 3, and then a 4, failing both times.
Two Yorkistcards! With the situation on the table very much in his favor, Peter turns the first card with eager anticipation.
End Turn! As this is the secondEnd Turn card turned, the turn is over, all play ceases, and the deck is shuffled. For this scenario, the Tudor Event?card is added to the deck at the reshuffle. When this card is turned, King Henry's fresh battle will arrive on the table to succor Oxford'sbeleaguered troops!
Turn 2 commences with a single Yorkist card.
Peter has the tough decision about which of his three battles should use this card! Should he move up the center battle under Lincoln, which has lagged far behind the others? Should he act with Schwartz's battle, which has three units of melee troops poised to strike,. even on a fairly low roll? Or should he try to finish off Oxford's left flank, with the Irish sweeping all around?
In the end, it is Schwartz'sbattle that gets the call! An "11" is rolled for Movement. The first unit of Pikemen moves straight ahead into contact with the opposing Tudor Retinue (Billmen). The second company of Pikemen might have first pivoted (which costs 3" of movement) and then moved forwards to hit the side of the same Retinue (which would NOT count as a flank attack, as they did not start behind the front of their opponent). However, with a formed company (the Archers) to their front and within 4", this is not allowed. Thus the second Pike company moves straight ahead into the Archers. Because they are now in Mass, there is no Withdrawal Test; the Archers must stand and fight! The third company (Retinue this time) pivots slightly and then moves forwards, striking a glancing blow on the same Archer company (this does NOT count as a Flank attack, as explained previously). The two resultant Melees are then worked out.
In the melee against the Archers, the Yorkists are +1 for Shock, +1 for Pikes in frontal melee, and +1 for Outnumbering the Archers. The Tudors are -2 for Archers in Melee, and -1 for having lost 1 RP. Long odds! David hopefully rolls his D12: an 8! 8 - 3 = 5. He hopes that Peter will roll a 1, 2, or 3... but he rolls an 8 as well; adding 3 gives Peter a final score of 11. With a difference of 6, the Archers lose 2 Resolve Points (and Oxford 2 BMP's). That brings the Archers to their maximum loss, and they are removed from play.!
The other melee should be closer. The Pikemen are +1 for Shock and +1 for Pikes in frontal melee. The Tudor Retinue has no applicable modifiers. David rolls a 4; not great, but Peter can still roll a 1!
However, he instead rolls... a 12! 12 +2 = 14, difference of 10. The Retinue loses 3 RP/s (and Oxford loses 3 BMP's).
Resolve Table
RP Loss+: Pass
Natural 1: Fail
Fail: Showing 1 RP loss: Turn Tail; 2+ RP: Rout
-2
-1
+0
+1
+2
Quality
Very Inferior
Inferior
Average
Superior
Knights
Losses
Per RP Loss showing
Circumstance
Isolated;
Panic
Commander Impact;
In Cover
Whenever a company loses a RP to Artillery fire, in Melee, or as a result of a failed Strengthen Resolve attempt, it must take a Resolve Test. The Tudor Retinue roll a "9" for this test, and pass. With only 1 Resolve Point left on the Retinue, and facing long odds if they were to stay in the melee, the Retinue Turns Tail. They roll a D12 ("5") and move 5" backwards, facing to the rear.
The situation at the conclusion of the melees; the total cost to Oxford's battle has been a whopping 5 BMP's; they have lost 13 of the 17 BMP's that they began with. The Yorkists are in much better shape.
Next is a Tudor card...
Flummoxed! Fortunately, it was the ONLY card in the Tudor run, so it has no effect whatsoever.
Next is a lone Yorkistcard...
The sole remaining YorkistArchers shoot and miss. 2 units of Kern and 1 of Archers are showing lost Resolve Points. The first company of Kern fails to Strengthen its Resolve with a 2, the second regains one lost RP (but NOT any BMP's!) on a 10, and the Archers fail with a 2.
This unit of Kern has regained one lost Resolve Point.
The Resolve Point loss die is reset to zero (indicated by a 6 showing).
Next are 2 Tudor cards...
Oxford (David) gives a sigh of relief - useful card! However, unless Henry arrives soon, his battle is going to be in a lot of trouble! He rolls "10" for his movement.
The remaining Archer company in his center in Wide formation voluntarily changes into Mass (which costs 3" of movement, but includes a free change of facing as part of the process), and turns to its left, along with its two accompanying Retinue companies, and all three move to attack the flank of Fitzgerald's Irish.
The remaining Archer and Retinue companies that were opposite Schwartz's Germans also turn to their left and move towards the Irish. Lincoln's center battle calls for some ale as they stand and watch their other two battles fight !
Melee time!
The Tudor Archers are attacking the Kern in the flank, so they get +1 for Shock but -2 for Archers in Melee and -1 for 1 RP lost, net -2. The Kern are -2 for Kern in melee and -1 for being flanked, net -3. Peter rolls 9 - 3 = 6, while David rolls 6 - 2 = 4. With a difference of 2, the Archers lose 1 RP (and another BMP is lost as well). The Kern pass their Resolve Test.
In Round 2, the modifiers for Flanked and Shock no longer apply, and the Archers are down another RP. Peter rolls 5 - 2 = 3, whilst David rolls 3 - 4 = -1; with a difference of 4, the Archers lose another RP, and another BMP is lost as well. Oxford is down to just 2 Battle Morale Points left. The Archer, having lost 3 RP's, are removed from play.
Aftermath of the Archer - Kern melee.
Fitgerald'sRetinue company is engaged in a ongoing melee with a battered company of Tudor Retinue, but now a 2nd, full strength Tudor Retinue company has joined the combat, and they are rated Superior. The modifiers for Shock and Flanking only apply in the first round of Melee, and this one was Ongoing. However, David can chose which company will be the Principal Attacker. By choosing the newly entered company, he gets +1 for outnumbering and +1 for Superior quality (and no penalty for the 2 RP lost by the outnumbering company). David rolls his D12... and gets a 2! Twisted Knickers! 2+2 = 4. Peter rolls his (in)famous Jalepeno die and gets... a 10! Bloody H@%%! With a difference of 6, the previously fresh Tudor Retinue company loses 2 RP (and Oxford loses another 2 BMP's... he now has zero BMP's left!). David rolls a 7 for his Resolve Test, and passes it. He decides to continue the melee, but now the net advantage is +1 to York. Peter rolls a 5 + 1 = 6, and David rolls a 7; with a difference of 0 or 1, there are no further losses, and the Melee becomes Ongoing.
Oxfordhas a shot at last minute redemption, with Henry still nowhere to be seen. David rolls a 4 for Movement.
David moves his companies to the left, creating one new melee with a company of his Retinue (led by Oxford himself) against another company of Kern. He can choose to resolve the melees in any order he choses, so he starts with the heavily advantaged Retinue vs Kern combat. The Retinue are +1 for shock, and the Kern are -2 for Kern in melee. Peter rolls... and 11 - 2 = 9. David rolls a 1 +1 = 2. Difference of 7, so the Retinue lose 2 RP's. Furthermore, because a "1" was rolled in melee by a unit with an attached Commander, Oxford is lost! His command loses 2 BMP's for the melee results, and yet another for the loss of Oxford himself. As the battle was already at zero BMP, this triggers a Battle Morale Test:
Battle Morale Table
8+: Pass
Fail: Battle Disperses; enemy receives 1 BMP
-2
-1
0
+1
Commander
None
Poor
Competent
Inspiring
David, true to form for the game as a whole rolls a 2, which fails rather spectacularly. Oxford's battle disperses, and with Henry not having appeared as yet, the game is over!
However, the Wars of the Roses being a power struggle between powerful noble houses, there remains one last procedure:
Losing Commanders' Fate Table
Winning Commanders' Fate Table
Commander Eliminated
All Others*
Commander Eliminated
Battle Dispersed**
Roll
Outcome
Roll
Outcome
Roll
Outcome
Roll
Outcome
1-4
Died on battlefield
1
Died
< 1
Disinherited
5-8
Captured
2-6
Captured
1-4
Died on battlefield
1
Died
9-12
Escaped, wounded
7-12
Escaped
5-12
Escaped, wounded
2-12
Escaped
* +2 for Fleeing Commander
** -2 for Fleeing Commander
The fate of Oxford is assessed by rolling a D12, and it comes up 6 - he is captured!
The ultimate fate of any Captured Commanders is finally determined by a roll on the Captured Table.
Captured Table
Roll
Result
1 - 8
Executed
9, 10
Imprisoned
11, 12
Changed sides
Heraldic Roses, Lancastrian (and Tudor), and Yorkist
(By Sodacan - Own work, CC BY-SA 4.0, https://commons.wikimedia.org/w/index.php?curid=61853381)
Test of Resolverules are available from their website in both both printed and PDF formats, along with custom card decks, the first scenario book, and, expected this summer, the second scenario book. Various bundles of these products are available at an additional discount. The QRS and files to print your own cards are available on their website as free downloads as well.
The printed rules and scenario book (only) are also available from Amazon.com.
The second scenario book will cover 8 more actions:
I have played every one of these scenarios in playtesting, several of them many times, and each one is unique. None of them involve equal forces of the same composition battling it out. Many if not most of the actions of the Wars of the Roses occurred in unusual situations, and/or with uncertain arrival or loyalty of key participants. Victory is always possible for either side. Each scenario contains the key historical background as well, so playing through them in order is like experiencing the broad sweep of the conflicts!
You Tube video of an interview with the authors, Tim Couper and David Knight, discussing the process of developing the rules. It isn't so much about the rules mechanisms themselves, which are better covered in this walkthrough. I found it quite interesting, even having been heavily involved in the project myself.
Although I have no financial interest in Test of Resolve whatsoever, I can hardly claim to be unbiased. Still, I think it is fair to say that Tim and David have achieved their design objectives extremely well. The scenario books are fantastic - well worth the price even for use with other sets. I recommend them all enthusiastically!
We will be playing a Zoom game of ToR as part of the Pandemically imposed virtual HAVOC, Hold the Line, on Saturday, May 22, with Tim and David hosting.
Peter, your work here is a very impressive overview and walkthrough of the rules. I think I would need to try a game or two to actually get a feel for the mechanisms at play. Seems complicated upon first impression. The video interview was interesting too. Thanks for compiling all of this material.
There are some new concepts to learn as far as how the missile and melee troops interact, but the rules are in fact pretty simple; in over 25 battles, almost all have ended in 2 hours or less. We should have Tim Zoom you into a game!
The 10 AM start for the game at Hold the Line would be 7AM Pacific time, probably a bit early. Tim, Davis, and I usually do playtest games on Thursday afternoons at 1:30 PM EDT, which is 5:30 PM ion the UK, and 10:30 AM Pacific Time, so that could work!
because the development took place almost exclusively during the pandemic, virtually (pun intended!) all the playtesting has taken place via Zoom. On the other hand, that has allowed many who would otherwise not be able to play together to do so!
For someone like you who is familiar with FopB, they started as an adaptation of FoB, until Dave and Tim, correctly, I think, decided to break from that. Still the concepts of card play in general, although more than a bit different here, and Morale/Resolve points should seem very familiar.
Great post Peter. As a reenactor in a FitzGerald group this battle is of particular interest to me. I have walked the battlefield in my kit accompanying a battlefield tour, some pics of the event are here if you are interested https://www.facebook.com/pg/gwp.reenactment/photos/?tab=album&album_id=1756661851079936&ref=page_internal
There are a lot of great pics there, Ollie. I believe David has pointed out that recent battlefield archeology has indicated that the traditional site of the battle is a mile or two off. In the previous playtest, Oxford swept the Yorkists from the field!
Thanks Peter - having the wrong site seems to be par for the course with Wars of the Roses battlefields - for years they had Bosworth, arguably the most iconic of the clashes, in completely the wrong place!
They are a LOT of fun to play, but definitely NOT for the control freaks! A version for the Swiss-Burgundian Wars, which were more or less contemporaneous, is in trial. We'll see if it works!
You're welcome, Norm. In addition to the games listed in the post, Tim tell me he's holding a 6 UK player game by Zoom this week to gibe them a firsthand run through (several if not all of them already have copies of the rules in hand or on order).
Another interesting Pandemic induced opportunity, despite the legion of misery it has caused!
These are Tim's figures over in Scotland, but I think they are on roughly 60 mm frontage (old WRG standard, so that's what I'd use myself, as ALL my ancients and medieval armies were and always will be based that way) - in the rules Tim suggests 60 - 70 mm front for 28 mm figures. Other basing (ie, Impetus, and others) can be accommodated.
Glad you found it useful. Milling around is back to classic Piquet in a way. Flummoxed is pure evil! :-) It was very tame this game, but others - talk about getting shafted! :-0
The nasty thing about flummoxed is not only do you lose a number of your own cards but your opponent, having had the benefit of them, is then due his own run of cards
Having played every scenario in these books at least once, and many several times, as in the actual history, there's a twist in every single one. Definitely not same old, same old!
I am not getting how the card sequence here is determined, i played a game and it seemed each time you draw a play deck you draw cards from the game deck until a card of the inactive side is drawn, then you stop and use the play deck, but in each case the inactive side only get one card is that correct.
OK, assuming no flummoxed cards and no second End turn cards, let us suppose the shuffled deck, top to bottom, was something like this:
YY - LLL - Y - LL - YYYY - L - YY - LLL
The deck would show a Yorkist (Y) card on top. The player would fan off cards until they came to a Lancastrian card, and then stop. Everyone would know that the Yorkists had 2 cards to play before there would be a Lancastrian card, but neither side knows WHAT the cards are until they are turned. The first Yorkist card is turned and acted upon, and then the second. Next are three Lancastrian cards; they are acted upon, one at a time, then the Yorkist card turns out to be the only one in that run. It is turned and acted upon. Next are two Lancastrian cards, which are turned and acted upon, one after the other. Following that, the Yorkist card showing atop the deck turns out to be one of four, so all 4 Yorkist cards are acted upon, in the order they are turned, and so on. Does that help it make sense?
Thaks Gonsalvo, that makes sense, but the rules didnt seem to read like that, they gave the impression a "Play Deck" is created each tim the active player session ends
It started out that way, and some similarities are obvious, but the combined sequence deck, the movement and missile and combat procedures are all different, and of course there are many very period specific provisions.
A slightly off-topic question - it looks like D6s are used for morale (or hit point?) markers, and I like the bases used to hold them very much, with the extra slot for a unit name or rating. Where do they come from? I've found some dice-only ones on Thingiverse, but not with the slanted slot. They look extremely useful - I've had difficulty with "marker" games where the dice scatter or turn over accidentally.
I have a question concerning the rules. Still don't understand the Movement rolls. Let's say i draw a Move card and roll a 7 for a battle. Does that mean that each company in the battle can move 7"? If that's right, do you then roll for each company you want to move to see if its move distance (which is variable) is less than 7" in which case the company's movement is curtailed?
I hope not, because that's very convoluted. But I can't understand what else it might mean.
The Roll applies to the entire Battle, and all of its companies. Individual companies only roll separately when they "Turn Tail" or are archers in wide formation contacted by enemy troops.


A great run through Peter
ReplyDeleteThanks David - it's been a pleasure playing with you via Zoom the past year!
ReplyDeletePeter, your work here is a very impressive overview and walkthrough of the rules. I think I would need to try a game or two to actually get a feel for the mechanisms at play. Seems complicated upon first impression. The video interview was interesting too. Thanks for compiling all of this material.
ReplyDeleteThere are some new concepts to learn as far as how the missile and melee troops interact, but the rules are in fact pretty simple; in over 25 battles, almost all have ended in 2 hours or less.
DeleteWe should have Tim Zoom you into a game!
I would enjoy that!
DeleteThe 10 AM start for the game at Hold the Line would be 7AM Pacific time, probably a bit early. Tim, Davis, and I usually do playtest games on Thursday afternoons at 1:30 PM EDT, which is 5:30 PM ion the UK, and 10:30 AM Pacific Time, so that could work!
DeleteA 0700 start is not too early for me. Either date/time works for me.
DeleteLooks very playable, Peter. Interesting to know they were created (at least partially) via Zoom.
ReplyDeletebecause the development took place almost exclusively during the pandemic, virtually (pun intended!) all the playtesting has taken place via Zoom. On the other hand, that has allowed many who would otherwise not be able to play together to do so!
DeleteNot a period I play but an interesting set of rules.
ReplyDeleteFor someone like you who is familiar with FopB, they started as an adaptation of FoB, until Dave and Tim, correctly, I think, decided to break from that. Still the concepts of card play in general, although more than a bit different here, and Morale/Resolve points should seem very familiar.
DeleteGreat post Peter. As a reenactor in a FitzGerald group this battle is of particular interest to me. I have walked the battlefield in my kit accompanying a battlefield tour, some pics of the event are here if you are interested https://www.facebook.com/pg/gwp.reenactment/photos/?tab=album&album_id=1756661851079936&ref=page_internal
ReplyDeleteThere are a lot of great pics there, Ollie. I believe David has pointed out that recent battlefield archeology has indicated that the traditional site of the battle is a mile or two off. In the previous playtest, Oxford swept the Yorkists from the field!
DeleteThanks Peter - having the wrong site seems to be par for the course with Wars of the Roses battlefields - for years they had Bosworth, arguably the most iconic of the clashes, in completely the wrong place!
DeleteWhich is where we still do the reenactment!
Perhaps better there than the parking lot! :-)
DeleteNot my period either, but the rules seem fun to me with plenty of ups and downs.
ReplyDeleteThey are a LOT of fun to play, but definitely NOT for the control freaks! A version for the Swiss-Burgundian Wars, which were more or less contemporaneous, is in trial. We'll see if it works!
DeleteVery cool, Peter!
ReplyDeleteThanks, Aaron; it is! :-)
DeleteThanks Peter, I have been looking for an explanation of the system and this has been a ton of work by you, again thank you.
ReplyDeleteYou're welcome, Norm. In addition to the games listed in the post, Tim tell me he's holding a 6 UK player game by Zoom this week to gibe them a firsthand run through (several if not all of them already have copies of the rules in hand or on order).
DeleteAnother interesting Pandemic induced opportunity, despite the legion of misery it has caused!
They look interesting! How big are your bases? I am guessing 28mm figures?
ReplyDeleteThese are Tim's figures over in Scotland, but I think they are on roughly 60 mm frontage (old WRG standard, so that's what I'd use myself, as ALL my ancients and medieval armies were and always will be based that way) - in the rules Tim suggests 60 - 70 mm front for 28 mm figures. Other basing (ie, Impetus, and others) can be accommodated.
DeleteExcellent overview
ReplyDeleteI really like the 'milling about' and 'flummoxed' cards.
Glad you found it useful. Milling around is back to classic Piquet in a way. Flummoxed is pure evil! :-)
DeleteIt was very tame this game, but others - talk about getting shafted!
:-0
The nasty thing about flummoxed is not only do you lose a number of your own cards but your opponent, having had the benefit of them, is then due his own run of cards
DeleteLike I said, Pure Evil - Bwah-hah-hah!
DeleteSounds like a game with nice period feel and the scenario books sounds great too!
ReplyDeleteBest Iain
Having played every scenario in these books at least once, and many several times, as in the actual history, there's a twist in every single one. Definitely not same old, same old!
DeleteI am not getting how the card sequence here is determined, i played a game and it seemed each time you draw a play deck you draw cards from the game deck until a card of the inactive side is drawn, then you stop and use the play deck, but in each case the inactive side only get one card is that correct.
ReplyDeleteOK, assuming no flummoxed cards and no second End turn cards, let us suppose the shuffled deck, top to bottom, was something like this:
DeleteYY - LLL - Y - LL - YYYY - L - YY - LLL
The deck would show a Yorkist (Y) card on top. The player would fan off cards until they came to a Lancastrian card, and then stop. Everyone would know that the Yorkists had 2 cards to play before there would be a Lancastrian card, but neither side knows WHAT the cards are until they are turned. The first Yorkist card is turned and acted upon, and then the second. Next are three Lancastrian cards; they are acted upon, one at a time, then the Yorkist card turns out to be the only one in that run. It is turned and acted upon. Next are two Lancastrian cards, which are turned and acted upon, one after the other. Following that, the Yorkist card showing atop the deck turns out to be one of four, so all 4 Yorkist cards are acted upon, in the order they are turned, and so on. Does that help it make sense?
Thaks Gonsalvo, that makes sense, but the rules didnt seem to read like that, they gave the impression a "Play Deck" is created each tim the active player session ends
DeleteGlad you found it helpful!
DeleteIt's one of those concepts that is easy to demonstrate and a bit harder to explain in words!
Is it, in effect, FOB 3 for Wars of the Roses?
ReplyDeleteEven the charts look the same!
It started out that way, and some similarities are obvious, but the combined sequence deck, the movement and missile and combat procedures are all different, and of course there are many very period specific provisions.
DeleteA slightly off-topic question - it looks like D6s are used for morale (or hit point?) markers, and I like the bases used to hold them very much, with the extra slot for a unit name or rating. Where do they come from? I've found some dice-only ones on Thingiverse, but not with the slanted slot. They look extremely useful - I've had difficulty with "marker" games where the dice scatter or turn over accidentally.
ReplyDeleteYes, the D6 indicates hits (Resolve Points) lost, with 6 being zero. the die color indicates the Battle they belong to.
DeleteThe die holders come from Lancashire games. Here's one of my posts with a link and also detailing another way to use them:
https://blundersonthedanube.blogspot.com/2020/06/battle-of-caldiero-1805-set-up-and.html
Scroll to the end for the bit about the markers.
I have a question concerning the rules. Still don't understand the Movement rolls. Let's say i draw a Move card and roll a 7 for a battle. Does that mean that each company in the battle can move 7"? If that's right, do you then roll for each company you want to move to see if its move distance (which is variable) is less than 7" in which case the company's movement is curtailed?
ReplyDeleteI hope not, because that's very convoluted. But I can't understand what else it might mean.
Thanks.
The Roll applies to the entire Battle, and all of its companies. Individual companies only roll separately when they "Turn Tail" or are archers in wide formation contacted by enemy troops.
ReplyDelete