Report of General Major Bajalich Regarding the Battle of Este
My Most Honored Sirs,
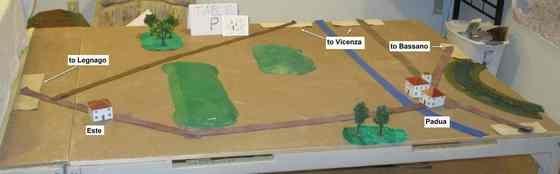
It is with pleasure I report our Austrian success in the defense of Padua and defeat of the French at the Battle of Este. (See map 00a and photo 00b for table layout - note photo is viewing the table from the south - all other photos view the table from the north.)
TABLE MAP 00a
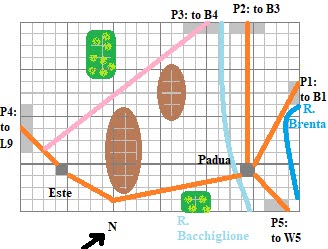
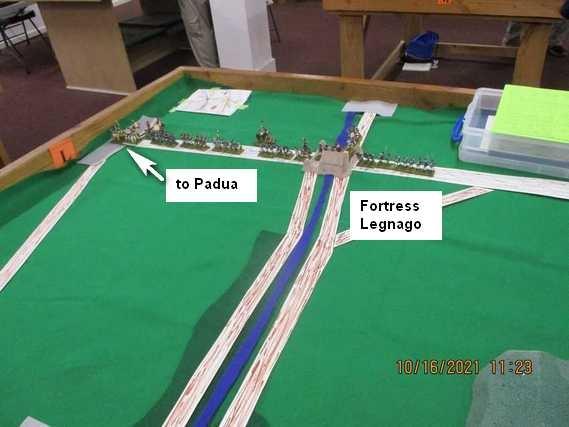
PHOTO 00b - Photo of Padua/Este Table
My forces started the campaign positioned in and around Bassano (Table B, see photo 01b). My orders from Baron Feldzeugmeister Alvincy were to drive south from Bassano supporting the divisions of General Major Lusignan (Russ, starting from Trente) and General Major Provera (Karl at Padua on Table P, photo 01p).
PHOTO 01b - Bajalich's Forces at Bassano
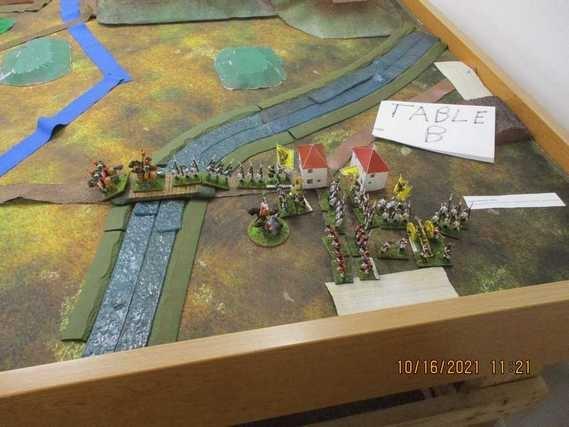
PHOTO 01p - Provera's Starting Forces at Padua
Lusignan was to travel Trente - Bassano - Vicenza - Verona while Provera was to attack westwards from Padua towards Legnago. Thus we three were to drive from the east, Lusignan to the north, my forces in the center, and Provera to the south, capturing the French attention and hopefully breaking the French line either at Verona or Legnago (see photo 01L for French starting forces at Legnago).
PHOTO 00L - Augereau's Starting Forces at Legnago
Basic Plan of Operation
Knowing Padua was our only supply center in the south and knowing the inherent (one might even say foolish aggressiveness) of the French, I determined my first priority was to help Provera cover Padua and help him drive on Legnago. To support Lusignan's approach to Verona and cover Padua against attack from the northwest, I garrisoned Vicenza and sent my sole cavalry unit for a quick reconnaissance along the Vicenza - Verona road.
Operations As Proceeded
My garrison occupied Vicenza without hindrance while my cav on recon had a clash with a French cav unit coming from Verona, it also apparently on reconnaissance.
(In Snappy Nappy terms, the French cav and my cav both simultaneously tried to enter the same Deployment Zone (DZ) connecting the Verona and Vicenza (Bassano) tables. This occurred on the turn 2 movement when all tables have their movement still synchronized. When two opposing forces of comparable strength simultaneously try to enter a DZ, they dice off to see who actually gets into the DZ, with the loser having to back off some safe distance from the DZ.)
The French cav, winning the clash (drat that 10 he rolled...) took one look at my troops still on the Bassano table, saw my (garrison) infantry approaching Vicenza, and the French cav turned around and left, returning to the Verona table. At that point, my cav was able to shortly follow and arrived on the Verona table to discover the presence of a full French division (Massena).
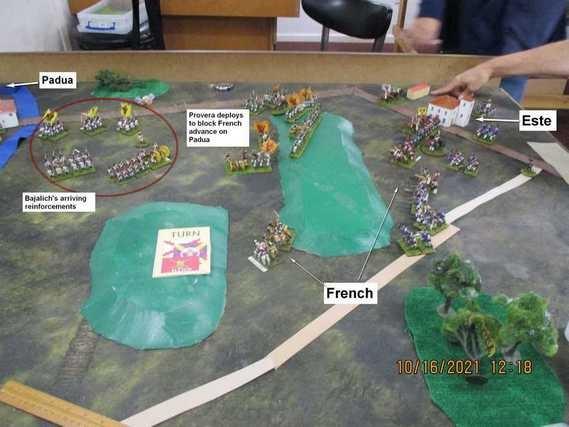
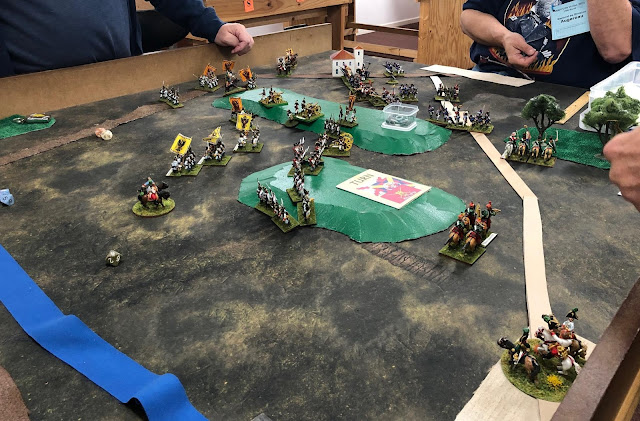
My main force left Bassano headed directly south, the shortest route to Padua. I reached Padua on turn three. At that point I could see Augereau coming from Legnago, had already reached Este and was deploying to drive on Padua. When he and I were able to confer, Provera had already started moving east against Augereau. I pointed out the great advantage to us should be gain control of the high ground between him and the French and urged him to make every effort to make that ground his. Meanwhile my forces would move behind Provera to deploy on his right (see photo 02).
PHOTO 02 - Initial Clash of Provera and Augereau
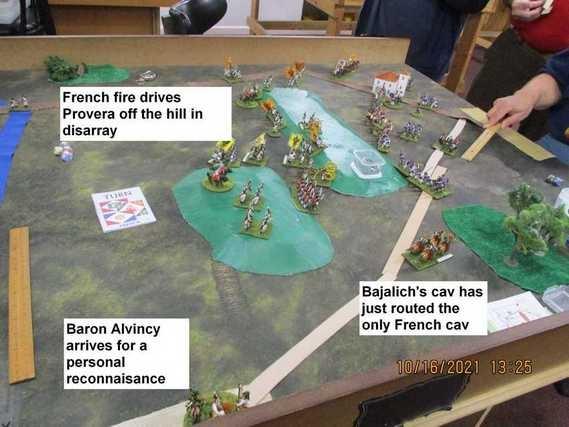
Provera indeed did manage to gain and deploy on the high ground to the French front. However massed French artillery destroyed one of his batteries and drove off most of the rest of his forces on the hill (see photo 03). At this point Baron Alvincy arrived for a personal reconnaissance to assess the situation for himself.
PHOTO 03 - Provera Driven Back
The French attack sent Provera's forces into somewhat disarray, and meanwhile my forces were still trying to maneuver to Provera's right (see photo 04).
PHOTO 04
My cav did have one very lucky break. In driving off Provera and threatening to take the high ground for themselves, Augereau sent his one cav unit far in advance of its supports (it was a good foot and more from friends with blocking terrain between it and friends). Just at that point, my own one cav unit finally returned from its reconnaissance mission to Verona, appearing in a DZ rather to the French cav's rear. Augereau chose to first face off against my cav and then about face his cav, moving it back towards his own line. Alas for the French, the initiative dice were unkind and gave the Austrian's a double move, allowing my cav to catch the French cav unit in the rear. Annihilation followed. (photo 03 to the lower right.) But much credit to the French for what was still a tough fight - the melee lasted all three rounds.
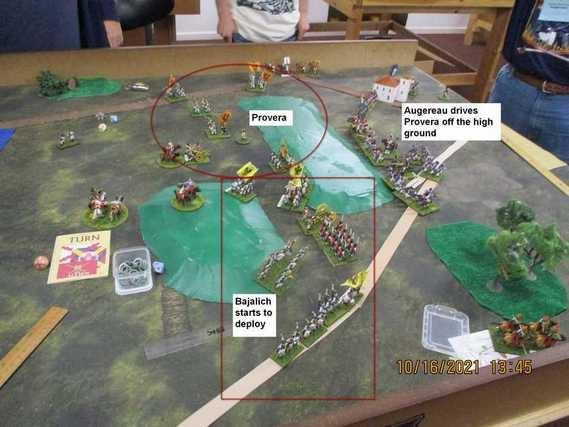
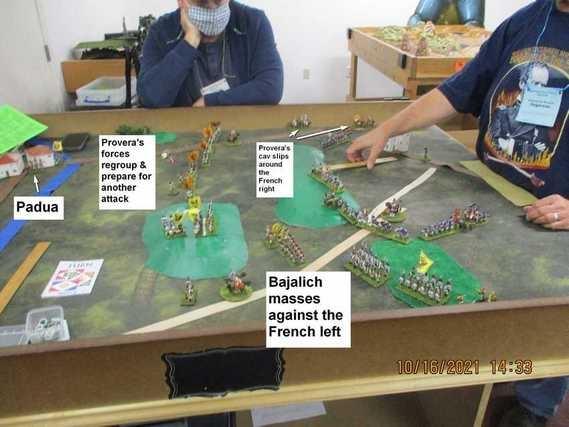
There followed a lull as Provera regrouped, Augereau took possession of the high ground, and my forces continued their approach march and started to deploy on the French left. Augereau redeployed a substantial portion of his forces to face threats on both his flanks. On his left, to face my on-coming units and on his right against Provera's cav slipping around that flank (see photo 05).
PHOTO 05
My forces paused their attack, awaiting Provera's movements to coordinate his and my counter-attack. During this period mostly only cannonade occurred between French on the hill and my one battery down below. However, yet once again, a lucky shot (VERY lucky) blew away the one French battery harassing me. (Not only did I have to hit on an 8+, but poor Phil managed five Veteran morale failures in a row. C'est le guerre, c'est le cubes.) Loss of this battery removed French artillery superiority, leaving both sides with two batteries each.
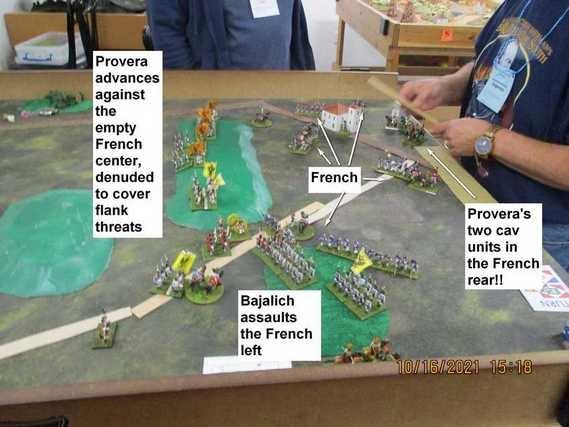
Next followed a massive assault by the Austrians all across and around Augereau. Provera's cav got into the French rear, my troops plowed en masse into Augereau's left, and Provera assaulted the French center. Augereau had rather denuded his center in particular to protect against the threats to his flanks and rear (see photo 06).
PHOTO 06
While able to beat off and destroy the Austrian cav in their rear (ah! clever maneuver those French trapping the enemy cav in their rear!), the French left was crushed and Augereau's center badly knocked about and knocked back. At this point, Augereau pulled his troops back into a small, but tight perimeter (see photo 07).
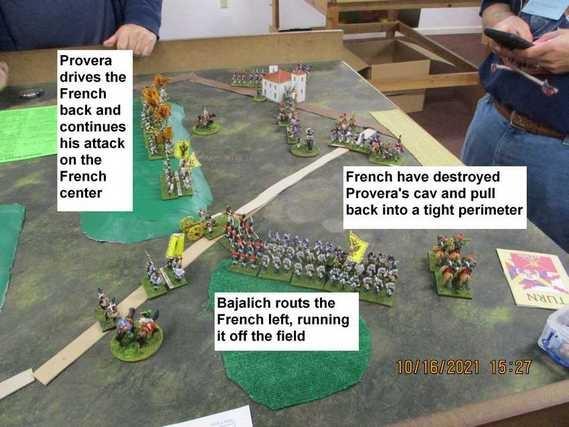
The final coordinated Austrian assault crumpled holes in Augereau's line, leaving a wide open left flank and Bajalich all but in the undefended French rear (see photo 08).

Most Respectfully Submitted, This Glorious January Day of 1799,
General Major Bajalich
Report of General Major Provera Regarding the Battle of Este
August members of the Aulic Council,
I, General Major Provera, was stationed in Padua at the outset of the Campaign.
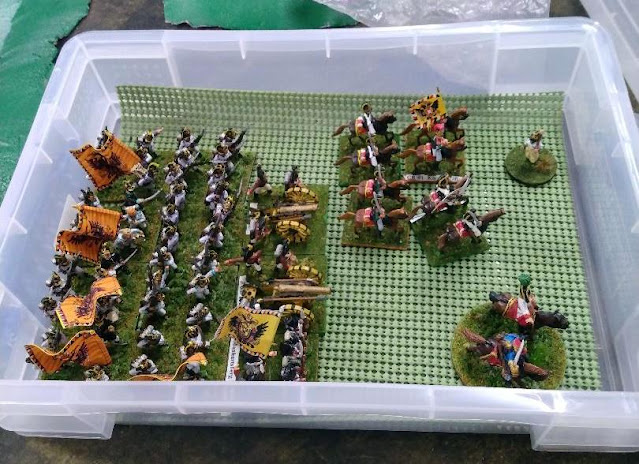
Provera's Division; I forgot one unit of Hussars, so we had to use some blocks to stand in for them.
I received Orders to move to Este and then to Legnago.
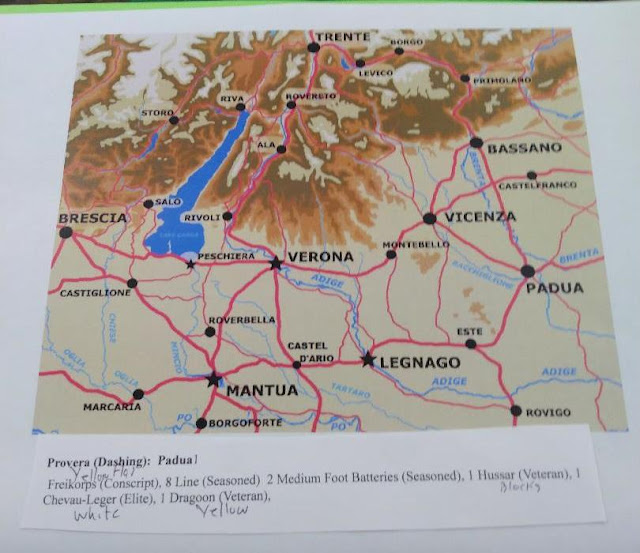
Campaign Map and Provera's roster

Provera's starting deployment near Padua; one unit of Dragoons scouts the road to the South, reporting impenetrable haze (i.e., this DZ leads out of the playable area of the Campaign)!
Before the morning mists had fully dispersed, the lead elements of my Division reported spotting a French cavalry unit.
French Chasseurs a Cheval emerge from the deployment Zone leading to Legnano!
I did not know if they were scouting or the main body was behind then. I surmised that it was probable that the main body was behind them.

Are they just scouts... or the vanguard of an enemy Division?
In the distance, the lead elements of Bajalich's Division can be seen marching on Padua from the Northeast.
My command proceeded to march, but and before we could reach Este, a whole French Division (under Augerau, I later found out) was headed for the same village.

They would get there first and set up a Line. I sent my Cavalry ahead and sent my Infantry and Artillery to the hill and deployed into line then I crested the hill.

Augereau wins the race to Este.
General Major Bajalich's Pontooniers attempted to bridge the Bacchlione, but were so slow in doing so that they instead debauched through Padua, and then headed for the French left while I opposed the center and the French right.
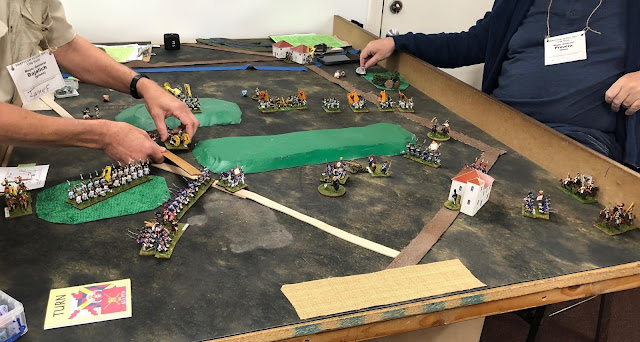
Lines develop for the Battle of Este.
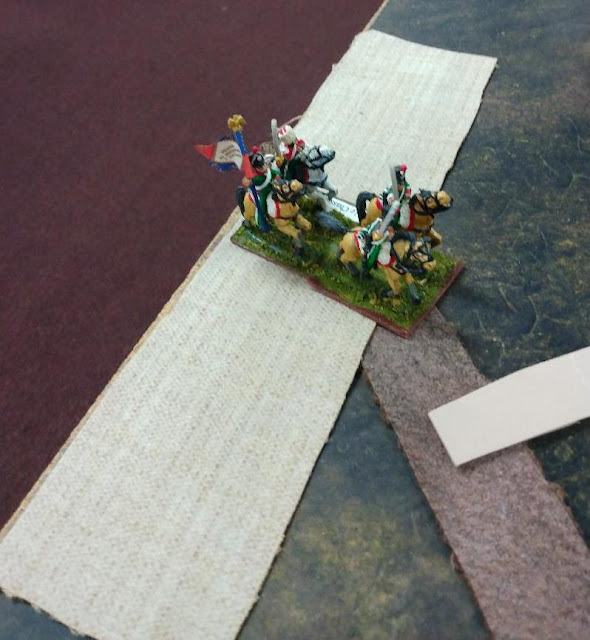
I saw an opportunity and ordered my veteran Chevau-legers to charge into some French infantry. Unfortunately, the target turned out to be French Grenadiers supported by a unit of veteran Legere; my troopers fought bravely but in the end were eliminated as a fighting force.

The ill fated Charge of the Austrian Chevau-legers!

The blocks represent the Hussars, which were MIA in Provera's box.
Bajalich's Division moves up in support as the melee with the Grenadiers nears its ugly conclusion!

The Chevauleger figures are resurrected, replacing the Blochovitch Hussars!

The Artillery duel; note a third battery of French artillery, evidently detached by Napoleon from Serurier's forces besieging Mantua to support Augereau in his 2:1 battle. Despite repeated pleas, it was all the help the brave Augereau would receive on the day!

Bajalich continues his slow march to my Right.

The newly arrived French battery moves forward towards its firing position.

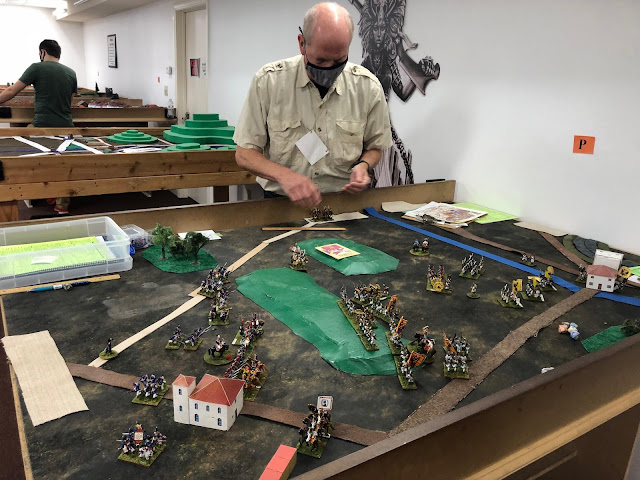
One of my infantry units is forced back by the intense French artillery barrage.
More of my infantry are driven back or destroyed by the hellacious fire of the French gunners! Meanwhile, our C-in-C, FML Alvincy, has ridden over to survey the situation for himself (lower right).

One of my batteries is eliminated by the French devil's cannonade!
However, Bajalich is arriving, and in a lucky charge (a timely double move!), his Hussars catch the withdrawing French Chasseurs in the rear (top middle ground).

Bajalich's Hussars are victorious, routing the Chasseurs, but my Division is now battered and severely outgunned.

I decide upon a strategic withdrawal to rally and regroup my forces.

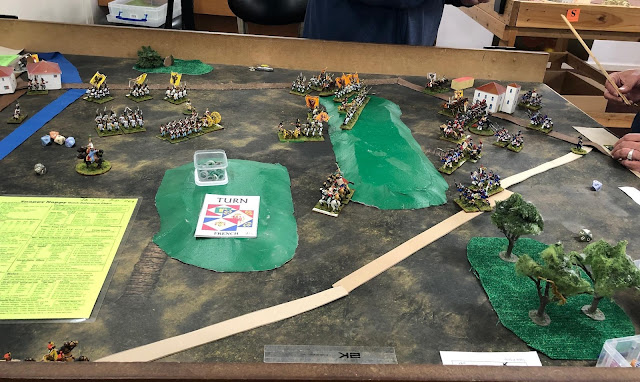
All three French batteries are now deployed; time for some reverse slope tactics!

As my troops pull back, Bajalich's men deploy on the French left.

Augereau lacks sufficient troops to cover such a broad front, and has no cavalry at all. This allows Bajalich's Hussars to get behind the French Left flank.

Augereau pulls some of his infantry out of the front line to form squares to protect his flank and rear.

Augereau has advanced boldly, perhaps one might even say, rashly, climbing the ridge overlooking the village, known to locals as the Este Ladder. Seeing the pressure Bajalich is exerting upon the enemy, my troops complete their regrouping and prepare to advance upon the denuded French center.

Augereau curses that upstart, Buonoparte; he may have accomplished great things in Italy thus far, but with just a bit of support, he wouldn't have had to contend with two open flanks and a gaping hole in his center!

"The French, cannot be everywhere, my freind", I observe to Bajalich. We begin to tighten the noose on them, as my Cavalry start to sweep past the far French right.

Augereau begins to pull back, realizing a tighter defensive perimeter would be easier to defend. He may have waited a bit too long, however.
One of the French Batteries is finally knocked out, emboldening our infantry to advance.

Augereau repositions his men as best he can. (Withdrawing in the face of the enemy is difficult in Snappy Nappy, except when it it is involuntary!)

My brave men ascend Este's Ladder for the second time, and enjoy a view of a great many French derrieres!

A French rear guard attempts to delay Bajalich, and buy time for the rest of his forces to withdraw.

They are swiftly overwhelmed and put to flight! Augereau is now heavily outnumbered.

"A fine day for a parade!"

My light cavalry are in Augereau's rear, and he becomes understandably obsessed with eliminating them!

Meanwhile, my Dragoons find just enough real estate to skirt the edge of the French square, and charge the French Grenadiers in the flank!

The Grenadiers are puched back with losses, but not destroyed.

The French invite my Light Cavalry to Lunch?

Overview of the final phases of the Battle of Este.

The French continue to contract their perimeter, as their command shrinks with each unit lost.

My light Cavalry are no more, but Bajalich's Hussars may be able to avenge them!

A bold charge by a French column upon Bajalich's infantry; they will need a lot of elan to prevail here!

Predictably, their desperate charge fails, and my boys seize the opportunity to charge the French Grenadiers in the rear!

How few remain!

Bajalich's Hussars in their rear, his infantry to their flank, and mine to his front. Augereau has fought a gallant battle, but, seemingly abandoned by his superiors, his position is all but hopeless now.

Sauve qui peut! Augereau surrenders.
Not long thereafter, I received word that elsewhere, our troops had broken through to Mantua, and that they would soon be forced to lift the siege, releasing General Wurmser and his much reduced, sickly garrison, just as they were on their last legs.
Mit Gott für König-Kaiser und Vaterland,
General Major Provera
A very satisfying campaign from an Austrian viewpoint.
ReplyDeleteThere were three hard fought battles, but in the end, the Auatrians prevailed in each. More yet to come!
DeleteAn enjoyable campaign and battles by the sounds of it. The Snappy Nappy rules look interesting.
ReplyDeleteSnappy Nappy works just fine for one off battles (large ones, generally), but to me these events are where the rules really shine.
DeleteSuper stuff
ReplyDeleteGlad you enjoyed it, Gary!
DeleteWonderful to have a report from a player's perspective in addition to your overview Peter. They achieved a rare thing in Napoleonics; complete destruction of an opposing army—ouch!
ReplyDeleteRegards, James
The flip side of the coin is that Augereau dominated the first half of the battle, and tied up 2 enemy commands. Had the French been able to capitalize elsewhere, that could have been enough for the French to win the Campaign.
Delete