Sunday, January 30, 2011

French Ligne, Part 2

OK, so like I said in my first post on the subject of French Line Infantry, you can never have too much French Ligne if you're a Napoleonic wargamer!  This batch are the most recently painted of all my French Line, and represent the units of  Claparede and Clausel's Divisions under Marmont at the end of the 1809 campaign . All are Old Glory figures in overcoats - I think the pose is Advancing. The five units were made up of 1 bag each of Center (Fusilier) companies (30), Elites (30), Command (20) and "Energetic French" (15).

The first unit is the 5e Ligne. The "regulation" overcoat was tan, the shade obviously likely to vary widely. This unit is distinguished by a rather light colored coat, and the majority of the figures wear the "bonet de police", or fatigue hat.


Unlike most of my units, these guys have 1812 pattern standards based upon the Tricolor; it just seemed fitting for this more rag-tag bunch. Wearing overcoats, they can easily double as militia or National Guards if need be.


 Rear view; with the fatigue "stocking caps" and coats, only the epaulets distinguish the elite companies of this regiment!


So *this* unit is actually Legere regiment, the 8e. How can one tell, you ask? Well, even though the coat covers most of their uniform, they have dark blue pants, of course!  Hmm, not impressed, eh?  Well, that's part of why I chose the somewhat non-regulation light blue/"steel grey" overcoats for this unit, so it would easily stand out from the rest of the Division!


The majority of the figures in this regiment came from the "Energetic French" pack. They *do* look rather energetic, don't they?


 Rear view of the 8e Legere; I like to use officers in Bicorn for my Legere units whenever possible. Don't ask me why, I just find they fit the feel of these Light Infantry units better.


Back to the Ligne regiments; this one is the 23e Ligne. The coats on this unit are a somewhat darker shade of tan than that of the 5e.  And yes, if you look closely, I managed to glue the flag on upside down, grr!


The unit is also distinguished by the light grey "oilskin" shako covers, used to protect the headgear in foul weather.  Sometimes regimental numbers or designs were painted onto these covers.


 In this rear view one might note that unlike my previously shown Ligne units, these troops in overcoats have the correct pom-pom colors for each individual company; that's because I'm already using the coat and shako cover colors to differentiate the units, so I don't need to fall back on the expediency of the pom-pom colors.


  This next unit is the 79e Ligne. It has formed up in square, perhaps wary of nearby Cossacks? They have much darker, red-brown overcoats...


and golden tan shako covers. No mistaking them for any of the previous units! Flags were downloaded from Napflag.org

 The last unit of the Division is the 81e Ligne; they have light brown coats and sickly green shako covers, for a somewhat different look. I think these Old Glory figures are very effective, and they were easy to paint/stain. Can't beat the price, either!


All of these coat and shako cover colors have been recorded, although not necessarily for these units or in these exact combinations. Of course, reality would likely be a much more jumbled assortment of colors for both. Still, even for my campaign uniforms, I like a certain amount of uniformity to facilitate easy identification of the individual units on the tabletop!

That's it for this post. See, I didn't drone on endlessly this time, did I?  :-)

Wednesday, January 26, 2011

Battle Report: Gorodetschna, 1812

The last post set out the scenario and background for Gorodetschna (with some modifications as a result of this playtest), so we'll move right along to the action. The game was played at The Time Machine in Manchester, CT; thanks to Ken et al for the use of the facilities. Czar Barry and I had the Russians, while Thomas and Greg had the Austrians and Saxons (mostly) respectively. One of the reasons for choosing this scenario was that all of the 'Rats can contribute troops to the game at HAVOC in April. Thomas brought his beautiful Front Rank Austrians, but as he arrived just after we finished setting out the troops only his newest unit (of Austrian Hussars) made it on the table this time.


This first of several pictures by Barry (thanks to the Czarina are in order for the camera, I think!) shows a long distance overview of the Eastern half of the battlefield, with the Austrians of Trautenberg and Frimont in the near ground, and the Russians all concentrated opposite them, Markov's troops being the nearer, and Kamenski's behind. They appear well prepared to defend any frontal crossing of the very marshy banked and difficult river!

The Eastern half of the Table seen from the Southern (Russian) side. The near troops are Barry's, all Front rank and very nicely painted. For all but a few artillery units and Cossacks, it will be their first tabletop action, and you know what that usually means!  Note how they tower over my vintage Minifigs!


To the far West, is the bulk of Reynier's Saxon Corps. They have "stolen a March" on the Russians, and are largely concealed within the dense pine woods. Austrian cavalry prepare to cross over the bridge (causeway) and support them.

Close up of the Austrian Cavalry command of Zechmeister. This photo is particualrly interesting as it depicts thee different units of Austrian Hussars, by three different manufacturers! To the far right are Thomas' beautifully painted unit by Front rank, with the bright blue shakos. To their left are my vintage Minifigs from 2 different regiments, bright green shakos in front and grey behind. On the far left are my Essex Hussars in the scarlet shakos, painted in 2009. The Front rank figures are enormous, I'd guess well over 30mm, and dwarf the "true" 25mm Minifigs, with the Essex in between, perhaps 28mm. Finally, the officer, wearing the uniform of a Hungarian Cavalry general, is by Old Glory!


 Barry's close up of the Russian deployment, focusing understandably on his new Front Rank figures; note once again the contrast between my old Minifigs. His infantry are based on 2 x 2" stands, 4 per stand, while mine are on 1 x 1.5-1.75" stands, further highlighting the disparity. Still, it had no effect upon game play at all, and didn't look badly on the table!

My own picture of the Saxons deployment, ready to burst forth from the Woods. The Saxons inlude my own vintage Minifigs, and some new troops of Greg's, ? Old Glory, with my troops in the shako and his in the bicorn!


Last is Siegenthal's Austrian Division, deployed West of Frimont and East of Zechmeister's commands.


More close up shot of Frimont's command and part of Trautenberg. The Russian buildings are by Hovels.


Trautenberg's Division as deployed at the start of the game.


 Close up of the massed Russian deployment. "I'm supposed to pin down all of that?"  Yeah, right!


Hordes of Ruskis eagerly await any attempted crossing of the river by the Kaiserlicks!


Overview of the table at the start of the game. Russian scouts have just reported a possible out flanking move by the Saxons. Do ya think?  Allied objectives are the low ridge, and the Russian line of communications (road exit near Zavnice, the building in the upper right hand (South- East) corner of the table.


The game commences, and very early the Russians turn a Maneuver card. How convenient! Czar Barry turns a Dragoon Division and an Infantry brigade to the West in response to the rumors of suspicious goings-on auf der Sachen-Wald. Note that in Field of Battle, troops can only move when they get a MOVE card, and they can only change their facing on a MANEUVER card, or on a MOVE card where they roll an "even" number on the Leadership die roll by the Command Group leader.  Thus just because you can see a threat to your flank gives NO guarantee you can  respond to it!


 On a hot streak, the Russians turn a MOVE ONE COMMAND card; they chose the newly maneuvered Dragoon Division to act upon the card. Czar Barry rolls very high, and they are allowed THREE move segments - 36' in all. Forming a nice echelon, they ride hell-for-leather to head off the Saxons form the vital road exit! Gorgeous troops, eh?  Barry's Front rank Russians with GMB flags.


In Field of Battle, when the two C-in-C's roll for the initiative, the winner chooses whether to go first or second, but both sides will ultimately have the same number of impetus points (cards, essentially) to act upon. The sequence of the cards, and their usefulness at the time, my be radically different, however! On the Allied initiative, a MOVE card sees the Saxons emerge from among the trees. An unlimbered Austrian horse battery  has moved forwards, perhaps a trifle too boldly; limbered artillery is terribly vulnerable, and as there is no set turn sequence, leaving them unscreened is asking for trouble if the play of the cards goes against you. In addition, Russian reinforcements are known to be coming, due to arrive along the very road the guns are astride.


Meanwhile, North of the River, Thomas is playing his Austrian commands quite aggressively, as they start the difficult task of fording the marshy river in the face of massed Russian opposition. The first artillery shots of the battle are exchanged, and an Austrian Battery is routed due to loses.


The Russians seize the initiative again, and another MOVE card appears. Hullo, the Western end of the table looks quite different now with the arrival of Lambert's command of Russian reinforcements. And damned if the Russian Dragoon command didn't roll three segments and *even*, allowing a grand charge. Their first time in action finds them unable to resist the temptation, as one unit slams into the flank of the Saxon Dragoons and another charges a unit of Saxon foot in line formation. A unit of Russian Hussars has already charged and routed their Saxon counterparts, seen streaming to the rear in their sky blue uniforms.


The same scene seen from the opposite side of the table; the Saxon Infantry is about to seize the ridge.


Another picture of the grand charge of the Russian Dragoons! Note the D12 from the set of  "Jalapeno Dice" in the background. What dice can be hotter than Jalapeno dice, I ask?


Aftermath of the charge: not surprisingly the Saxon Dragoons are forced back (but not destroyed). The Saxon Foot, who only start with a D8 Combat Die (worst possible) desperately need a good volley to prevent the Dragoons from trampling them underfoot in the melee to follow. Hmm, UP 1 for First fire, UP 1 for Point Blank Range, and UP 1 for Target in deep formation - Now that D8 is up to a D12 +1!  Greg rolls for their fire, having selected the dreaded Jalapeno Dice for this game. Greg rolls a 10, plus 1 is eleven, while Barry's D6 Defense Die roll is... a two. Difference of nine, causing the Dragoons to lose 3 Unit Integrity. As that reduces them to zero UI, they Rout. Saxons win!  Note the use of "smoke" to indicate the Saxons have fired, and are "unloaded" (unable to fire) again until the smoke is removed when the Allies next turn an INFANTRY FIREPOWER card.  Note also the "Rock" and the "Ram" markers on the Saxon Dragoons in the background. The "rock" indicates the Dragoons have lost one UI, whilst the "Ram" indicates the unit is "Out of Command"; this is a bit like "shaken" might be in some other rules sets. Finally, note the "smoke" on the unit of Russian Musketeers with the yellow flag in the foreground; they have just fired at the limbered Horse battery, scoring heavy losses and removing it from play.


 Meanwhile, the initiative has returned once again to the Allies! Showing remarkable aggressiveness and sang-froid, Thomas throws the Austrian Divisions of Frimont and Trautenberg across the river and into the teeth of the hordes of waiting Russians. This can't end well for the white coats... can it?


Back on the Western end of the table, the Saxons use the MOVE card to form square with some of their infantry to protect the flank of the rest of the Division as it advances upon the key ridgeline, while the newly arrived supporting Austrian cavalry Division of Zechmeister sends a unit of chevaulegers charging into the unloaded Russian line infantry seeking to avenge their Horse Artillery's extermination.


 Overview of the Western end of the table, with Bianchi's Austrian Infantry Division now also across the bridge and into the woods.


Reynier's troops seize the Ridge, as the remaining unit of Russian dragoons can only watch impotently, being bereft of meaningful infantry support.


Another Austrian Move card results in storm of cavalry charges, a unit of Russian Jagers in skirmish order being caught unloaded. Not surprisingly, they were destroyed in the ensuing melee!


 Overview of the Saxon position and Western end of the battlefield at this juncture.

The Saxon infantry are now firmly established on the ridge, with little likelihood the Russians will be able to eject them. I love the Saxon standards, BTW; in this case all hand painted by me many years ago.

 Back to Eastern half of the battlefield. Thomas' troops have charged several times in a row, and have blown straight through the first Russian command with minimal losses. Amazing! Meanwhile, Russian Cavalry gallops to the West attempting to contest the dangerous Saxon advance. Well placed Austrian batteries have already routed the Uhlans with their timely fire. The Austrian Infantry command continues to the West, but is still too far away to accomplish anything.


  Close up of the seemingly unstoppable Austrian steamroller, powered by Thomas seemingly rolling nothing but 11's and 12's! Czar Barry could seldom roll more than 2 or 3 in response.


Even Siegthal's Division is across the stream now, and enjoying shooting up Russian cavalry from the flank. There will be much weeping in Moscow!

What is left of Lambert's troops (my command) - a rather naked looking horse battery, a unit of Hussars, and a single infantry unit... with hordes of Austrian infantry and cavalry descending upon them!


The Russian Infantry Command detailed to contain the Saxons hasn't made much progress; We (the Russians) had a huge run of impetus - 11 points, and made good use of it, but when the Austrians got their 11 impetus thereafter, they made even better use, and won the next roll for yet another 9 impetus points. Although Filed of Battle includes LULL cards that can interrupt a long run like this at the most inopportune times, the few that the Allies turned wound up doing nothing to further the Russian cause, and by the time the dust had settled, an absolutely astounding number of Russian units had been destroyed outright - something that is quite unusual in Field of Battle. In addition to allowing deadly Allied action, the long impetus run precluded the Russians turning any LEADERSHIP cards to rally their troops.  Although the Russians would doubtless have used their own upcoming impetus run to redress the situation , they had only two army morale points left versus more than thirty for the Allies. In Field of Battle, when an army reaches zero Army Morale Points, it is vulnerable to the ARMY MORALE CHECK card; flub that roll, and your army pretty much packs it in then! As I had promised to be home to take my wife out to dinner, we called the battle at this point. It was clearly a Major Allied Victory... and threatening to become even worse than that for the Russkis!

Although Barry and I had our clocks cleaned but good in this one, we had an absolute blast playing the game anyway. As you can see, it looked great as well. Total playing time was less than 4 hours. Vive FoB! Hopefully the game goes half as well at HAVOC in April!

Sunday, January 23, 2011

The Battle of Gorodetschna: August 12,1812

The Hofkfreigsrat (aka simply "the Rats") subgroup of the Hartford (CT) Area Historical Gaming Society [HAHGS] will be running the Battle of Gordetschna at Battle Group Boston's annual spring convention, HAVOC, on Saturday April 2nd. We met today and played out a test game, and had a blast doing it. As usual, that lead to a few insights and tweaks to the scenario. I'll report on the actual game next time, with pictures, of course, but I wanted to present the scenario, both for any players who want to look it over beforehand (or use it for their own game), and because it is in exactly the same format that is planned for the Blunders on the Danube scenario book. Just as for that book, the scenario is designed for use with Brent Oman's Field of Battle by Piquet.


The Battle of Gorodetschna, August 12, 1812

Scale: 1 Infantry unit = 600 men, 1 Cavalry unit = 400 men, 1 Artillery unit = 6-8 guns Allied, 12 guns Russian.
Table Size: 5 x 9 feet

Background: The Saxons Corps and allied Austrian Auxiliary Corps under the combined command of FML Schwarzenberg were operating on the Southern Flank of Napoleon's invasion of Russia. As in 1809, there was a secret convention between Austria and Russia that they would both avoid active combat with one another as much as possible. The Allies had already pushed the Russian 3rd Army of the West under Tormassov out of one of its major magazines at Prujany. Tormassov resolved to slow their advance on Kobrin. He set his troops in a strong defensive position behind a swampy river, covering the anticipated line of Advance from Prujany. He was expecting the rest of his army, another 13,000 men, by nightfall.
    The Allies had suffered a sharp repulse at the hands of Tormassov earlier in the campaign at Kobrin, resulting in the surrender of a Saxon brigade. Reynier and Schwarzenberg were both eager to avenge the stain of that defeat, but they realized that a frontal attack would be extremely risky, and bloody even if successful. Reynier suggested a maneuver against the Russian left/rear, and Schwarzenberg agreed, detaching Austrian troops to support him.
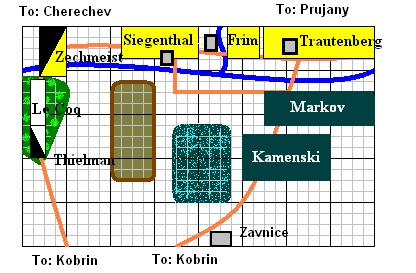
Map: The River has marshy banks, and is Class III Terrain (combat bonus to the unit NOT in the River!) . Passage is handled as follows: All units stop at contact with the river's marshy banks. Their next move segment is to the middle of the river's water area. A third move segment is required to move the unit to the far edge of the river's marshy banks. Units moving across a Class III river are forced Out of Command. Artillery may not move across the river except at the bridges. The bridge at Podubny is narrow and unsuitable for the passage of Artillery; other troops may cross in Column of March only. The other bridges (actually more causeways than bridges) can pass all arms in Column of March or Attack Column. The bridges may NOT be destroyed in the course of the game.
The Villages are all Class II terrain. The Woods is dense and rates as class III terrain, although units on the road in March Column may move at normal Road rates. The swamp is Class IV (impassable); any units forced to retreat into the swamp are destroyed. The ridge is class II for movement only, and blocks line of sight; it offers no combat or elevation advantages.

Scenario Rules: Russian Batteries all have three UI instead of the usual two, and will have a CD UP 1 from the standard; this reflects the large, 12 gun Russian batteries. To reflect the combination of their poor firepower but great stoicism, Russian Line and Jagers, although Regulars, will have a Defense Die of D8 but Line roll on the Raw table for their Combat Die, and Jagers on the Regulars table! Austrian Jagers and Grenz, and Saxon Light Infantry may use Skirmish. Unrated officers are included for clarity, but are not represented in the game. Finally, on the first Russian MOVE card after Allied troops are seen emerging from the woods, any or all Russian Commands may expend one of their move segments to change facing for the purpose of responding to the presence of the flanking Saxon attack

Deployment: Saxon, Austrian and Russian forces are deployed as shown on the Map. Where Artillery units are listed under the Corps command, they must be allocated by the player to one or more of the sub-commands.

Russian Reinforcements: Lambert's command enters deployed within 8” either side of the Kobrin-Cherechev road on the first Russian MOVE card after Allied units are seen exiting the Woods.
Allied Reinforcements: Bianchi's Austrian command, followed by von Funck's Saxon “Division” enter in March Column along the road from Cherechev on any Austrian Move card. Any Austrian units that cannot fit in their deployment zone(s) can enter from the friendly table edge, deployed, on any Allied MOVE card.

Victory Conditions: Automatic/Decisive Allied victory – hold the road exit at Zavnice in force at any point . Major Allied Victory – hold any two river crossings and the ridge at the end of the game. Major Russian Victory – no “In Command”, unrouted/unsilenced Austro-Saxon units south of the river and east of the woods at the end of the game. Unless an “automatic Victory is achieved, play continues until one side concedes or fails Army Morale. If none of the above conditions are met, the side that does not concede/fail army Morale has won a Marginal Victory.

Scenario design notes: This was a difficult scenario to develop, because there is so much contradictory information or lack of information. Nafziger's book is, as usual, both full of detail but at time maddeningly incomplete or even contradictory. Several scenarios for other rules sets seem to contain numerous units that were not in fact engaged in the action. I have probably rather understated the Austrian strengths, but I think this works fine given both their tactical situation and limited enthusiasm for the cause. There is a good account of the battle on the web at: Link


Austrian Auxiliary Corps, FML Schwarzenberg (overall Allied commander)
Average; LD   , CR       Average Sequence Deck Morale Points: 61
12# Foot Battery Regular DD6   CD
6# Horse Battery Regular DD6   CD
(May not form Grand battery, but must be allocated to individual commands at the discretion of the Allied C-in-C)

Division Frimont Poor; LD    , CR
1st Grenadier Bn Elite DD10   CD
2nd Grenadier Bn Elite DD10   CD
1/IR Davidovich (Hungarian) Raw DD4   CD
2/IR Davidovich (Hungarian) Raw DD4   CD
1/IR Esterhazy (Hungarian) Raw DD4   CD
2/IR Esterhazy (Hungarian) Raw DD4   CD
6# Foot Battery Regular DD6   CD

Division Siegenthal Poor; LD   , CR
Jager Bn #7 Crack DD8   CD
1/Warasdiner Kreutzer Grenz Raw DD4   CD
1/IR Czartoryski Regular DD6   CD
2/IR Czartoryski Regular DD6   CD
1/IR Sottulinski Regular DD6   CD
2/IR Sottulinski Regular DD6   CD
Levener Dragoons Regular DD6   CD
6#Horse Battery Regular DD6   CD

Division Trautenberg Poor; LD     , CR
1/Kienmayer Hussars Crack DD8   CD
2/Kienmayer Hussars Crack DD8   CD
Reisch Dragoons Regular DD6   CD
1/St Georg Grenz Raw DD4   CD
Jager Battalion #5 Crack DD8   CD
1/IR Duka (Hungarian) Raw DD4   CD
2/IR Duka (Hungarian) Raw DD4   CD
1/IR Beaulieu Regular DD6   CD
2/IR Beaulieu Regular DD6   CD
6# Foot Battery Regular DD6   CD

Division Bianchi Poor; LD   , CR
1/IR Alvintzi (Hungarian) Raw DD4   CD
2/IR Alvintzi (Hungarian) Raw DD4   CD
1/IR Hiller Regular DD6   CD
2/IR Hiller Regular DD6   CD
1/IR Colloredo Regular DD6   CD
2/IR Colloredo Regular DD6   CD
6# Foot Battery Regular DD6   CD

Austrian Cavalry Division, Zechmeister Poor; LD   , CR
Hohenzollern Chevaulegers Regular DD6   CD
O'Reilly Chevaulegers Regular DD6   CD
1/Kaiser Hussars Crack DD8   CD
2/Kaiser Hussars Crack DD8   CD
1/Blankenstein Hussars Crack DD8   CD
2/Blankenstein Hussars Crack DD8   CD


VII Corps (Saxon), General de Division Reynier Skilled; LD   , CR

Corps Artillery (May not form Grand Battery, must be allocated to sub commands)
12# Foot Battery Regular DD6   CD
6# Horse Battery Regular DD6   CD

21st (Saxon ) Division – LeCoq

Brigade von Strendel Average; LD   , CR
Libenau Grenadier Bn Crack DD8   CD
1/Pr Frederick IR Raw DD4   CD
2/Pr Frederick IR Raw DD4   CD
1/Pr Clemens IR Raw DD4   CD
2/Pr Clemens IR Raw DD4   CD

Brigade non Nostitz Average; LD   , CD
1/1st Light Infantry Regular DD6   CD
2/1st Light Infantry Regular DD6   CD
1/Pr Anton IR Raw DD4   CD
2/Pr Anton IR Raw DD4   CD


22nd (Saxon ) Division – von Funck

Brigade von Sahr Average; LD   , CR
Von Spiegel Grenadier Bn Crack DD8   CD
Anger Grenadier Bn Crack DD8   CD
1/2nd Light Infantry Regular DD6   CD
2/2nd Light Infantry Regular DD6   CD


23rd (Saxon) Light Cavalry Brigade, Von Thielman Average; LD , CR
Saxon Hussars Crack DD8   CD
Polenz Chevauleger Crack DD8   CD
Pr Clemenz Uhlans Crack DD8   CD

Austrian Totals: 23 Infantry, 10 Cavalry, 8 Artillery
Saxon Totals: 13 Infantry, 3 Cavalry, 4 Artillery

Combined: 36 Infantry, 13 Cavalry, 12 Artillery


Russian 3rd Army of the West, General Lieutenant Tormassov
Average LD     , CR       Average Sequence Deck Morale Points: 48


1st Corps, General of Infantry Kamenski Average; LD   , CD
12# Foot Battery Regular DD6   CD
6# Foot Battery Regular DD6   CD

18th Division, Prince Tchervatov

1st Brigade, General Bernardos Average; LD   , CD
1/Tambov IR Regular* DD8   CD
2/Tambov IR Regular* DD8   CD
1/Vladimir IR Regular* DD8   CD
2/Vladimir IR Regular* DD8   CD
1/28th Jagers Regular# DD8   CD

2nd Brigade, Prince Khowanski Average; LD    , CD
1/Dneiper IR Regular* DD8   CD
2/Deneiper IR Regular* DD8   CD
1/Kostroma IR Regular* DD8   CD
2/Kostroma IR Regular* DD8   CD
2/28th Jagers Regular# DD8   CD

8th Cavalry Division, Tschaplitz Average; LD    , CD
Starodoub Dragoons Regular DD6   CD
Taganrog Dragoons Regular DD6   CD
Tver Dragoons Regular DD6   CD
6# Horse Battery Regular DD6   CD


2nd Corps, General Lieutenant Markov Average; LD   , CD
12# Foot Battery Regular DD6   CD
6# Foot Battery Regular DD6   CD

15th Division, Nasimov

1st Brigade, General Reichel Average; LD   , CD
1/Riajsk IR Regular* DD8   CD
2/Riajsk IR Regular* DD8   CD
1/Nacheburg IR Regular* DD8   CD
2/Nacheburg IR Regular* DD8   CD
1/10th Jagers Regular# DD8   CD


2nd Brigade, General Stepanov Average; LD   , CD
1/Koslov IR Regular* DD8   CD
2/Koslov IR Regular* DD8   CD
1/Vitebesk IR Regular* DD8   CD
2/Vitebesk IR Regular* DD8   CD
2/10th Jagers Regular# DD8   CD

Ad-Hoc Cavalry Division, General Anon Average; LD    , CD
1/Pavlograd Hussars Crack DD8   CD
2/Pavlograd Hussars Crack DD8   CD
4 Sqns Tartar Uhlan Regt Regular DD6   CD
1st Kalmouks/Cossacks Rabble DD4   CD
2nd Kalmouks/Cossacks Rabble DD4   CD
6# Horse Battery Regular DD6   CD


Generalmajor Lambert (part 3rd Corps) Average; LD    , CD
1/Kourin IR Regular* DD8   CD
2/Kourin IR Regular* DD8   CD
1/14th Jagers Regular# DD8   CD
2/14th Jagers Regular# DD8   CD
1/Alexandria Hussars Crack DD8   CD
2/Alexandria Hussars Crack DD8   CD
6# Foot Battery Regular DD6   CD


Russian Totals: 24 Infantry, 10 Cavalry, 8 Artillery

* = Roll on the Raw table for Combat Die
# = Roll on the Regulars table for Combat Die


The Battle of Gorodetschna, August 12, 1812