
Well, someone starts off the turn with a nice run of cards! Did Karl finally catch a break?

Nah, Karl's really, really bad, awful day continues with Andre leading off the turn!

The first card was ARTILLERY FIRE; the horse battery drives back another whitecoated unit on the Northern ridge.

The other horse battery obliterates the remnants of the plucky Austrian Grenadier square... leaving the Austrian left flank wide open!

MELEE is next.

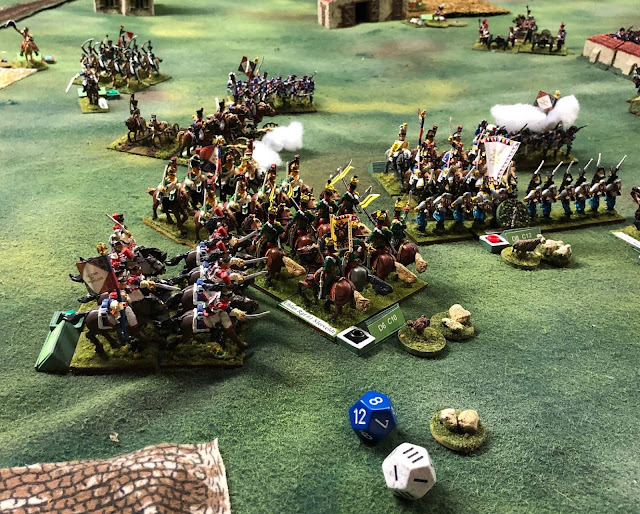
Once more into the breech, dear friends; the Dragoons get a slight edge in the 1st round.

With 2 more hits in round 2, the Uhlans are pushed back with the loss of another UI; the Dragoons, having rolled EVEN again, follow up and retain good order. Talk about a see-saw battle! The Austrians have been driven back such that there are no other French units eligible for favorable;e melees now.

Would you care for seconds, Sir?

The Horse Artillery batters the remaining Grenadier unit on the far South of the field, but fails to Disorder it.

ANOTHER Austrian unit is driven back on the extreme North, with loss. The remaining French batteries are all screened by the advance of their troops.

Karl groans as Andre turns yet another MOVE card!
 Mermet rolls up a big Triple Magic Move for his Cuirassier brigade; remember, the corresponding Austrian reserve cavalry brigade hasn't even appeared on the field yet!
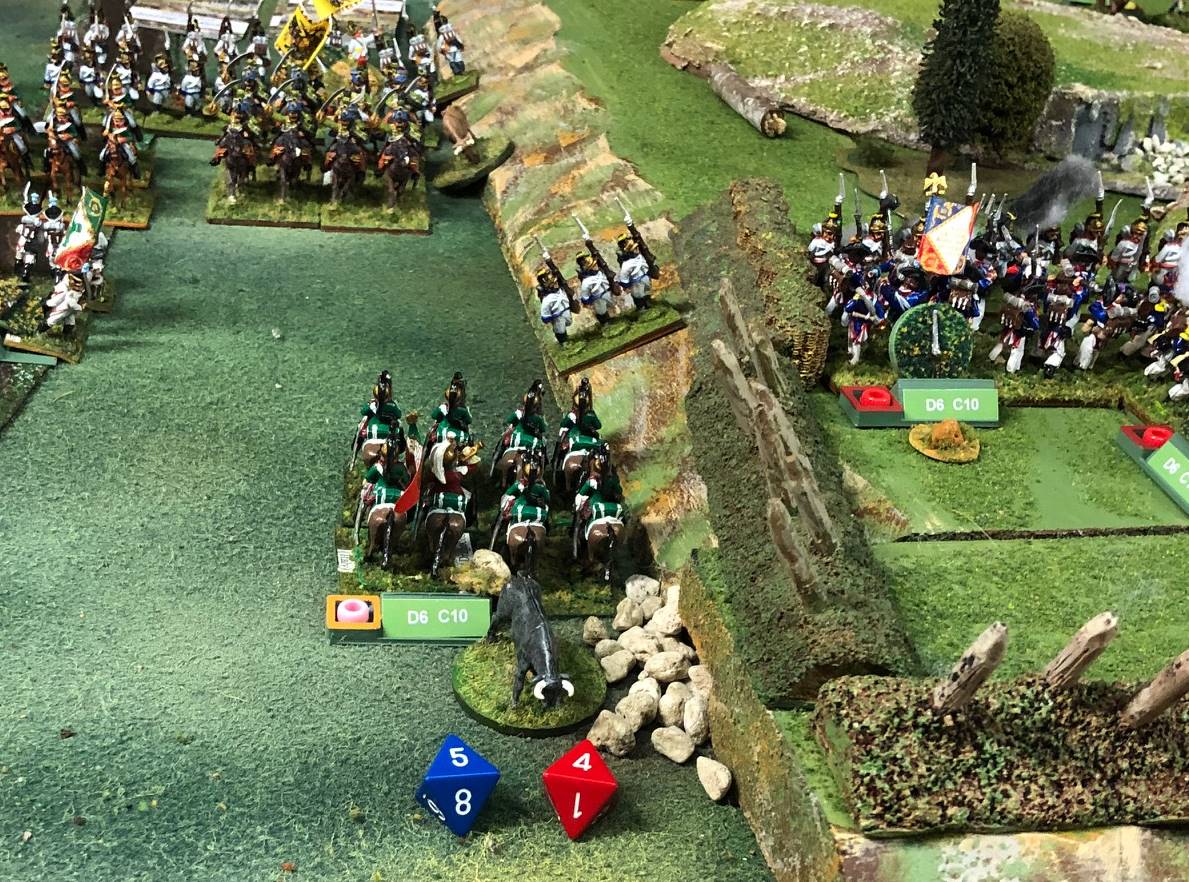
 Situation after the move, and prior to melee resolution (remember that in addition to allowing up to three move segments, and a possible change of facing, a Magic Move allows immediate melee for any Cavalry units). Ouch!
 The Curiassiers charge into the flank of the Uhlans; the result was never in much doubt (I think that's a D`12+ 4 or something). They did this by making a 12" move, using their 2nd segment to turn, and the last 12" to hit the Uhlans in the flank. In FoB2, this would have been counted as a Frontal attack, because a unit had to START behind the enemy;'s flank (or rear for rear attacks) in order to get the modifiers for same. That limitation is gone in FoB3, and Brent confirmed this is correct. So, watch those flanks carefully, gentlemen!
 A fresh unit of Cuirassiers charge a severely battered (3 UI lost already), "unloaded" Grenadier unit in line; bye-bye "armchairs"!
 Lacour is rolling for his Dragoons, seen in the far distance; 2 segments, but no magic.
Another change from FoB2; in that version, units outside the command radius of their General (twice the LD rating, in inches) were OUT of Command and could only move half speed. Out of Command in FoB2 is replaced with Disordered in FoB3, which still halves movement, BUT there is no movement penalty for being beyond command distance. Units outside of command distance may not be rallied, however, and also cannot use the change of facing or formation option on a LEADERSHIP card, either.
 G(h)oulus scores his own Triple Magic!
 With no good targets for direct attack, he uses it to reposition his brigade to attack the flank of the Southern ridge.
 2 segments without fancy business for Brigade Camus.
 His Brigade advances further onto the Southern ridge, but cannot initiate melee, so it plans to use its muskets.
 A sharp exchange of fire takes place; the Austrians inflict heavy losses on the column advancing out of Caldiero, while it manages to shrug off the effects of being shot at in the flank. It's sister unit is pushed back with some loss, leaving it dangerously isolated.
 The Reserve Artillery's double magic move isn't enough to reposition it effectively, so it holds its grown, discouraging any overly aggressive Austrian moves (assuming they ever get one) in the center.
 A little light magic for Solinac's Reserve Brigade.
 His command is advanced and repositioned.
 A single move for Launay's Brigade.
 Austrian routers are contacted by a French column, and removed from play; this doesn't cost any additional UI or Morale point loss.
 Karl looks on, well aware the day is not going well for the Hapsburg cause!
 Advantage: Austria in this exchange of fire.
 "Their shots went right over our heads!"
 A touch of magic for Valory's Brigade.
 The command moves forwards, with two units now breaking through the ridge line position.
 2 moves, but nothing fancy for Compere's Brigade.
 It move forward, and converges fire on the Grenadiers holding the field works, but fail to have any real effect (the target is already Disordered).
 Triple move sans magic for Lenchantin's boys.
 Unfortunately, things are too crowded to make full use of it; positions after the MOVE.
 Valentin move his 2 Grenadier units forward to support the attack on the Northern ridge.
 The single segment doesn't tempt Espagne's cavalry brigade to act.
 Yes we'll rally round the flag, boys, we'll Rally once again...
 With no enemy within 12", the base LD12+1 makes this roll successful at restoring the Cuirassiers to Good order. Because bring Disordered not only acts as a negative modifier in melee, but also halves movement, the effects are greater than one might think at first. The especially applies to the MELEE card, where half a segment at half speed reduces the distance units can attack from to 2" (from 4") and 3" (from 6") for infantry and cavalry respectively.
 "Say Pretty please rally, next time!"
 That's one sheep on the lamb.
 The Dragoons are now back to fresh after their long melee with the Uhlans.
 No joy here.
 Order restored!
 No Bull!
 Not quite enough.
 The square is back in good order.
 Done for the moment here!
 The 30e Ligne is still rocked big time.
 Not enough here...
 or here.
 Yes, Sir, reporting for duty again, Sir!
 That's the way, uh, huh, uh, huh, I like it!
For his last card (not shown), Massena turns MELEE. Maneuvering his troops into position earlier should pay dividends now!
 Attacking the flank with a supporting unit, that's a SD12+2, and the French still lose round one of the melee by a hair.
 Advantage France for round 2, but they become Disordered.
 The strong finish; losing 3 UI in a single round, and 3 overall, the Austrians are finally Routed back 10". The French roll is odd, so they can not seize the position.
 As bad as it gets; the other French column makes short work of its opposition, and the Austrian defenders are dispersed!
 The final charge is the stalwart Grenadiers of Solinac's Brigade. They have little difficulty dissolving the severely compromised (Disordered and 2 UI lost) battery once their defensive fire fails to stop the charge!
"I believe it is now your turn mon ami", Andre remarks airily to Karl, who scowls in return.


Another change from FoB2; in that version, units outside the command radius of their General (twice the LD rating, in inches) were OUT of Command and could only move half speed. Out of Command in FoB2 is replaced with Disordered in FoB3, which still halves movement, BUT there is no movement penalty for being beyond command distance. Units outside of command distance may not be rallied, however, and also cannot use the change of facing or formation option on a LEADERSHIP card, either.


For his last card (not shown), Massena turns MELEE. Maneuvering his troops into position earlier should pay dividends now!


"I believe it is now your turn mon ami", Andre remarks airily to Karl, who scowls in return.
Poor Karl.
ReplyDeleteI have to say this has been a lot of fun to play solo, but it wouldn't have been so great with a live Karl having such bad luck!
DeleteNot looking good for the white coats...
ReplyDeleteNo indeed!
DeleteYour presentation is a thing of beauty.
ReplyDeleteThanks for the very kind words, Jon!
DeleteWow that is a lot of action in this post !
ReplyDeleteRe the Cuirassiers charging onto a flank
"They did this by making a 12" move, using their 2nd segment to turn, and the last 12" to hit the Uhlans in the flank."
I do not believe this is correct as the turn to face must be done on the 1st Segment if contacting enemy
As per Page 50, 5th Bullet of Immediate Melee
"Units may only change face on the first move segment."
This was confirmed by Brent on the IO forum (possibly later in your initial thread post)
Not sure the Uhlans would have survived frontally anyhow :-)
Ok, that's a good thing, really, as this way is too liberal re: gaining the flanks. Could still maneuver like this and *fire into a flank (obviously not with Cuirassiers!)
DeleteAnother gripping installment, and more bad luck for the Austrians.
ReplyDeleteThe Kaiserlicks certainly can't seem to buy a break (or a MOVE card!) , can they?!
DeleteYou really wouldn't want to be the Austrians! Talk about kicking a man when he's down!
ReplyDeleteBest Iain
It's not a good day to be wearing white!
Delete