With the year drawing to a close, it is past time to wrap up the Campaign in a Day event from back in October(!)
From the pen of French General Rey, aka Mark Mclaughlin
Napoleon and Rey (me) start out at Mantua laying siege. one of us has to stay there to keep the city under siege and keep its defenders inside. that is a condition of victory.
Nappy decides he will leave the minimum to mask the fortress. takes a quarter of his army on the move, follows me to Verona, where i join up with Massena. Alvintzi shows up. I decide Massena and i should crush him...but Nappy shows up. tells me to stay as his army reserve. sends Massena in alone (sigh).
i detach a quarter of my corps and give it to Massena, telling him he will need it.
Nappy puts me in defense around Verona while he and Massena attack. an Austrian column appears out of the mountains. I turn to face it. they scurry back off the table. i send the guides to follow to see where they are going...and to slow them down.
Nappy gets messages from Joubert and Augerau. each are engaged with larger forces. Joubert at Rivoli, Augerau at Este. Nappy tells me to send hussars and chasseurs to scout out both and report back, keeping the rest of my corps in reserve.
Augereau is holding his own at Este. Joubert is being overwhelmed. Nappy agrees to let me take half of my corps to help Joubert...but to leave the last quarter as a reserve.
i go to help Joubert who is being slammed. i stabilize the front. I send to Nappy - "I have them stalled. either use my reserves to help Massena or send them to me"
i do this four turns in a row. On the fifth turn they reach me....just in time to cover my withdrawal, leaving Joubert to fort up as best he can
(The Austrians had two batteries when i arrived...i had one. they had two regiments of cav..I had one...i was holding my own until his lancers broke a square (each side rolls a d10 in combat. i rolled a 2 and he rolled a 10....that was enough to make my infantry take morale. they failed, and broke out of square to fall back. a second infantry unit received a charge in line, failed to make square, and was beaten...but not broken. that ended that
i got my shattered corps back to Verona so i could rally it...the Austrians did not follow me, as Nappy had feared, but decided to finish off Joubert
Massena fell back from Alvintzi, both sides in bad shape, and in the end, Augerau was all but annihilated. Not a good day to be French! My corps should have been thrown in all intact either at Alvintzi at start or to help Joubert....and all in, instead of in pieces
We were just too cautious... but it was a hell of a lot of fun, as always!
Napoleon, as told to Montholon, on St. Helena:"As I look upon it now, it is clear that the failure of the Army of Italy was due to Augerau's and Massena's misunderstanding of the orders for defense. Despite what has been said, the outcome would have been completely different if only their scouts, and not their entire forces, were engaged East of the Adige as they were told to do. Defending at the Adige was necessary, as defending an interior river line is a schoolboys' exercise. Improper strategic movement doomed the defense, despite the valor of our soldiers in the field. Such is war, of course."
I know the table set up made that look odd, and it would have been really boring to play that way I think!!
I had a great time! Thanks, everybody!
Rob
Some final Austrian commentary from General Bajalich to General Lusignan:
It occurred to me last night (no doubt in a bad dream), that when I got your plea for reinforcements (I think it was from you?), I actually could probably have sent off two infantry units to you relatively quickly. I don't remember exactly, but I think I got your note around 1400, and if you'll notice, the time stamps on my photos #4 (1330) and #5 (1430), show my Padua forces quite close to the Vicenza DZ's. So, one way or another I could actually have spared you at least a few units which could have reached you in probably like 45 minutes or so at worst (not the two hours elapsed time that I believe I had replied to you).
Especially galling, I knew the exact table layout connections between myself and you. My forces were all on the Padua table, I had laid out the Table V (Vicenza) terrain myself and my forces started on Table V, and I had cav recon to the Verona table - so I knew all the distances and interconnections. And yet, when the plea for help came, I still did not visualize the space/time/geometry properly. Shows how great SN and the multi-table setup is in reproducing the fog of war. Good little lessons learned for me here.
Also makes me even more aghast at Napoleon's genius in his ability to have so often exactly correctly done the same sort of calculation over and over.
So, General Lusignan, please accept my sincerest apologies for not having come to your succor. It was an error on my part.
My dear General Bajalich,.
At the time, I saw the French Rey (Mark) appear on my table and start sending about a third of his command to join Massena and then Napoleon himself arrived with a cavalry unit in the lead -- now I'm figuring two more commands were comin' my way. Meanwhile, Massena was sending in his artillery reserves.
I knew what I had and it was attrition of my lads that was limiting what I could do. I had no idea what was going on on other tables, but I knew the connection between Montebello - Vicenza - and where your (original) garrison troops had marched off -- it would be a quick transit of the Vicenza table, so ... I asked on the off chance there was a garrison unit hanging around the rear areas.
No apology necessary. From the sounds I heard at your table, you were quite involved, and from Peter's blog post, the French had done well to push troops off the hill at Este -- probably around the time my request showed up.
Three things bailed me out:
Ocksay showed up near Verona, holding 2/3 of Rey in place.
Napoleon did not bring any other troops except that cavalry.
John and Adam (non-players) showed up and my luck changed, including that miserable right flank artillery battery that dragged every 1 and 2 out of its die rolls for hit rolls or should I say miss rolls -- and there wasn't a corresponding number of 9s and 10s on the other shots and melees. These two guys arrived and like a light switch, the fortunes of war changed. Well....until the end (see attached recap). :)
I narrowly held on and managed an advance, so it worked out
>visualize the space/time/geometry properly.
It is tough to do. It is even tougher when the tables do not abut. For example, I marched from Trente to Levico to Borgo to Bassano. On the map, there's a stretch of road that includes Primolano, but tabletop wise, that stretch is not there. Obviously, any table with that road stretch is just a warp-speed transit table, but I completely forgot about that little wrinkle, so I thought that I reached Primolano -- it was really Bassano -- and that the town holding your original garrison was Bassano -- it was really Vicenza.
Then I saw French cavalry. How did French cavalry get to Bassano? Us Austrians are about to get stuffed here in the foothills -- we'll never get to Mantua! (woe is us and our plan!) :)
Then I learned the location. Obviously, I was pleased, as any commander would be, that I was closer to my objective than expected. Then I'm thinking about what awaits me on the next table...
>Napoleon's genius in his ability to have so often exactly correctly done the same sort of calculation over and over.
Practice makes perfect. :)
Although his marshals sometimes goofed or just ignored his plan. Russia, especially, with his nephew (?) lollygagging and failing to close the trap near Minsk, and then Jomini failing to close the trap at Smolensk.
> Shows how great SN and the multi-table setup is in reproducing the fog of war.
Thanks. Mostly because the former tries not to get in the way of the latter. :)
Finally, the GM's (me) perspective:
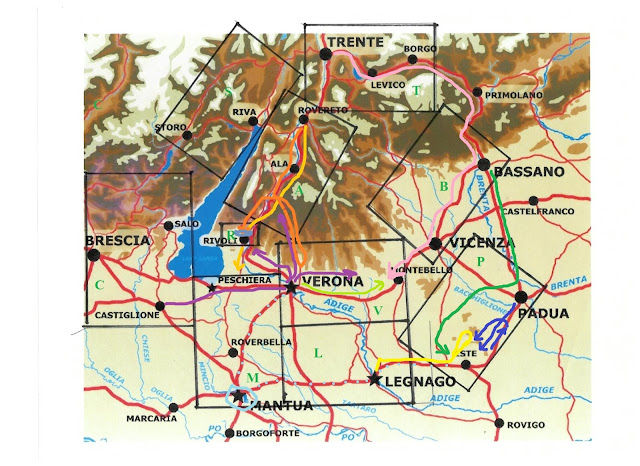
GM's summary of moves;
For the French - Purple is Rey, Yellow Augerau, Lime green is Massena, Steel Blue is Jouibert, and light Blue is part Serurier (the forces that could be spared from the siege).
For the Austrians - Pink is Lusignan, Medium Green is Bajalich, Medium Blue is Provera, Light Orange is Vukassovich, and Orange is Ocksay.
The French had a tough assignment in this one. They were outnumbered 5:4, more or less, with only a very slight quality advantage in troops and a bigger one in Leadership. I would agree with Mark (Rey's) analysis; Rey's entire command should have been committed at Rivoli or Montebello, with Serurier's detachment perhaps serving as a small reserve at Verona. I did provide a tiny bit of assistance to the Austrians, as Alvincy and Ocksay were both new players. Ocksay was backed up behind Vukassovich trying to enter the Rivoli table. After a while, I asked Ocksay "Where do you think those other roads lead to?", after which he thought about it and sought new orders from his C-in-C to split his command to allow some of his forces to enter table R on the Western portion.
After Rey's reconnaissance of Table A with just Bonaparte's Guiides had ended, I pointed out to Alvincy that all Rey had to do was send some infantry to occupy Ala (which he never tried), and the supply line for both Ocksay AND Vukassovich would be severed. When that happens, those commands may not advance more than 6" further until supply is restored, AND all out of supply units have to take a single Morale test once each hour until supply is restored. A 2 unit garrison was dispatched to Ala not long thereafter.
One of the other objectives was to create a scenario where we would NOT have one large battle with 4 or 5 players a side fighting, due to pandemic concerns, and that worked well, with 3 players fighting at Este, 3 at Montebello, and 3 at Rivoli, for the most part. I can't wait to do another one!
Sounds like a lot of fun for all involved!
ReplyDeleteThese events are really a whole lot of fun; very unique!
DeleteQuite the busy situations. With all the cross attachments, maybe the principle of mass was underserved?
ReplyDeleteI think that was the case on the French side, remembering though that they were significantly outnumbered. It was a scenario requirement that at least one of the three Austrian Divisions at Trent went East and at least one went West.
DeleteFog of war sounds convincing! Sounds like great fun, I'm getting on painting my Austrians!
ReplyDeleteBest Iain
These events really recreate the Fog of War feeling. I do love my Austrians.... almost as much as my French!
DeleteA nice conclusion to another fun campaign. They always come across as very enjoyable thanks to all the pre-planning you put in to them.
ReplyDeleteTactical skill, strategic planning, and Coup d'oeil all come into play in these events!
DeleteA superb campaign and account, Gonsalvo, as always. These are the items I like to come back to from time to time.
ReplyDeleteThanks so much, glad you enjoy them!
DeleteA great early campaign, Peter! A period which intrigues me, but alas, haven't given the proper time and attention to.
ReplyDeleteThanks, Dean. Certainly my own interest is greater during the Imperial era, but Bonaparte's first and second Italian campaigns hold a lot of interest as well!
DeleteEnjoyable, intriguing and challenging. You clearly did a wonderful job of design and gamemeistering and the players all did their part in playing to the spirit. A huge success, I'd say.
ReplyDeleteRegards, James
Thank you, James. It worked very well, especially given some of the COVID specific parameters we were aiming for.
Delete