
Table for Caldiero with all of the troops deployed., looking from the North.

Looking from the West, French Division Molitor in the foreground.

Looking from the West, with Division Gardanne in the foreground.

Still looking from the West, Division Duhesme, mostly.

Southern end of the battlefield, with the rest of Divisioon Duhesme in the foreground.

Back to the Northern end of the filed, but now looking from the East, with troops of Simbchen's Division in the foreground.

More of Sibchen's Division, and some of Reuss's Division to the left.

Reuss's Division on the Southern end of the main ridge line.

Division Vogelsang is deployed astride the Verona - Venice highway.

More of Reuss's Division deployed in Caldiero itself, and the lesser ridge line.

Southern end of the Battlefield, looking from the East.

The field viewed from the South.
 Scenario Map once again for orientation. I have revised and updated the original scenario post.


French Reinforcements; most of these will arrive almost immediately.

Austrian reinforcements; most will not arrive until well into the battle.

One of the reasons it took so long to get this table set up, was that I decided to finally use these plastic unit markers I acquired from Lamcashire Games last year. I would also note the Lancashire is the UK distributor for all tings Piquet/Field of Battle.

The color of the plastic used is variable.

2 sizes/sty;es of General bases. I plan to use the square markers for Command group leaders, and these for higher level commanders.

The idea for these was shamelessly adapted from Tim Couper. I spray painted all approximately 150 bases green; Rustoleuim "Moss Green", to be specific.

The outline of the dice frames were then painted in the colors of the Corps (Divisions for this game). I deliberately used somewhat toned down versions (The white is Carftsmart "Bisque, the yellow the ever popuilar Delta CC Straw Yellow, Madras Red etc).

The same was done for the higher echelon General markers.

Again, taking a leaf from my good freind, Tim, I used a spreadsheet to print up labels for use with the markers, white on green, and printed them out onto thin card stock. Tim uses a colored square on each label to indicate the command, and also includes a lot more information. I wanted the labels to be more generic than that, and the DD and CD values to be easily read but unobtrusive.

The labels were then cut out, and sorted by DD and LD ratings.
 Tim uses Blue-tack to affix the unit markers to their units, and the labels to the markers. I didn't want to go to the store during the height of the Covid-19 pandemic, so I ordered 2 packs of this stuff via Amazon. Made in Germany. the English states "Re-usable Multipurpose Tack"; or "Wiederverwendbare Allzweck Klebenmasse". You just gotta love German! In any language, it doesn't take much of this stuff; I used less than half a pack for everything for both armies.


I could have used micro dice in many different colors for commands and to track hits, but I find that very fiddly. These beads, acquired for about $20 on sale at Michael's craft stores for 2,300 beads, fit just about perfectly in the dice frames, and come in 14 different colors (there are double servings of white and black).. Partial inspiration here came from James Roach, who uses a post and different colored beads on his bases to track various game related issues.

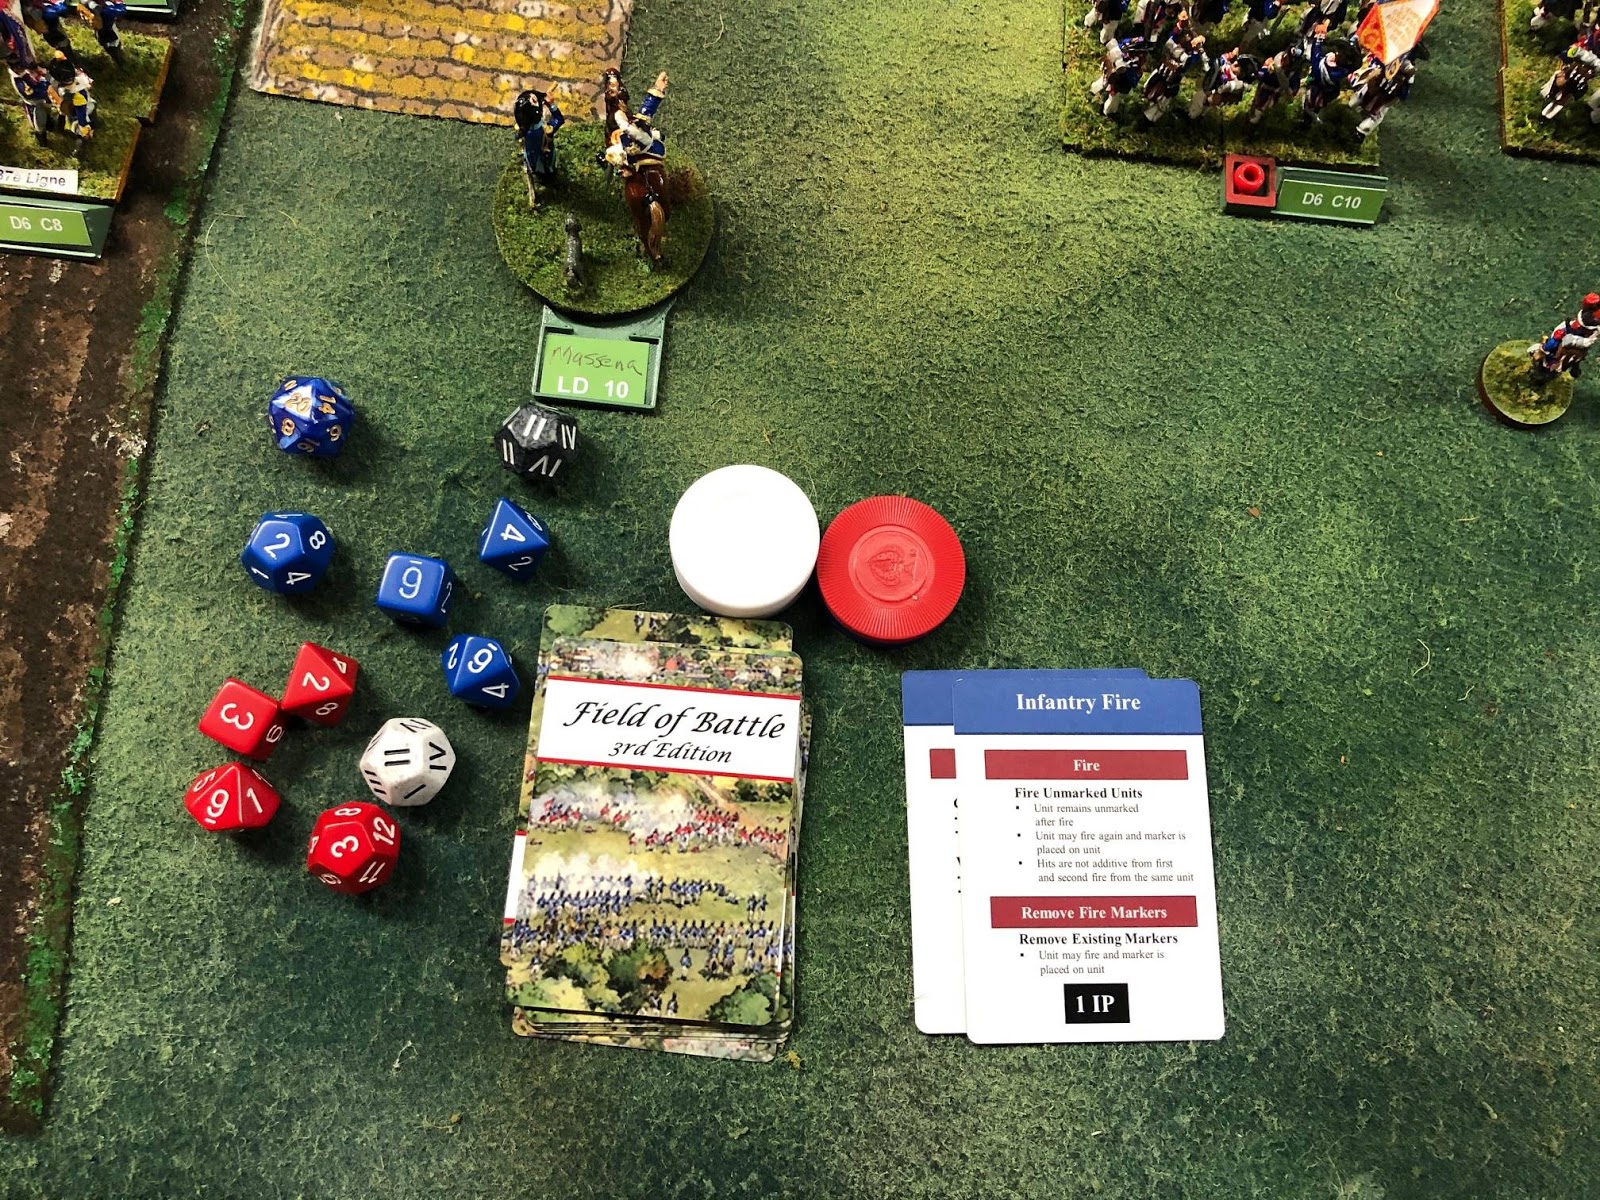
Next, it is time to set up the sequence decks. There have been major changes in these from FoB1 and FoB2. All decks now have only 23 standard cards, and there are only 3 versions - Inferior, Average, and Superior. All decks have 3 each MOVE, MELEE, INFANTRY FIRE, ARTILLERY FIRE (note the semantic change from the early "Firepower" and "Reload" terminologies), and ARMY MORALE cards, 2 TACTICAL ADVANTAGE and 1 MOVE ONE COMMAND. The sole difference is in the number of LULL and LEADERSHIP cards; 3 LULL and 2 LEADERSHIP for Inferior (as seen above for the Austrians in this game), 2 LULL and 3 LEADERSHIP for Average (Massena rolled up as only an LD10 and only an Average deck, which is substandard for the "Excellent" Leadership rating of the 1805 - 1806 French; ah well, it is a secondary theater, after all), and a Superior deck has but 1 LULL but 4 LEADERSHIP cards. In addition, the MANEUVER card has disappeared from the deck, with its functions assimilated by the new LEADERSHIP card definition. There are a number of additional/optional cards that can be added to these decks, which are generally scenario driven.

In a convention or multiplayer game, I usually "stack" the decks a bit by including a MOVE card within the first 3 cards, in order to get the game moving. This game is an attack/defend type scenario, so I stacked the french deck in this fashion, but not the Austrian one. These three cards will be shuffled and added to the top of the French deck.. Morale points are set out for each army (White = 1, red = 5, Blue = 10). Ordinarily, the total and points remaining are kept hidden from the enemy, buit that's a bit pointless for a solo game!

Any game of Field of Battle starts out with an Initiative roll. Both Amry Commanders roll their Leadership Die; the high score wins. Here Massena (blue) has rolled a "10", whilst Karl (red) has rolled an "8". Both sides count off the difference in pips in cards from the top of the deck, in this case two cards. As the winner, Massena can choose to act first or second. With the Austrians in a defensive position, the wily Massena graciously concedes the initiative to Karl (in so doing, he hopes that Karl will burn up useful cards before he can use them. This is pretty safe in this situation, but doing so with a large number of cards and a more active opponent can definitely backfire!)

The action thus shifts to Karl and the Kaiserlicks (sounds kinda like a 50's rock and roll group, doesn't it?). Without any salting at all, his 1st card is a MOVE card. This really isn;'t great, as Karl is on the defensive, and thus has little need to move at present. On the other hand, it does bring the arrival of his reinforcements closer.


Unfortunately, Kalnassy doesn't have much that hsi troops can do with this windfall. He does decide that the Uhlan unit of his command might be better stationed guarding the extreme Southern end of the Austrian line.

The Uhlans use the "magic" to change facing, consuming one segment of movement; they have one left, which is up to 12" for cavalry. As part of its MOVE, as unit can oblique up to 1/2 of its frontage, BUT it can NOT change its facing at all.

In the course of a MOVE, a unit can interpenetrate or be interpenetrated, but only ONCE. Also, it must be able to get completely clear of any unit it moves through. Even with the Obl;ique, this limits the MOVE of the Uhlans, as they could not get clear of the first unit before encountering the second,. Also, if a unit interpenetrates another, it may NOT use immediate melee on a won - even MOVE roll. These are important changes from FoB1 and FoB2, and I think are very reasonable restrictions.
Kalnassy has no other troops he wishes to move (the Grenadiers are part of a different command, and thus could not oblige the Uhlans by moving out of their way!). Note that, aside from Routing (and some special cards), you are never required to move, nor to use all of your available movement if you do.

O'Reilly's command has quite a traffic jam along the highway, so he decides to roll for his MOVE and see if he can tidy things up. Per the period specific rules, Austrian infantry of this era may NOT use attack column (which is allowed starting in 1809). Only British infantry are allowed to immediate melee in line formation per the Napoleonic era rules. All other infantry must be in Attack Column to do so. Oops! O'Reilly winsd even, but only by 2 pips, so only one segment; all units in his command may MOVE 1 seggment OR change formation. He contents himself with a bit of oblique movement by a few units.

Soudain's command (white bead in yellow frame) decides to roll for movement, and wins by 1 pip, but rolls odd. His command decides to stand pat.

Michalowich's brigade (red in yellow) rolls for their MOVE; tied 5's. That allows 1 segment but no "magic". Michalowich also stands pat. The other Austrian commands pass on even trying to roll for their MOVED, being content with their defensive positions.

Karl turns his second card; MOVE 1 COMMAND. Not that helpful (Note: In large multiplayer/convention games, sometimes I allow each player to MOVE one of their commands on this card).

Thinking of getting the Uhlans into better position, Karl gives the nod to Kalnassy. A "2" vs a "6". Although he lost the roll, he didn't "rolla 1", and thus gets 1 segment. Although he rolled EVEN, he didn't win the roll,l so there will be no "magic" for his men this time!

The Uhlans oblique 1/2 their frontage, and move forward. Their 12" would get them all the way through the single Grenadier unit now in their way, and thus they could move through them.

Looking at the overall picture, this seems unwise, so they pull up short of their full MOVE. The Austrians have used their 2 cards, and thus the French now become the Active side.

Massena turns a MELLEE card. This allows units to move straight ahead up to 1/2 a move segment and engage immediately in melee if they can reach the enemy. With all of his troops way beyond a half a move from the enemy, Massena grunts at the waste of the card.
Massena turns his 2nd card; INFANTRY FIRE. This allows infantry units to remove "smoke markers" resulting from firing. With all of his units already "fully loaded", and certainly none within musket range (6") of the enemy, this is a wasted card for now.

Neither side has cards to play left, so a new initiative roll is made. Massena wins again, 4 to 1. He opts to pass the initiative to Karl, hoping he will turn some Artillery Fire or Infantry Fire cards while his troops are still distant from the Austrian line.

Thus we leave Karl for now with three cards to play, which will be followed by three for Massena.
A meticulous set=up Peter, and it's fun watching the card activations. After thoroughly enjoying my first Command and Colors game I'm liking the look of Field of Battle.
ReplyDeleteThanks, Lawrence; much more to come!
DeleteGreat run through of a FOB 'turn'.
ReplyDelete++"In FoB gamer speak, this is often called a "Double Magic Move"++ we always said 'Even means can do 'fancy' stuff' :-)
Alternate lingo indeed is, "with Fancy Stuff"; the L.A. guys like to say "Fancy Pants", but I think that's going a bit too far, don't you?
Delete(Mary Poppins reference - "Indubitably!"
Pretty set up. Interesting use of the markers.
ReplyDeleteThanks, Joe. We'd tried some other ones for out Kalvan games, but they wound up being fairly intrusive.
DeleteVery interesting and informative post, nice clear breakdown of the action!
ReplyDeleteBest Iain
Thanks, Iain; much more to come in a few days!
DeleteGreat scenario by the looks of it from the Rise of Eagles book which I have.
ReplyDeleteStill not got around to playing it but it looks like a goody!
Impressive report, glad you had fun!
Best wishes,
Jeremy
Thanks, Jeremy. Michael has FOUR Caldeiro scenarios (North only and South only versions of this battle, and then another the following day!)
DeleteThat's looking great sir!
ReplyDeleteThanks so much, Micael!
DeleteCaldiero is really an impressive work on the battlefield layout front. Gorgeous display. Your accessories are impressive too. Good to see what the Lancashire accessories look like. I have been tempted to give them a try and your review is encouraging.
ReplyDeleteThanks, Jon. Lancashire makes a couple more versions of these kinds of unit markers. You can see the way that Tim used them in some of his posts from Historicon last year:
Deletehttps://meleegamers.blogspot.com/2019/07/battle-of-culloden-moor-16-april-1746.html?fbclid=IwAR2BR_cIp7nzoai74UyM3w0qV_7XtdTFOPArVWpF8wIL8oiek0l12EW6aoI
Looks like great fun, Peter! To quote the Earl of Manchester at Edgehill, "Damn me, they've got a lot of fellows over there!"
ReplyDeleteIt;s being fun to play out - just needs 4 - 10 players to play out faster (obviously, taking photos to drive the narrative slows things down a lot!).
DeleteGreat quote, by the way!
What a wonderful looking game Peter. Looking forward to more of this.
ReplyDeleteEven with my bias against name tags or other markers attached to units, I have to admit that these ones blend in quite nicely. Good job to you!
Thanks, James. These are about the most unobtrusive that I have seen!
DeleteThanks for this. I’m considering buying FOB3 and have been looking for game reports. This is the first/only that I’ve been able to find, so it’s very helpful!
ReplyDeleteGlad to be of service! In my not at all unbiased opinion, it's a great set of rules. The write up should give you a pretty good idea if they're worth purchasing for your tastes!
DeleteBought the rules and learning the rules from your blogs, thank you!
ReplyDeleteI did not understand why Karl is left with 3 cards to play? Is it because the pip difference is 3 and therefore both players can draw three cards?
Yes, exactly; you've got it!
ReplyDelete