I ran this game Friday night at Historicon, with Field of Battle, 2nd edition rules, by Brent Oman. The scenario is from my book with some minor modifications, as posted here earlier.


View of the set up from the West.

View from the South (French starting positions).

View from the East; the Pancza stream is potentially fordable by artillery from the first tree in the distance to the near edge of the table.

View from the Austrian defensive positions. The Szabadhegy Heights are in the foreground. I deliberately left the under table area showing on this picture to illustrate all the boxes that held the troops, terrain, and other items needed to stage the game! Not shown - the GM's glass of wine... purchased on site, of course!

The French won the initiative, and seized it big time. Two early MOVE cards and some high Leadership die rolls brought them quickly up to the edge of the Austrian defensive positions along the Pancza stream, which was passable (with difficulty - Class III terrain!) by infantry only along its Western 2/3. Cavalry and artillery would have to use the bridges.

The action becomes general. Luke (in Fall In T shirt) is acting as C-in-C for the French, as well as playing Grenier. He would drive his men very hard this day!

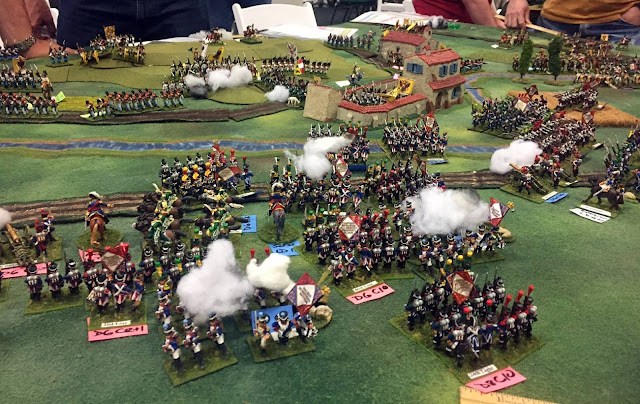
The opposing cavalry forces glare at each other across the Pancza. Roger graciously took command of the Austrians, largely composed of raw Hungarian Insurrectio cavalry. For this game, I used Austrian Hussars to represent them, and Cheavu-Legers to represent the Hussars. I have 6 units of Austrian Hussars, and even then I had to press a Uhlan unit into service as well!

I knew that I wouldn't have much time between playing in Eric's 7 Years War game and starting this one, so I had the forces super organized. Each command group had color coded labels for each ubnit and their officer, and I used variable ratings per the rules, instead of my usual fixed ones for convention games. On balance, this helped the Austrians more than the French... at least as far as the troop ratings were concerned!.
Fortunately, the tables were unused earlier in the day,. so Barry and I were able to set up the terrain and the majority of the troops before Eric's game started. That made me much less hyper while I was playing in Eric's game!

Sahuc's cavalry crosses the Westernmost bridge, whilst Severoli's Italians, ably played by Tim and Noah, close on the other bridge across the Pancza.

Cavalry charges go to and fro along the Eastern portion of the Pancza.

Overview of the center of the battle, and the bitter fighting around the strong point of the Austrian defensive position, the Kismeyer farm.

The Austrians extend their line to the West, hoping to avoid having their flank turned. In the distance, Czar Barry stays hydrated!

Luke hurls the men of Seras' Division (blue labels) at the Farm complex again and again.

Seras succeeds in penetrating the Pancza line (and knocking out much of the Austrian artillery), but the farm complex proves a very stubborn nut to crack!

View from the West end again. The Pancza stream is Wizard Kraft terrain.

Seras' Division is largely spent, but Durotte's Division (purple labels) is massed for the neck attack.

The cavalry of the Insurrectio is still holding the Pancza line.... at least for now!

Pacthod's Division (pink lables) moves up as well, leaving lanes for the many routed units of Seras to pass through!

Sahuc's cavalry and Seroli's Italian infantry are pressuring the Austrian right flank, with Pully's Dragoons moving up in support.

Austrian infantry in squares backing up Mescery's Hungarian cavalry. Obviously, they have every confidence in their mounted arm...

View from the East, as the cavalry continue to swirl in melee along the banks of the Pancza. tbe Chevau Leger Lanciers are standing in for Chassuers, just as the Cuirassier unit is for Dragoons!

Those Kaiserlicks can't be pried out of the farm complex no matter how many times Luke tries! However, their position is becoming increasingly isolated as the inits on either side of the farm are pushed back.

Fierce fighting between the Tims on the Western end of the table. Note the Italian Guards d'Honneur in support.

The French cavalry have broken across the Pancza!

Erzherzog Johan commits the Grenadiers of the Reserve to stabilize the situation alongside the Farm.

french cavalry pour across the Eastern reaches of the Pancza; those squares are looking like a wise precaution now!

Overview of the table, as the French win a big run of initiative to start the second Turn of the game. Morale points were fairly even on both sides prior to that.

The Austrian right flank is collapsing under heavy pressure. The White menace is now paying morale chips to the French with regularity. Not long after this shot, the Austrians turn an Army Morale card, and fail the test. The Battle of Raab is over, as the Austrians grudgingly quit the field.
Beautiful table, Peter, and a riveting account of the battle. Your photos provide a sweeping view of the action and troop dispositions.
ReplyDeleteYou certainly brought a lot of gear with you to host your many games. I'm sure the participants were grateful for your generosity and hospitality.
Well done!
Thanks, Jon. I was pleased with just about everything with this game, and it even finished exactly on time, after 4 hours, at 10 PM.
DeleteExcellent report and game Peter, one I must have a crack at one day :)
ReplyDeleteThanks, Mark. Raab makes a good game under almost any set of rules, and is probably a reasonable size for a multi-player game of GdA. You already have French and Austrians...
DeleteFantastic looking game and three cheers for the brave defenders of the Kismeyer farm!
ReplyDeleteThanks, David. The Farm hel;d out valiantly against many (all) attacks. When I set up the game, I put two of the best Austrian units in there!
DeleteYears of training, a determined resolve to hold at all costs and decent die rolls paid of on that part of the front!
DeleteIndeed it did!
DeleteSuper AAR and it must be like moving house when you go to Historicon !!!
ReplyDeleteI took 34 x 8.1 L Really Useful Boxes worth of troops alone with me this time, a new record, I think. There wasn't much spare room in the car, that's for sure!
DeleteAs others have already said, a wonderful report with fabulous images. What a Napoleonic game should be!
ReplyDeleteThanks, Dean! I do love the 1809 campaign in particular!
DeleteThat looks absolutely superb.
ReplyDeleteJames
Thank you, James. That is high praise indeed coming from you! :-)
DeleteThank you for the post Peter. By that time of the day the batteries in my camera were on their last legs. It is great to see the battle preserved this way.
ReplyDeleteYou're welcome, Tim!
DeleteAnother great 25/28mm napoleonic game for you Peter. We both have played out the full Raab 1809 battle on the tabletop this year.
ReplyDeleteStill have a backlog of reading and comments to post for your recent games. Been sidelined with leg injury (the "aimless appendage" as called by my sons).
Michael
Thanks, Michael, and indeed we have, along with Jon on the Palouse Wargaming Journal. Hope the leg gets better soon!!!
Delete(I can think of worse meanings for "the aimless appendage", but I'll restrain myself, LOL!)
Great looking game, and, by your account, an exciting one. Excellent!
ReplyDeleteGreat looking battle! Who makes that interesting modular hill?
ReplyDeleteAnd I have such bad luck attacking strong-points that I refuse to attack them and do anything possible to just maneuver the enemy off of them or die trying. Some day, I will make it to Historicon. Some day...
The two level hill is constructed from Geo-Hex (which is available once again after ? 20 years).
DeleteThat does look like an epic battle with an impressive array of figures. I really thought the Austrians were going to pull it off there for a while.
ReplyDeleteThanks, Lawrence; if the Austrians had won the initiative at the start of turn 2, they might indeed have been able to pull it off!
DeleteGreat looking game, lovely figures and nice rivers, at least it wasn't a pushover for the French. Looks like tons of fun and an awful lot of kit!
ReplyDeleteBest Iain
Thanks, Ian! t was a hard fought action on both sides!
Delete